Interested in this project?
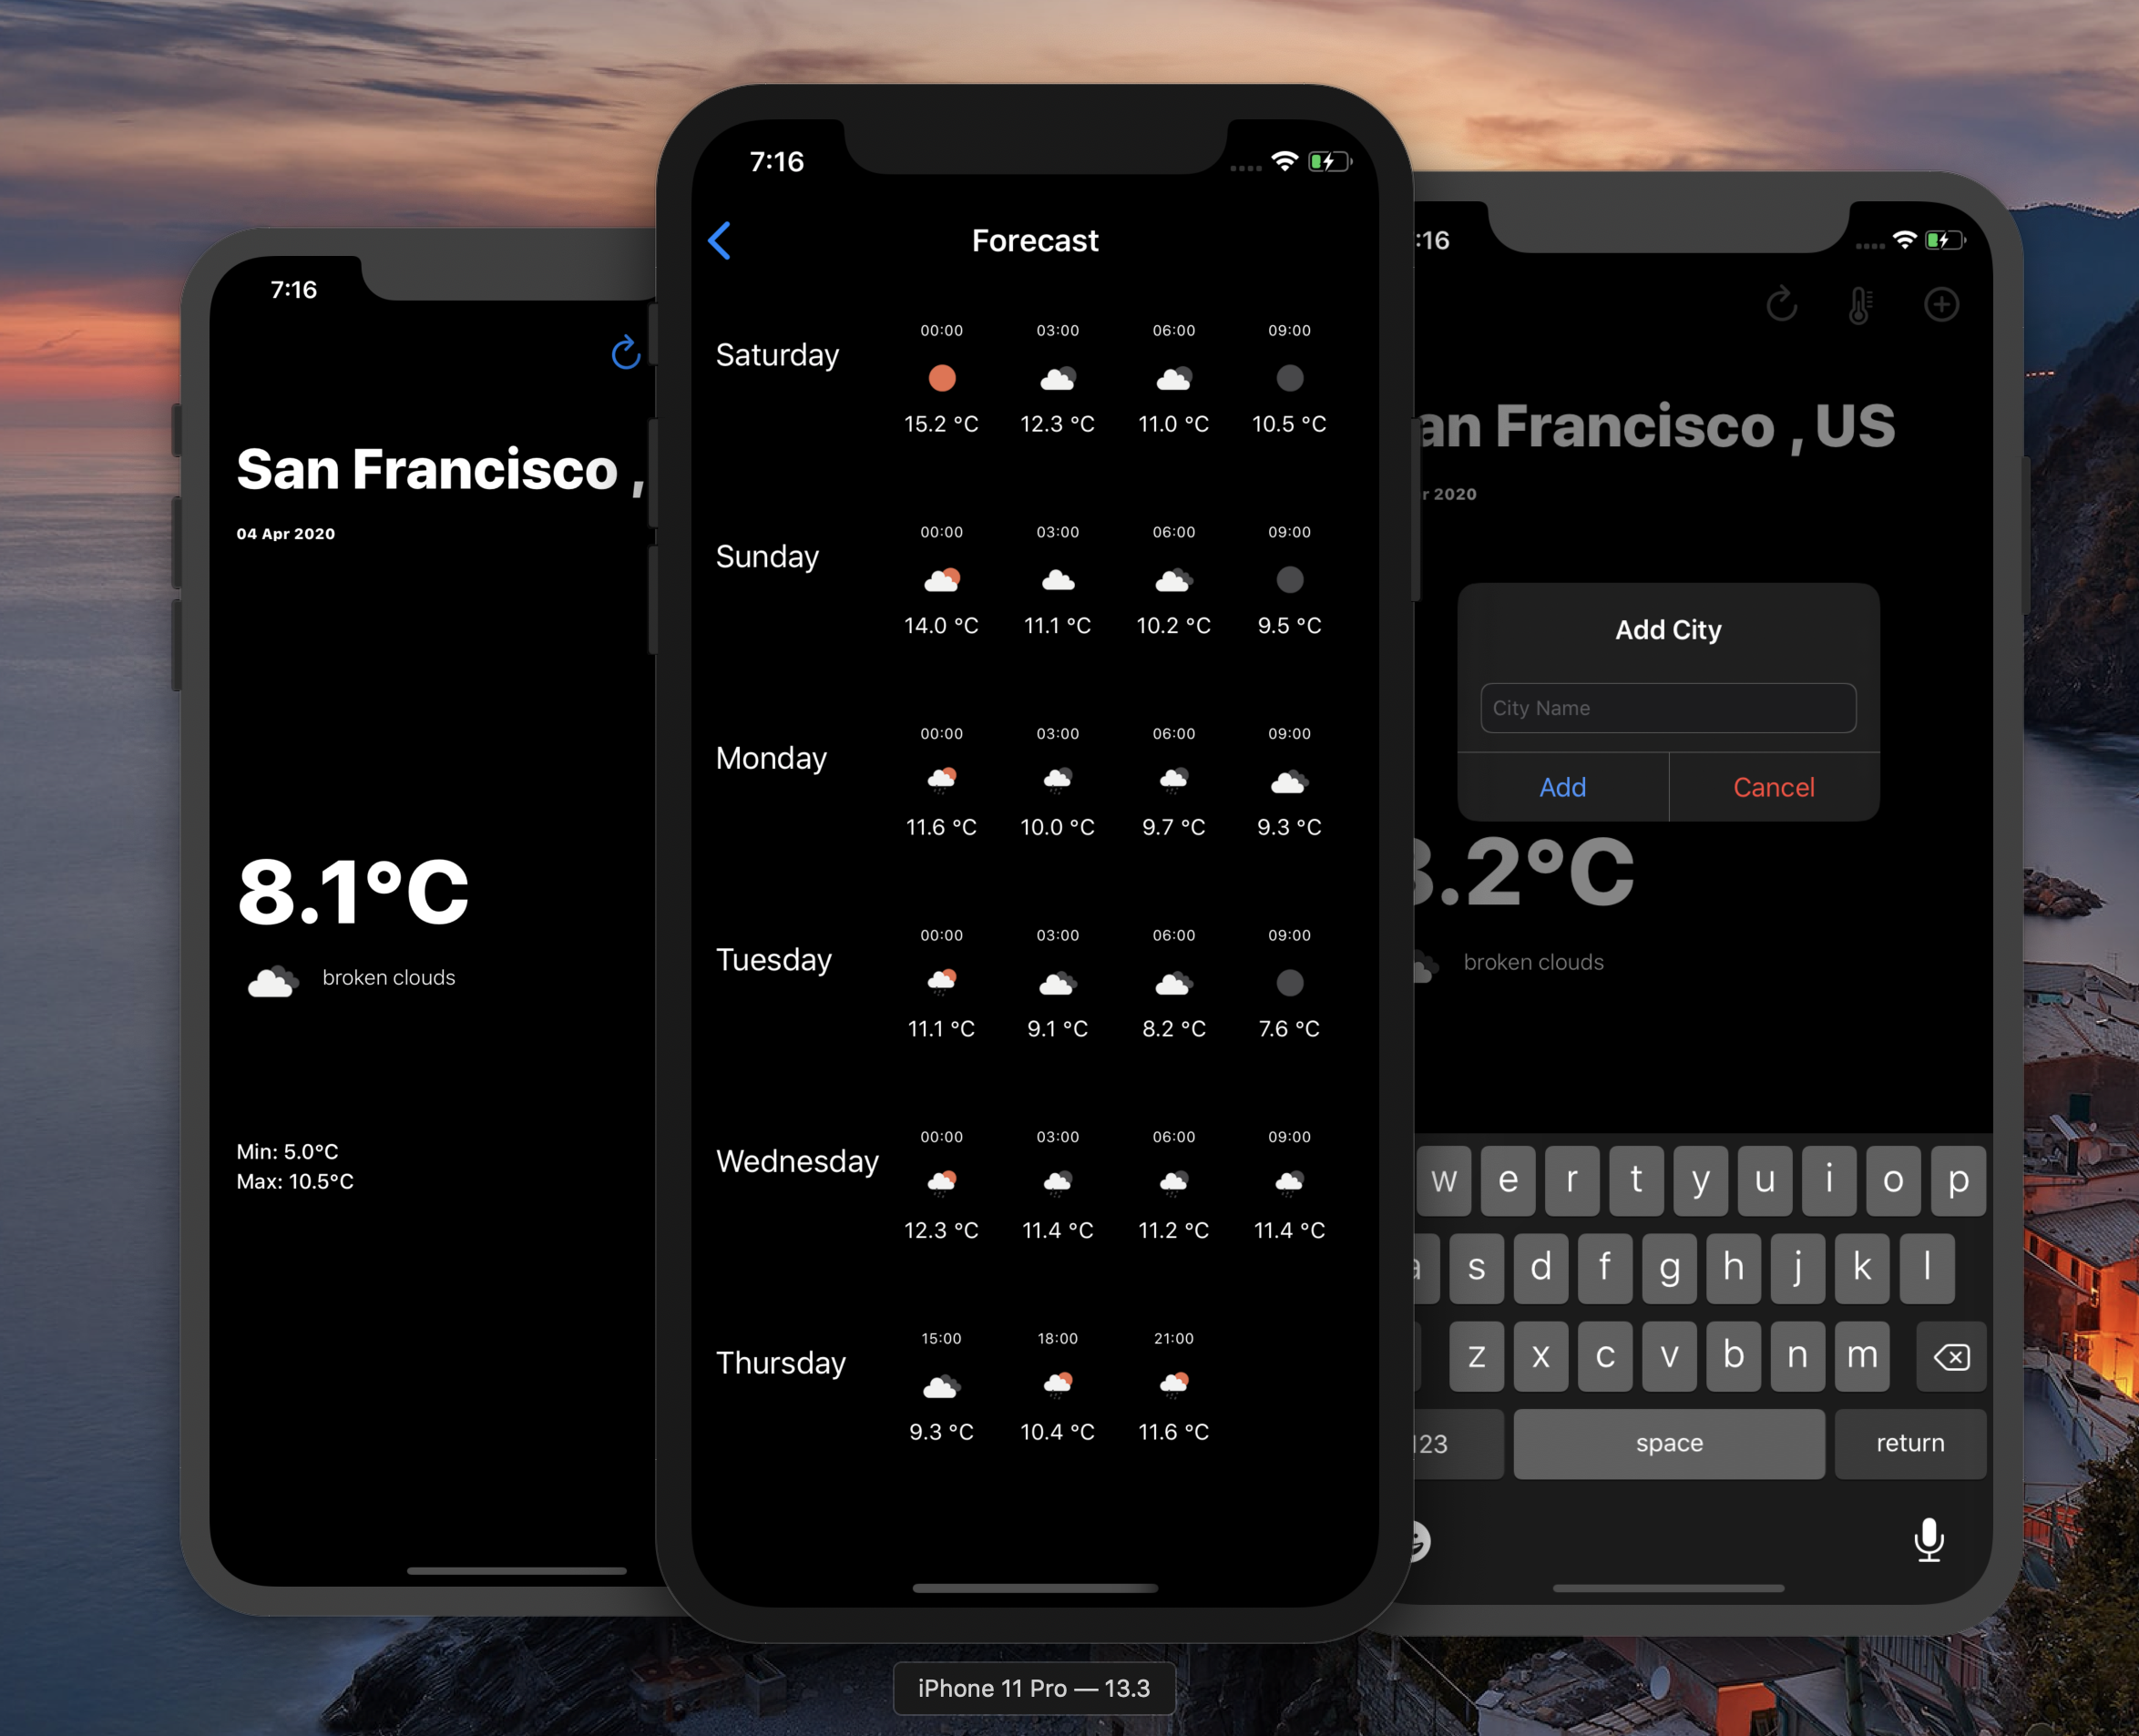
Continue LearningIn this tutorial, we will be creating a weather forecasting app using Swift. This app will contain two screens: the main screen will show the current weather and temperature while the second screen will show the weather forecast for the next five days.
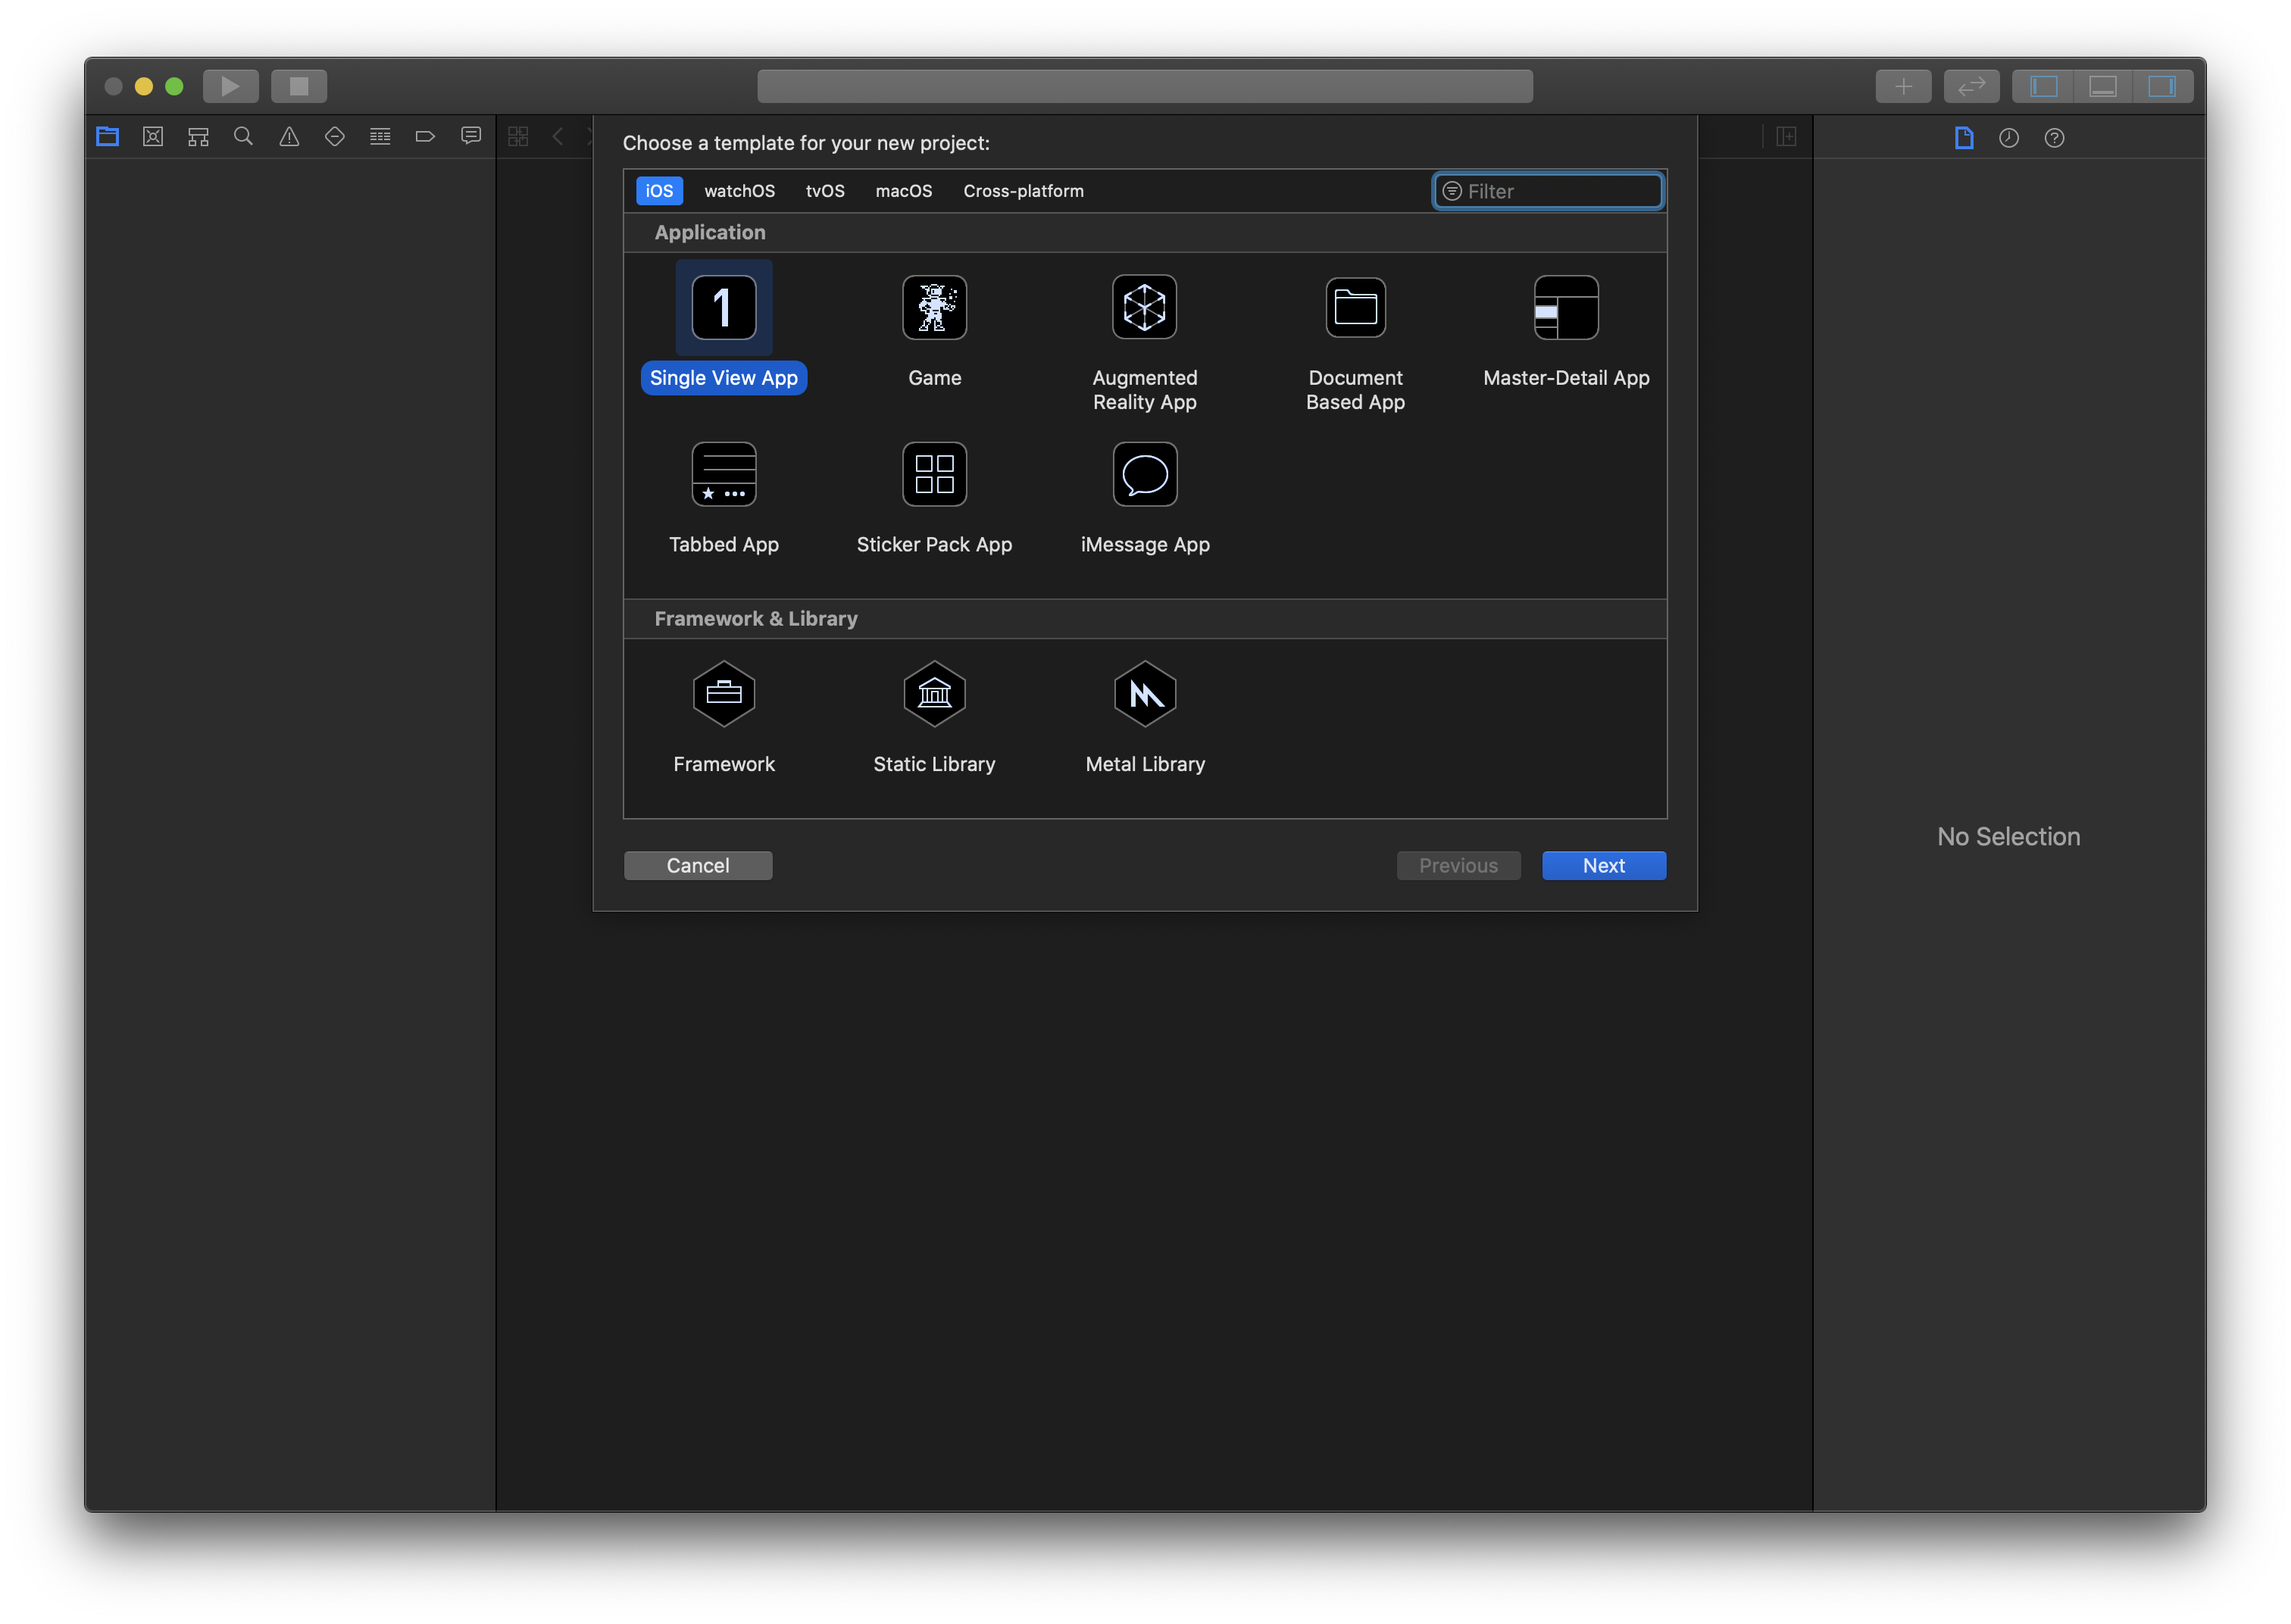
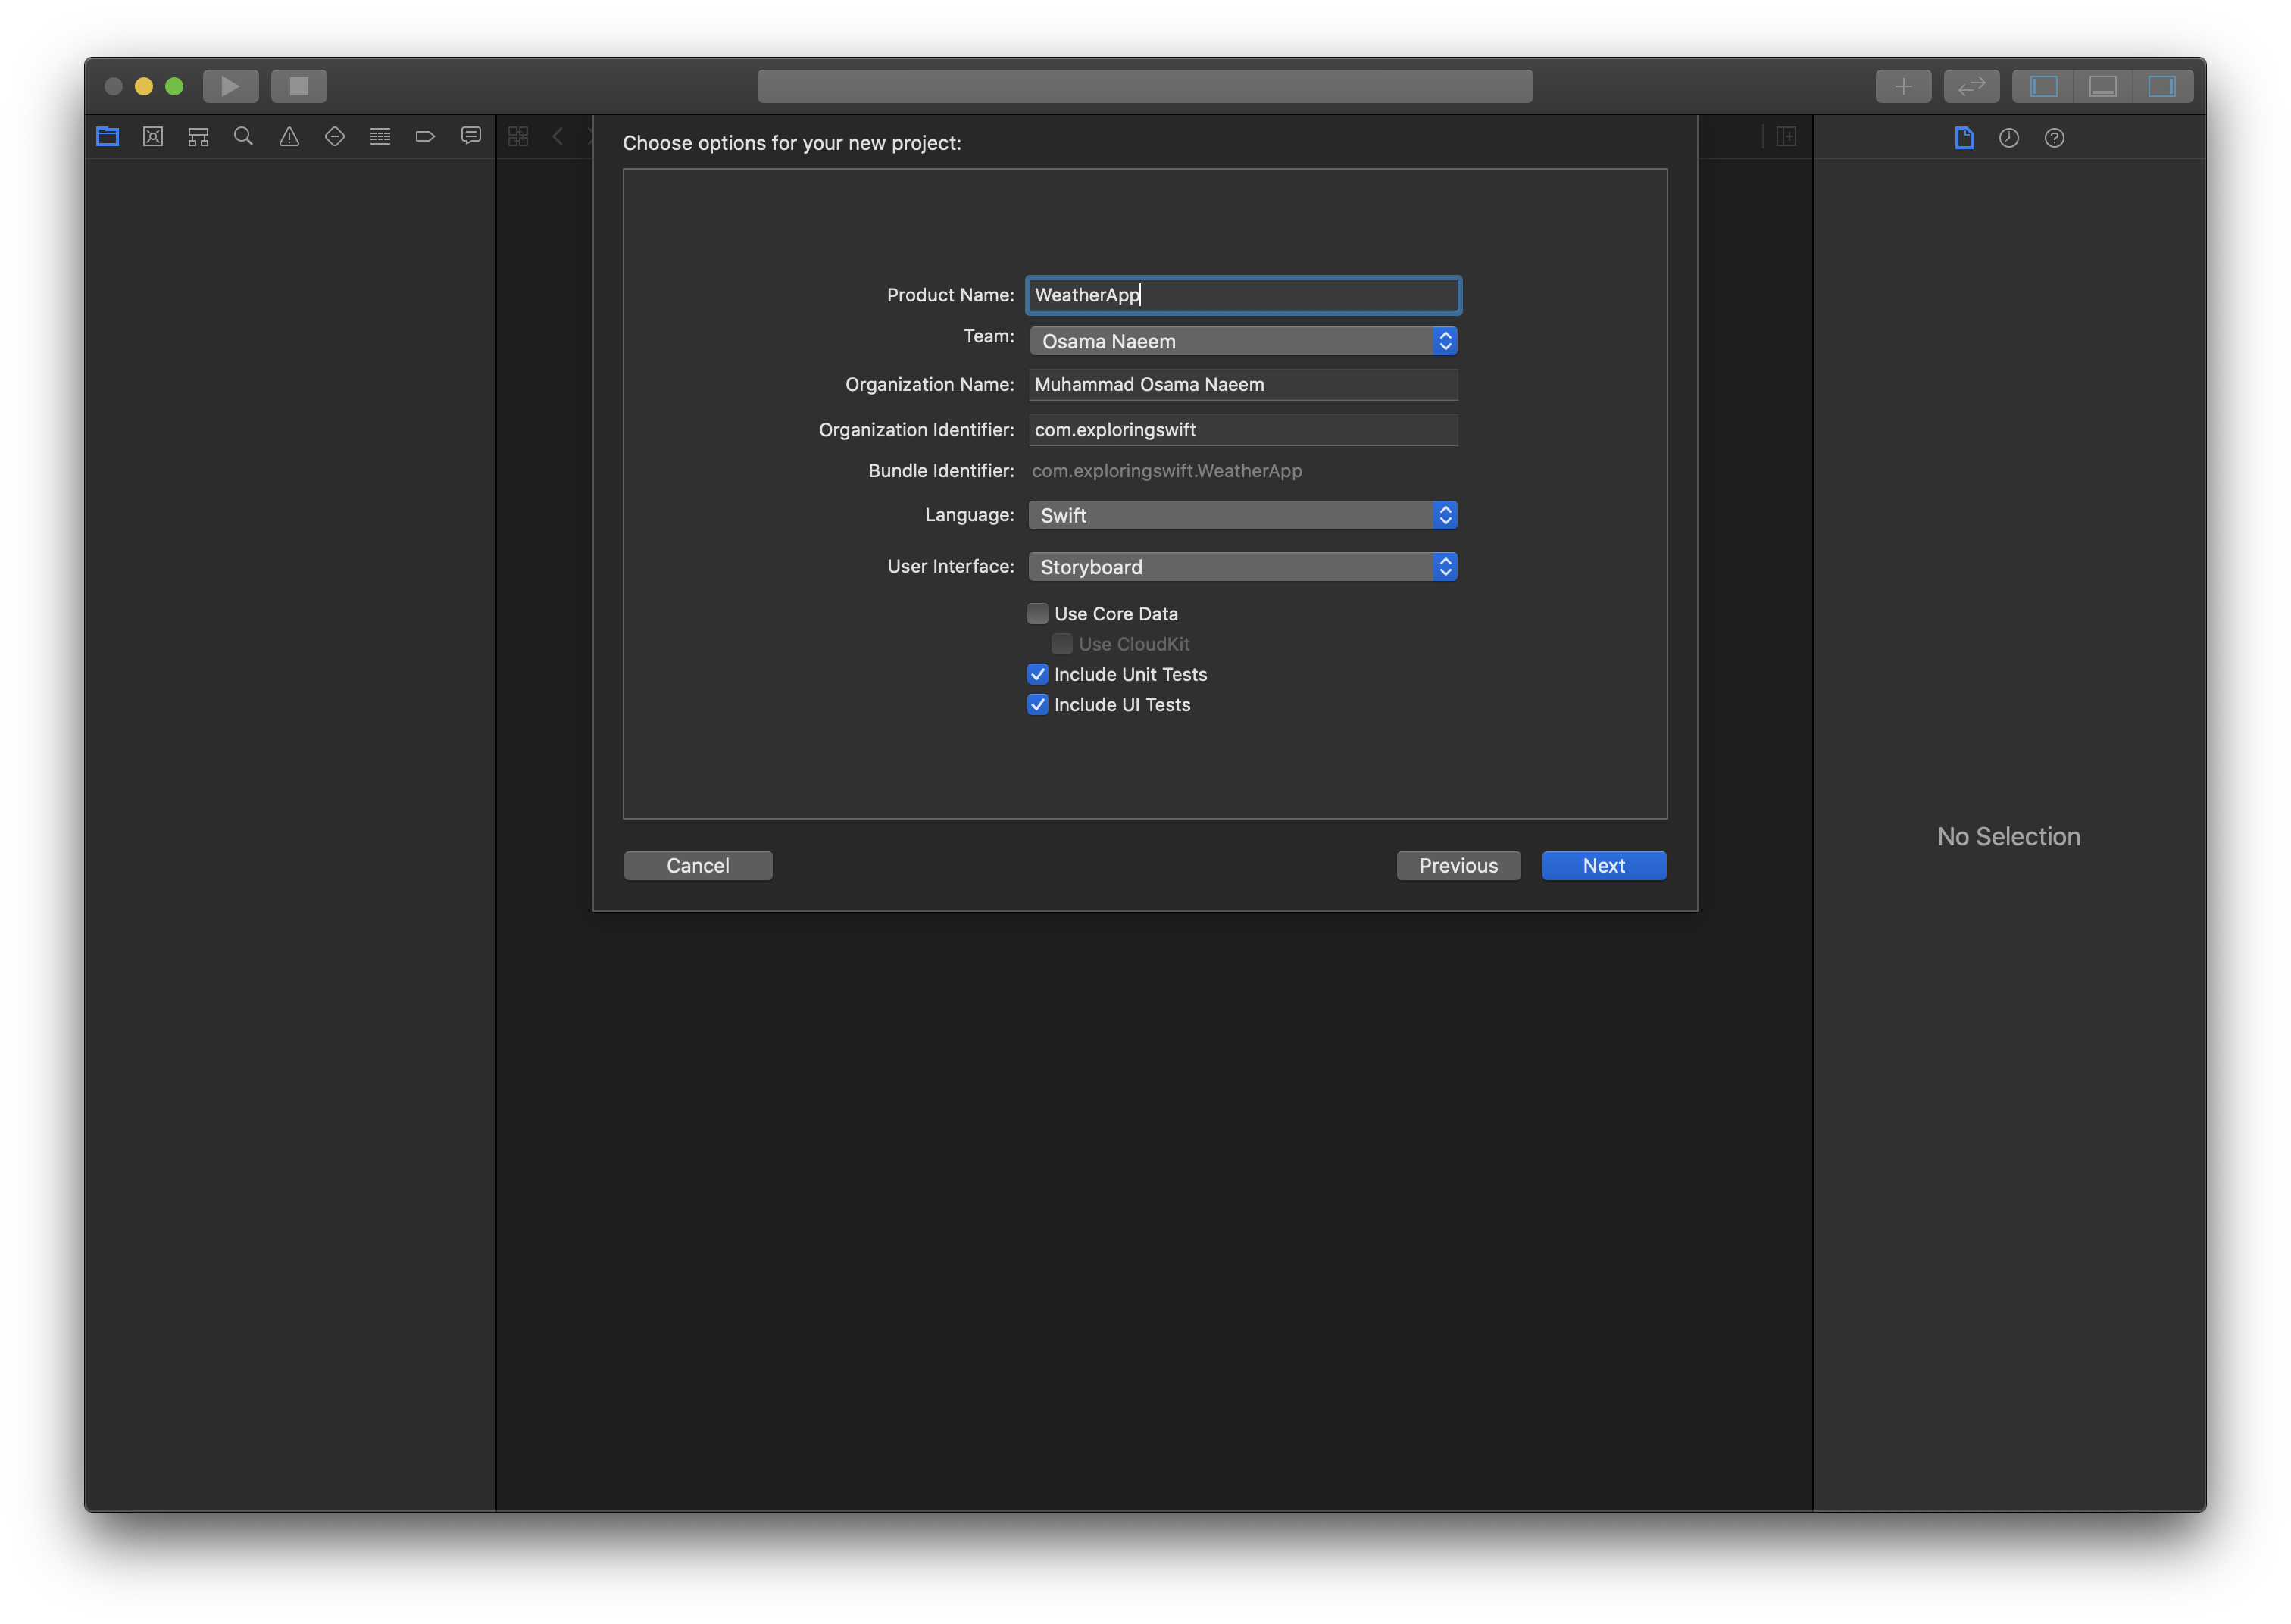
Let's start this by first creating a new single view application and naming it whatever you feel it. I went with "WeatherApp". Save the project where you please and then head over to the scene delegate file.
Since we will not be using storyboards - we will first set up our UIWindow and the root ViewController. In this particular scene delegate method, write this code to set up our user interface.
func scene(_ scene: UIScene, willConnectTo session: UISceneSession, options connectionOptions: UIScene.ConnectionOptions) {
    // Use this method to optionally configure and attach the UIWindow `window` to the provided UIWindowScene `scene`.
    // If using a storyboard, the `window` property will automatically be initialized and attached to the scene.
    // This delegate does not imply the connecting scene or session are new (see `application:configurationForConnectingSceneSession` instead).

    guard let winScene = (scene as? UIWindowScene) else { return }

    let vc = UINavigationController(rootViewController: ViewController())
    window = UIWindow(windowScene: winScene)
    window?.rootViewController = vc
    window?.makeKeyAndVisible()
}
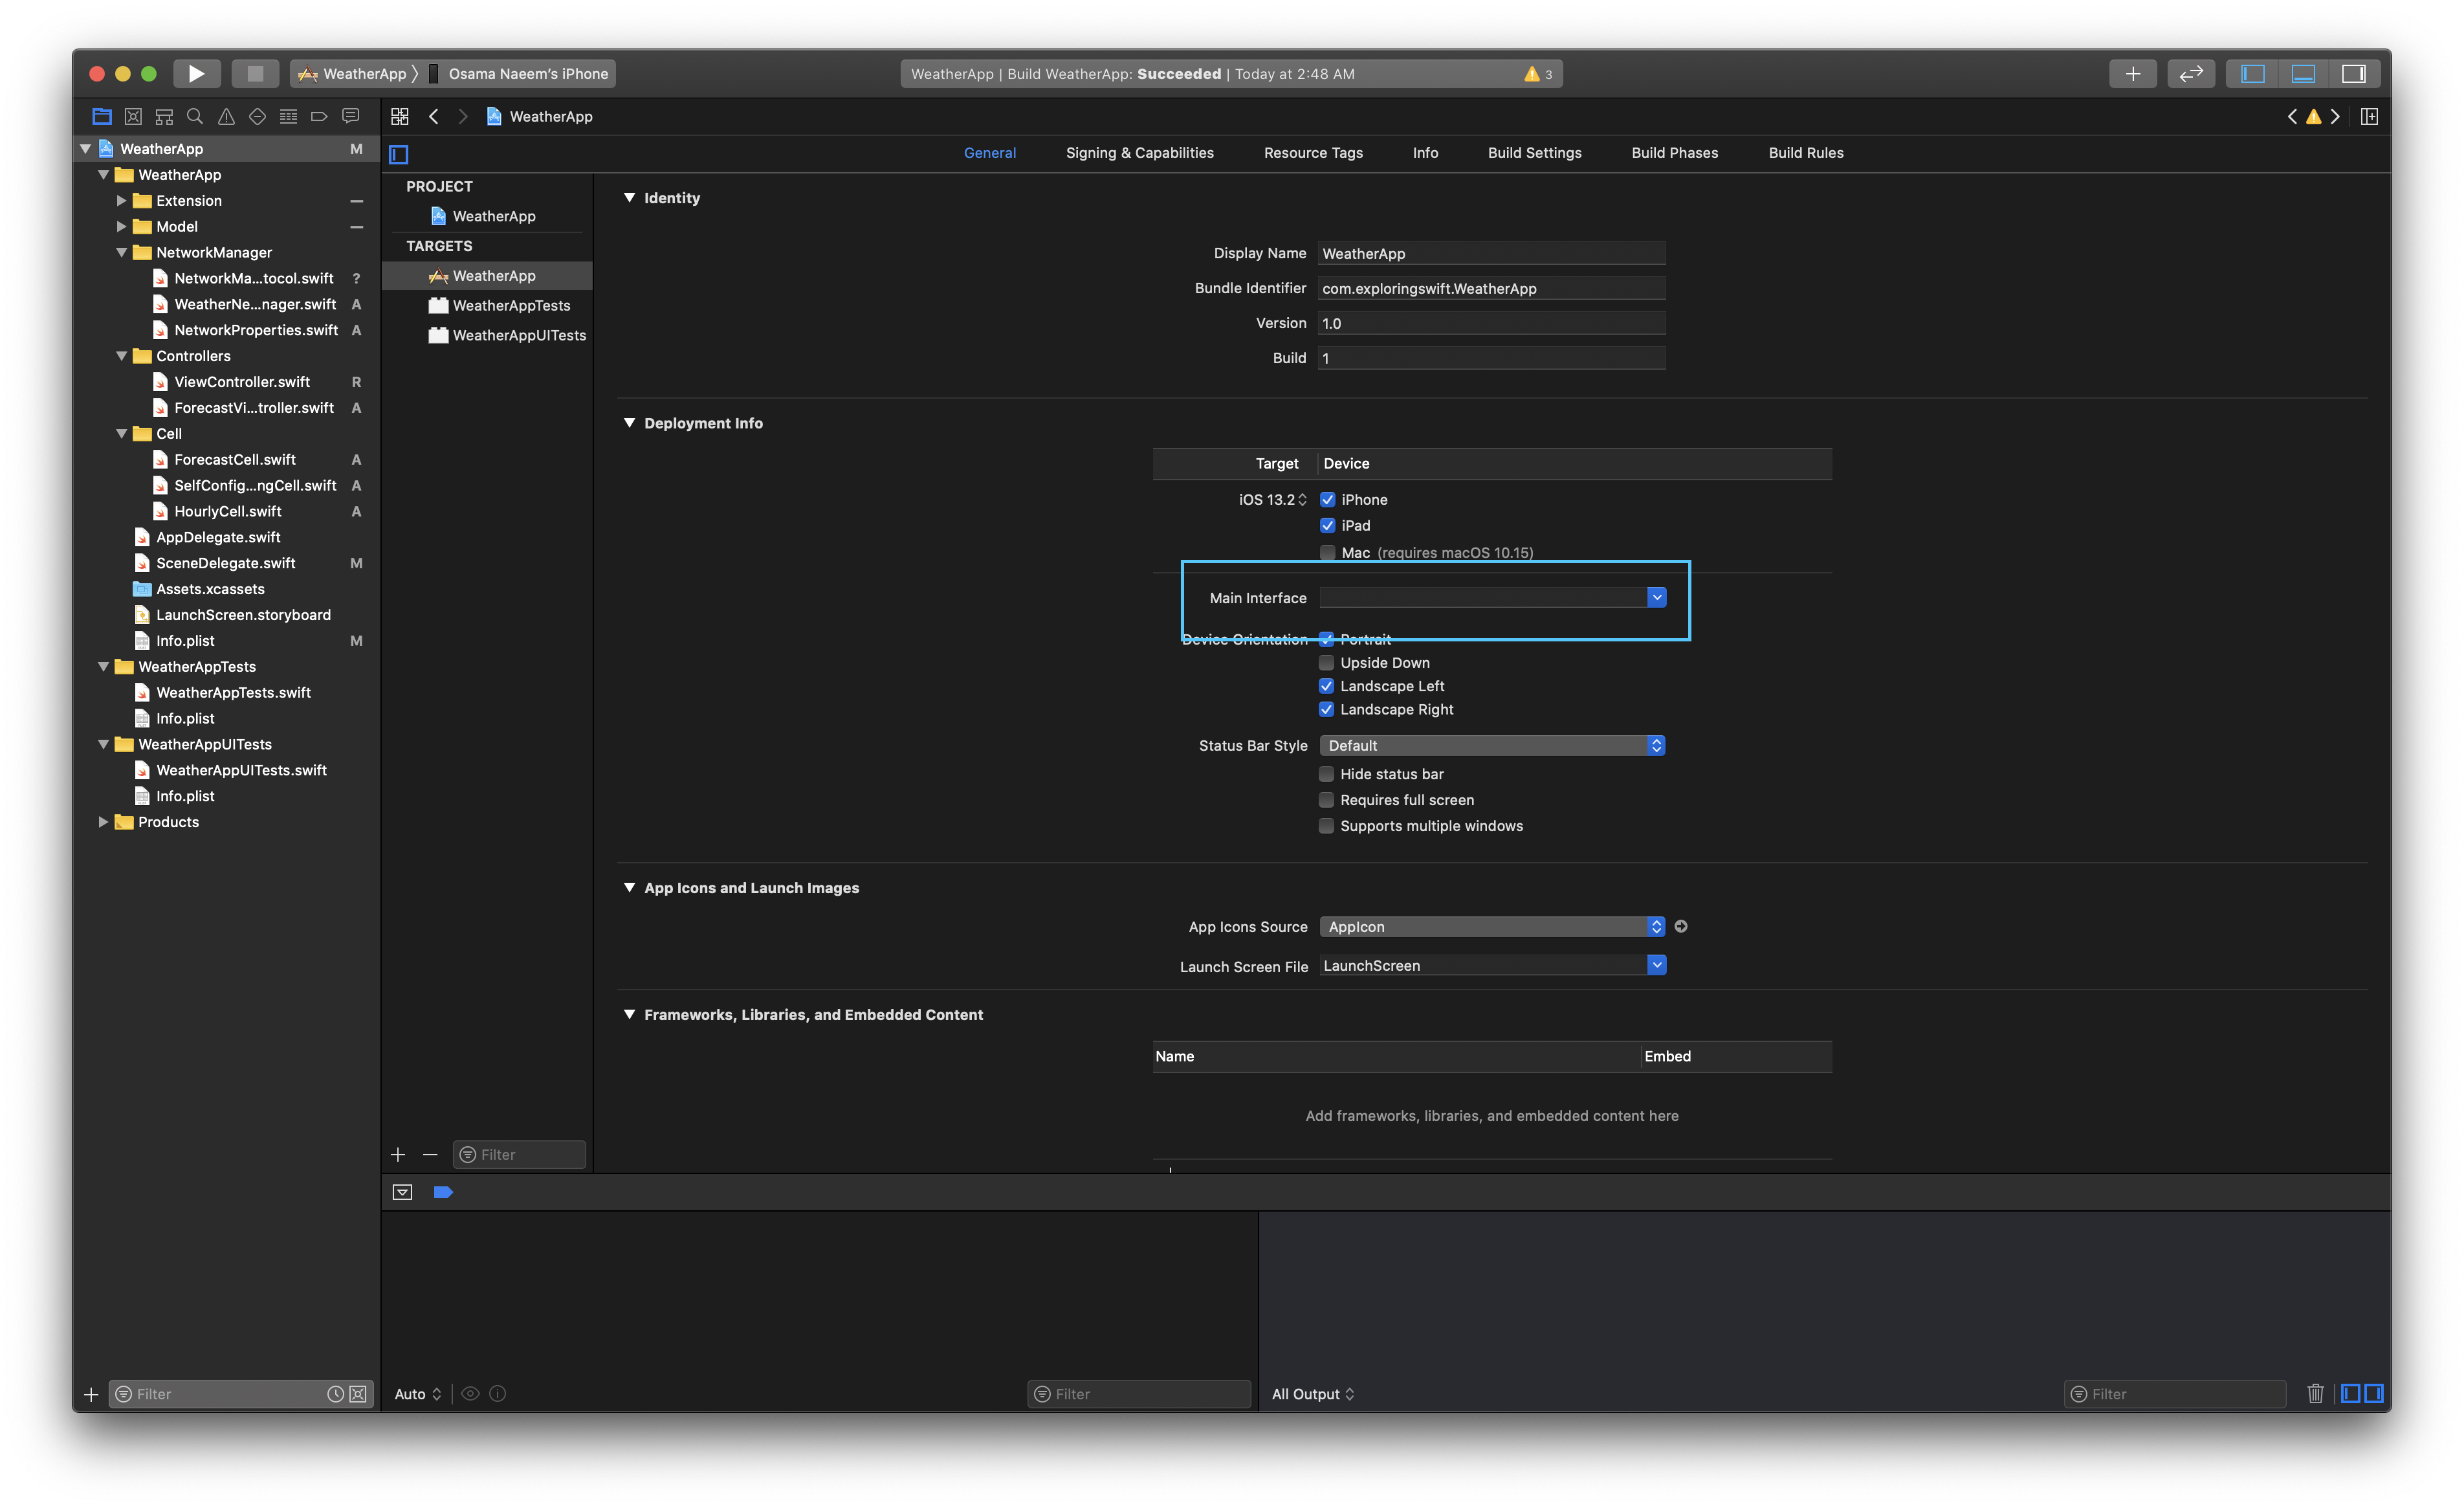
Once done, you may delete the main.storyboard file. In the General tab, go ahead and remove the Main from this drop down menu.
Last step, head over to the info.plist file and remove the Storyboard key from application scene manifest.
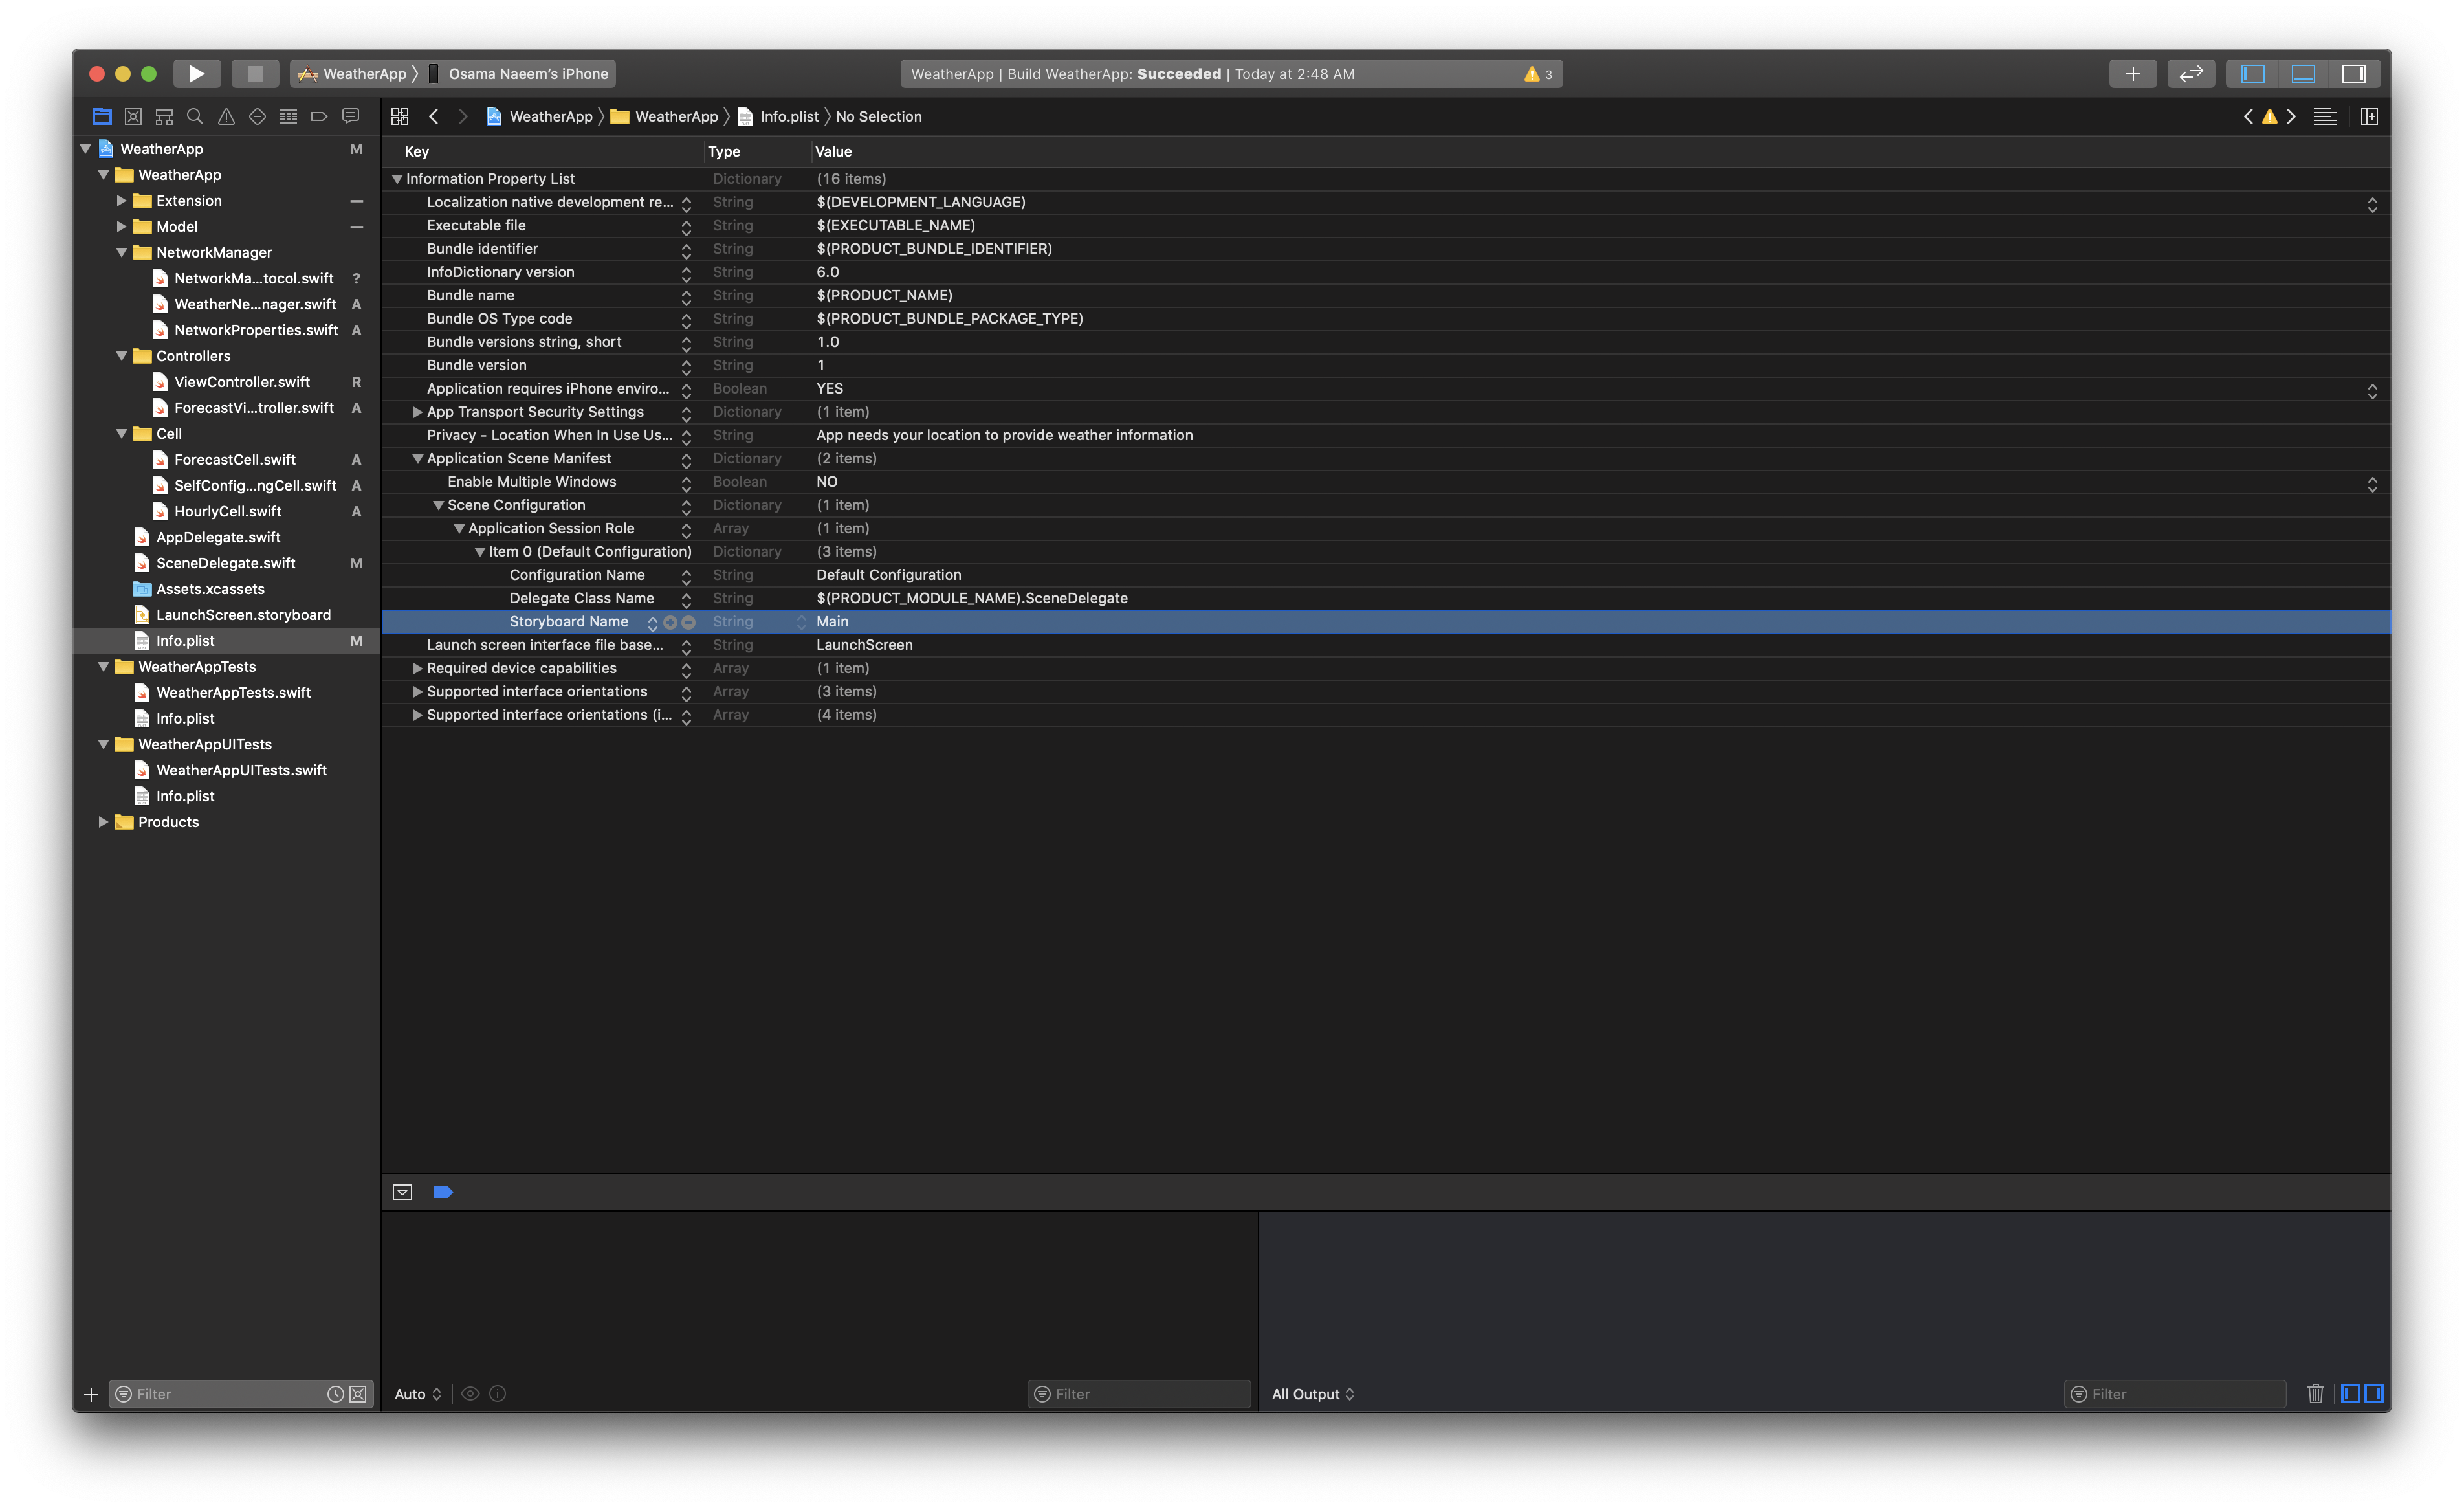
That's it! We have removed the storyboard and the entire app UI will be created programmatically.
The major part of this app revolves around networking and parsing the data we get from an API. The API service we will be using is called OpenWeatherMap. We will be using the free service which provides us the current weather and five day (3 hour forecast) for over 200,000 cities around the world.
Calling API & Parsing Data
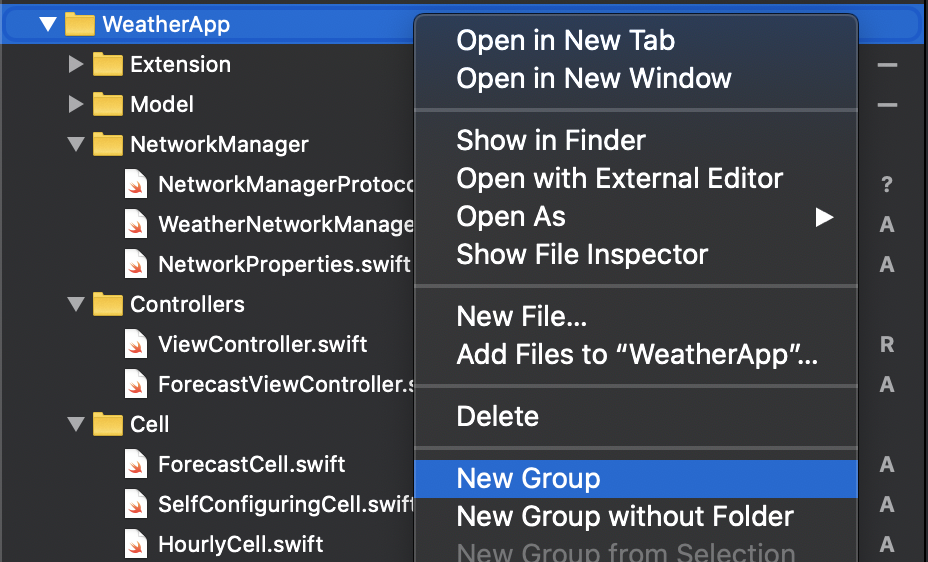
Let's begin by first creating a new group called NetworkManager and inside creating a new Swift file called NetworkManagerProtocol. This protocol will allow us to keep the front-end (UI/CollectionView) separate from the backend logic (fetching data from the API). This way, if any one of you want to connect your own backend service, you can do so really easily.
The NetworkManagerProtocol will contain three functions:
protocol NetworkManagerProtocol {
    func fetchCurrentWeather(city: String, completion: @escaping (WeatherModel) -> ())
    func fetchCurrentLocationWeather(lat: String, lon: String, completion: @escaping (WeatherModel) -> ())
    func fetchNextFiveWeatherForecast(city: String, completion: @escaping ([ForecastTemperature]) -> ())
}
Now, create a new swift file under the NetworkManager group and call it WeatherNetworkManager. Create a class of the same name, and conform it to the NetworkManagerProtocol.
class WeatherNetworkManager : NetworkManagerProtocol {
  //3 protocol methods will appear here
}
Before going any further, let's take a look at the data we get from the OpenWeatherAPI. Initially when you sign up on the OpenWeatherAPI website, you are given an API key. Using that api key, you can perform a GET request to get the current weather in any city around the globe. Here is how:
Go to this URL in your browser:
api.openweathermap.org/data/2.5/weather?q={city name}&appid={your api key}
{city name}insert the city name.{your api key}insert your API key.
This will return such json:
{
   "coord":{
      "lon":-0.13,
      "lat":51.51
   },
   "weather":[
      {
         "id":803,
         "main":"Clouds",
         "description":"broken clouds",
         "icon":"04d"
      }
   ],
   "base":"stations",
   "main":{
      "temp":279.99,
      "feels_like":272.77,
      "temp_min":278.15,
      "temp_max":281.48,
      "pressure":1038,
      "humidity":45
   },
   "visibility":10000,
   "wind":{
      "speed":6.7,
      "deg":50,
      "gust":13.4
   },
   "clouds":{
      "all":75
   },
   "dt":1585497356,
   "sys":{
      "type":1,
      "id":1414,
      "country":"GB",
      "sunrise":1585460504,
      "sunset":1585506501
   },
   "timezone":3600,
   "id":2643743,
   "name":"London",
   "cod":200
}
Now, we need to parse this data and make our own data model from it. We don't have to use all the data fields that are provided here. We will start from the top and see what data types we need to create. Let's start from the first object, that is weather. This object contains the id, main, description, icon. So let's create this data type:
struct Weather: Codable {
    let id: Int
    let main: String
    let description: String
    let icon: String
}
Next, we will create the main object. The main object contains temp, feels_like, temp_min, temp_max. So let's create a data type:
struct Main: Codable {
    let temp: Float
    let feels_like: Float
    let temp_min: Float
    let temp_max: Float
    let pressure: Float
    let humidity: Float
}
We will do the same for sys.
struct Sys: Codable {
    let country: String?
    let sunrise: Int?
    let sunset: Int?
}
Lastly, we will create a struct that will contain all the above data types and all the remaining fields such as timezone, dt_txt, name.
struct WeatherModel: Codable {
    let weather: [Weather]
    let main: Main
    let sys: Sys
    let name: String?
    let dt: Int
    let timezone: Int?
    let dt_txt: String?
}
Note: In the JSON, the weather object has data within two square brackets []. This tells us that we need weather array inside WeatherModel as shown above. We have successfully create a data model using the JSON that we recieved from the OpenWeatherAPI. Now, we will decode this JSON. This is extremely easy and we can parse JSON in Swift with just one line of code.
Head back to the WeatherNetworkManager and inside the fetchCurrentWeather(city: String..) method, write this code:
let formattedCity = city.replacingOccurrences(of: " ", with: "+")
let API_URL = "http://api.openweathermap.org/data/2.5/weather?q=\(formattedCity)&appid=\(NetworkProperties.API_KEY)"

guard let url = URL(string: API_URL) else {
    fatalError()
}

let urlRequest = URLRequest(url: url)
URLSession.shared.dataTask(with: urlRequest) { (data, response, error) in
guard let data = data else { return }

    do {
        let currentWeather = try JSONDecoder().decode(WeatherModel.self, from: data)
        completion(currentWeather)
    } catch {
         print(error)
    }

}.resume()
Note the API_URL, this is the exact url that I mentioned earlier, only in this case we are getting the city from the function parameter, and the API_KEY is saved as a static variable inside NetworkProperties class.
struct NetworkProperties {
    static let API_KEY = "5aa8d384afe4769c566762d5e85249ba"
}
The formattedCity variable replaces any spaces inside the city name with + sign. So San Francisco will become San+Francisco. This formattedCity variable gets passed into the GET request URL.
Then, we create a URL from the API_URL string. We create a URLRequest with our url and then start a URLSession with that URL request. This gives us a closure, with three parameters - data, response & error. If the data is not nil, we try to decode the data through JSONDecoder method. We pass the WeatherModel data type (which we created earlier) and the data which we get from the closure parameter. We do this entire decoding inside a Do / Catch block since this process may throw an error.
do {
    let currentWeather = try JSONDecoder().decode(WeatherModel.self, from: data)
   completion(currentWeather)
} catch {
    print(error)
}
Once the JSON is successfully decoded and gets saved as an instance of our data type (WeatherModel), we can simply call the completion handler and pass the data model.
Creating the UI
Now, we are getting the data and we are able to parse it. Next, we need to show that data on the device's screen. So, let's create the main screen. I won't be using storyboards in this, instead I will creating all the UI programmatically. Here is the main screen design.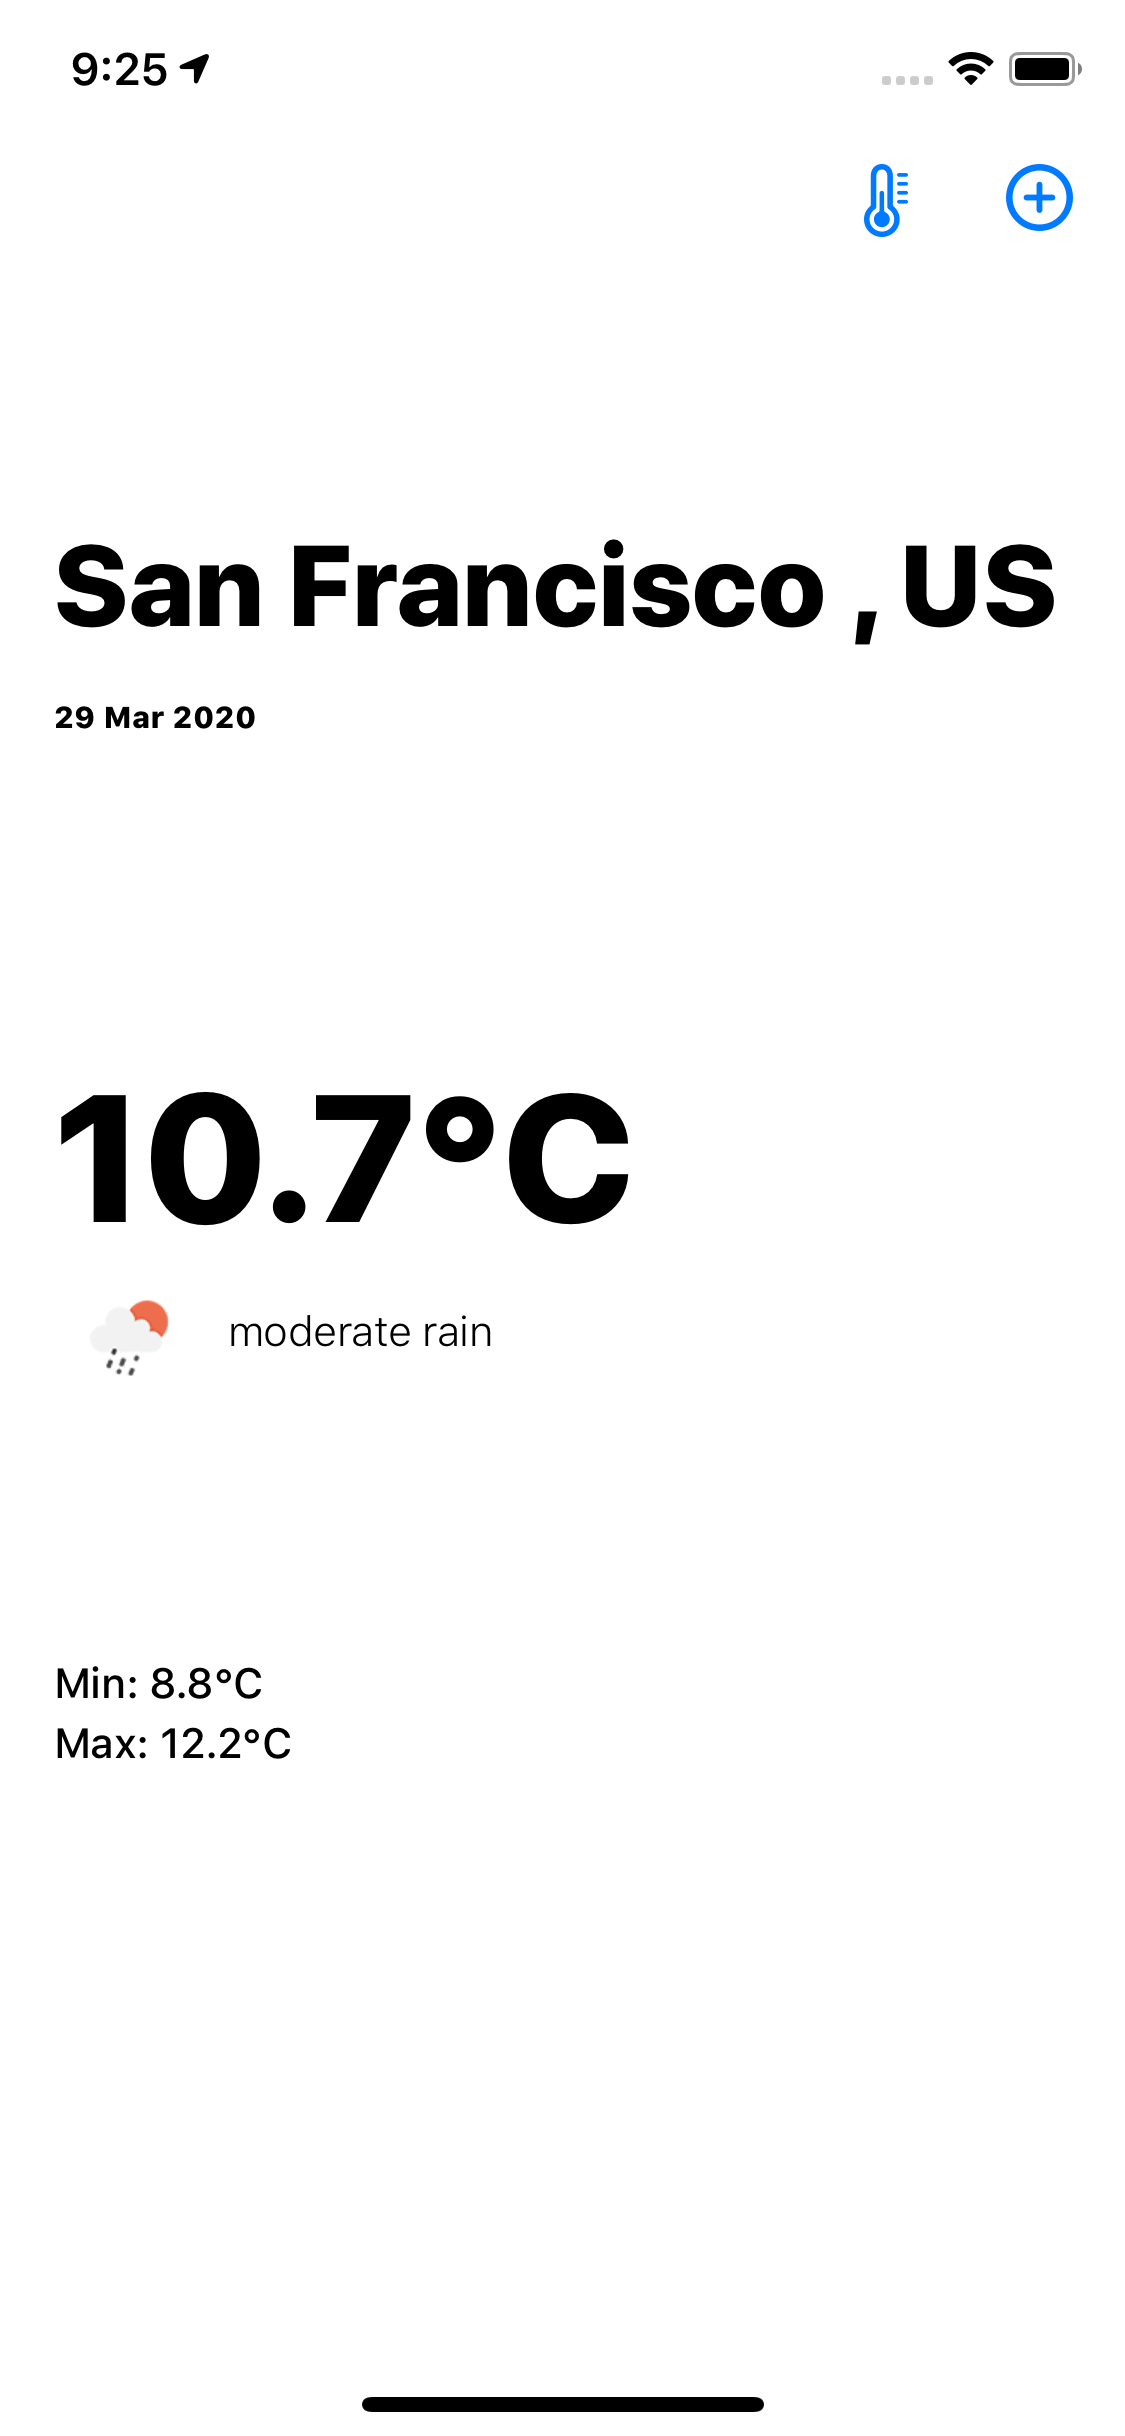
We have a currentLocation label, then a currentDate label, the currentTemp label along with an tempSymbol image view and tempDescription label.
Head over to the ViewController, and create few UILabels and an UIImageView. The best way to make views programmatically is through using closures. I will show you how to create one of these views, and after that I hope you would be able to set up the rest yourself.
let currentLocation: UILabel = {
       let label = UILabel()
        label.translatesAutoresizingMaskIntoConstraints = false
        label.text = "...Location"
        label.textAlignment = .left
        label.numberOfLines = 0
        label.font = UIFont.systemFont(ofSize: 38, weight: .heavy)
        return label
    }()
The above block of code creates a label. Setting this label.translatesAutoresizingMaskIntoConstraints to false makes sure that we can set up auto layout on this view. Next, we will add this label to the view
view.addSubview(currentLocation)
Then, we will set up the constraints:
currentLocation.topAnchor.constraint(equalTo: view.safeAreaLayoutGuide.topAnchor, constant: 20).isActive = true
currentLocation.leadingAnchor.constraint(equalTo: view.leadingAnchor, constant: 18).isActive = true
currentLocation.trailingAnchor.constraint(equalTo: view.trailingAnchor, constant: -18).isActive = true
currentLocation.heightAnchor.constraint(equalToConstant: 70).isActive = true
The constraints basically state that the currentLocation top anchor will connect to our view controller's view's top edge, with 20px padding. The leading anchor of the label (left side - if the text starts from left (English) / right side if it is Arabic) will connect to the view's leading anchor. Similarly we will connect the label to the trailing edge of the view. So now our label has the width (it stretches from left edge of the view to the right edge), the only thing left is the height, so we will provide the height ourselves.
This is how, a view can be programmatically created and viewed. Do the same thing with all the other views you want to show on the main screen. Now let's connect the models to the view.
Connecting Model to the View
In the ViewController, create a NetworkManager instance:
let networkManager = WeatherNetworkManager()
Create a new function, called loadData(city: String)
func loadData(city: String) {}
Inside the loadData method, call the networkManager.fetchCurrentWeather method.
networkManager.fetchCurrentWeather(city: city) { (weather) in
     let formatter = DateFormatter()
     formatter.dateFormat = "dd MMM yyyy" //yyyy
     let stringDate = formatter.string(from: Date(timeIntervalSince1970: TimeInterval(weather.dt)))

     DispatchQueue.main.async {
         self.currentTemperatureLabel.text = (String(weather.main.temp.kelvinToCelsiusConverter()) + "°C")
         self.currentLocation.text = "\(weather.name ?? "") , \(weather.sys.country ?? "")"
         self.tempDescription.text = weather.weather[0].description
         self.currentTime.text = stringDate
         self.minTemp.text = ("Min: " + String(weather.main.temp_min.kelvinToCelsiusConverter()) + "°C" )
         self.maxTemp.text = ("Max: " + String(weather.main.temp_max.kelvinToCelsiusConverter()) + "°C" )
         self.tempSymbol.loadImageFromURL(url: "http://openweathermap.org/img/wn/\(weather.weather[0].icon)@2x.png")
         UserDefaults.standard.set("\(weather.name ?? "")", forKey: "SelectedCity")
     }
}
When we call the method, we are getting our data inside the closure. The closures always run in the background thread and the UI should always be updated from the main thread. Therefore, we need to jump back to the main thread using DispatchQueue.main.async{}. Any code executed within this will run on the main thread.
This is now self-explanatory. I am setting all the UI labels and images views from the data that I receive from the closure.
self.currentTemperatureLabel.text = (String(weather.main.temp.kelvinToCelsiusConverter()) + "°C")
The kelvinToCeliusConverter is an extension to the Float type that converts the temperature provided to us by the API to celsius. Similarly, I am setting all the other labels and images from the WeatherModel above.
tempSymbol is the image view that shows an image of the current weather condition. This image is grabbed from the openweathermap's website.
The loadImageFromURL method that I am using here allows the images loaded from the web to be cached. This allows for smooth loading of images and doesn't use the cellular data every single time.
let imageCache = NSCache<AnyObject, AnyObject>()
extension UIImageView {
    func loadImageFromURL(url: String) {
        self.image = nil
        guard let URL = URL(string: url) else {
            print("No Image For this url", url)
            return
        }

        if let cachedImage = imageCache.object(forKey: url as AnyObject) as? UIImage {
            self.image = cachedImage
            return
        }

        DispatchQueue.global().async { [weak self] in
            if let data = try? Data(contentsOf: URL) {
                if let image = UIImage(data: data) {
                    let imageTocache = image
                    imageCache.setObject(imageTocache, forKey: url as AnyObject)

                    DispatchQueue.main.async {
                        self?.image = imageTocache
                    }
                }
            }
        }

    }
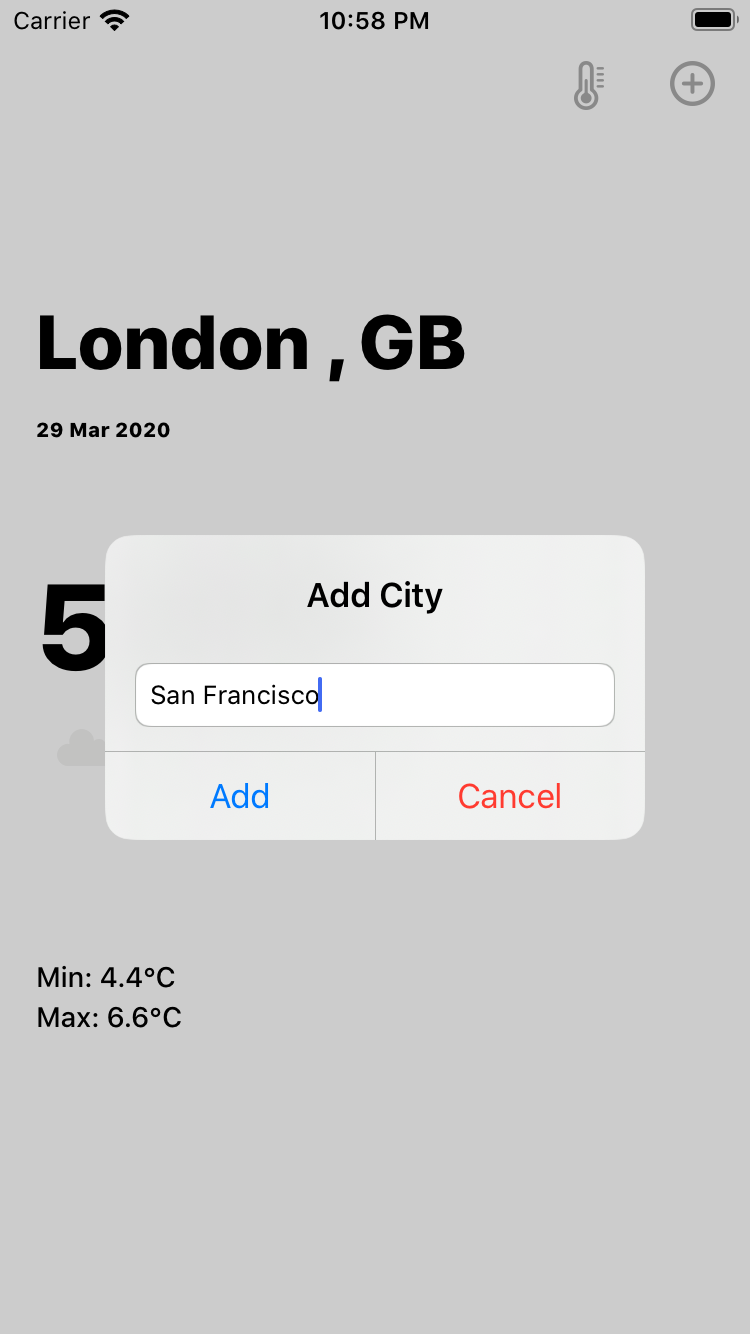
In order to add a city name, I am using a simple alert controller with a textfield, and a add button in the navigation bar.
@objc func handleAddPlaceButton() {
    let alertController = UIAlertController(title: "Add City", message: "", preferredStyle: .alert)
     alertController.addTextField { (textField : UITextField!) -> Void in
         textField.placeholder = "City Name"
     }
     let saveAction = UIAlertAction(title: "Add", style: .default, handler: { alert -> Void in
         let firstTextField = alertController.textFields![0] as UITextField
         print("City Name: \(firstTextField.text)")
        guard let cityname = firstTextField.text else { return }
        self.loadData(city: cityname) // Calling the loadData function
     })
     let cancelAction = UIAlertAction(title: "Cancel", style: .destructive, handler: { (action : UIAlertAction!) -> Void in
        print("Cancel")
     })


     alertController.addAction(saveAction)
     alertController.addAction(cancelAction)

     self.present(alertController, animated: true, completion: nil)
}
That's about it. Now whenever you tap on the add button on the nav bar, the alert controller pops up and asks you enter a city name, tapping the save button invokes the loadData function and you will see the all the data showing up on the screen. This should give you a basic idea on how to make network calls, design data models from JSON, design the backend architecture in such a way to maintain decoupling between the UI and the data, and lastly how to create programmatic UI!
Bonus: CollectionViewCompositionalLayout
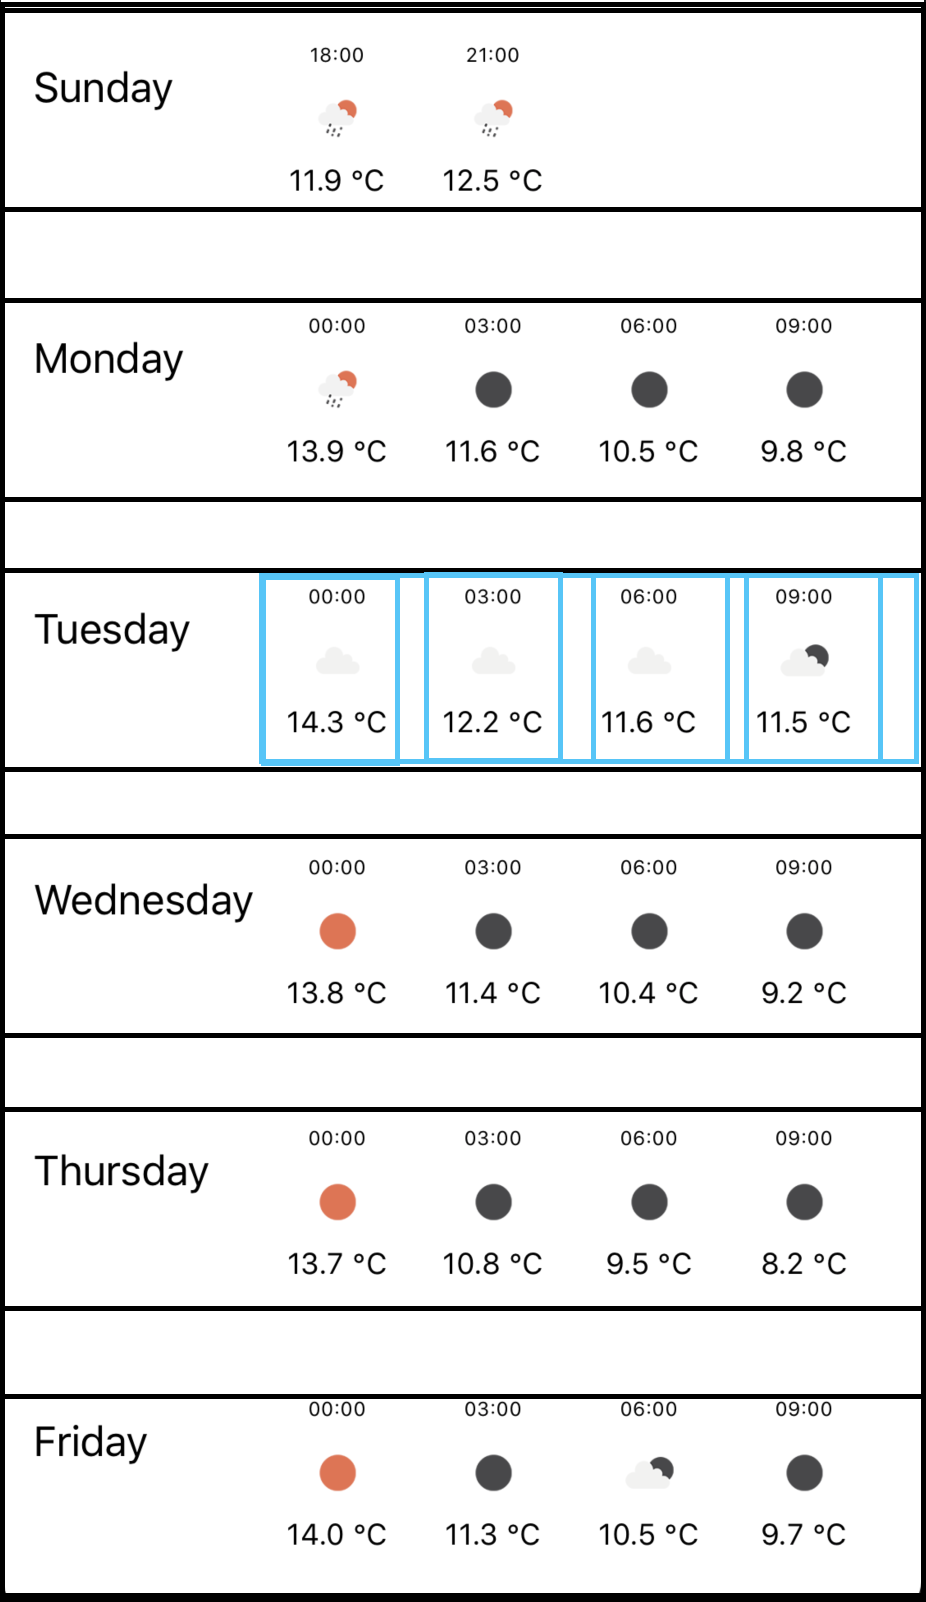
The second screen of the app will show the forecast for the next five days. In this screen, we will use a collectionView and each cell will have a collectionView. (nested collectionViews). As you can see in the picture above, the black boxes shows the main CV and the cells. Then each black box, contains the blue box (CV) with cells.
Create a new view controller, ForecastViewController and add a collectionView.
collectionView = UICollectionView(frame: view.bounds, collectionViewLayout: createCompositionalLayout())
collectionView.register(ForecastCell.self, forCellWithReuseIdentifier: ForecastCell.reuseIdentifier)
collectionView.autoresizingMask = [.flexibleWidth, .flexibleHeight]
collectionView.backgroundColor = .white
collectionView.delegate = self
collectionView.dataSource = self
view.addSubview(collectionView)
In the initializer, we will pass the createCompositionalLayout() function.
func createCompositionalLayout() -> UICollectionViewLayout {
        let layout = UICollectionViewCompositionalLayout { sectionIndex, layoutEnvironment in
            self.createForecastSection()
        }

        let config = UICollectionViewCompositionalLayoutConfiguration()
        layout.configuration = config
        return layout
    }

func createForecastSection() -> NSCollectionLayoutSection {
    let itemSize = NSCollectionLayoutSize(widthDimension: .fractionalWidth(1), heightDimension: .fractionalHeight(1))

   let layoutItem = NSCollectionLayoutItem(layoutSize: itemSize)
   layoutItem.contentInsets = NSDirectionalEdgeInsets(top:5, leading: 5, bottom: 0, trailing: 5)

   let layoutGroupSize = NSCollectionLayoutSize(widthDimension: .fractionalWidth(1), heightDimension: .estimated(110))
   let layoutGroup = NSCollectionLayoutGroup.vertical(layoutSize: layoutGroupSize, subitems: [layoutItem])

   let layoutSection = NSCollectionLayoutSection(group: layoutGroup)
  // layoutSection.orthogonalScrollingBehavior = .groupPagingCentered
   return layoutSection
}
Inside the createForecastSection, we are creating the collection view design. The CollectionViewCompositionalLayout divides the collection view in to
- item,
- group,
- section.
The item is the smallest entity. In our case the item size has a fractionalWidth of 1 and fractionalHeight of 1. This height and width is that of the parent. The parent of the item is a group. The group has the fractionalWidth of 1 and heightDimension of 110px. This means, we are setting the group height as 110px and the width will stretch the entire collectionview's width. This group gets into the section and that's about it.
The API URL we will use to request five day forecast is this:
api.openweathermap.org/data/2.5/forecast?q={city name}&appid={your api key}
The data we are getting from the API is an array of temperatures every three hours for the next five days. In total, we have 40 data readings. The readings are not separated by the date, so we need to do all this data manipulation inside the fetchNextFiveWeatherForecast method inside the NetworkManager class. Make sure to check out the full project on my github to check the full code. Inside the fetchNextFiveWeatherForecast method, I am seperating the data into five arrays and I have created a new data model ForecastTemperature that contains an array of WeatherInfo and weekDay.
// basic idea:

forecastmodelArray = [currentDayTemp, secondDayTemp, thirdDayTemp, fourthDayTemp, fifthDayTemp] // 5 or 6 total
The forecastmodelArray consists of five or six ForecastTemperature instances, each instance contains a weekDay and WeatherInfo array. This array will be passed in to the collectionView inside the collection View cell.
So, back in ForecastViewController, where we are configuring the ForecastCell, we will pass the ForecastTemperature instance to the cell.
func collectionView(_ collectionView: UICollectionView, cellForItemAt indexPath: IndexPath) -> UICollectionViewCell {
   let cell = collectionView.dequeueReusableCell(withReuseIdentifier: ForecastCell.reuseIdentifier, for: indexPath) as! ForecastCell
   cell.configure(with: forecastData[indexPath.row])
   return cell
}Weath
Inside the ForecastCell, we have created another collectionView and set it up as we have done before. This time the createCompositionalLayout() is a bit different.
func createCompositionalLayout() -> UICollectionViewLayout {
    let layout = UICollectionViewCompositionalLayout { sectionIndex, layoutEnvironment in
        self.createHourlySection()
    }

    let config = UICollectionViewCompositionalLayoutConfiguration()
    layout.configuration = config
    return layout
}

func createHourlySection() -> NSCollectionLayoutSection {
    let itemSize = NSCollectionLayoutSize(widthDimension: .fractionalWidth(1/4), heightDimension: .fractionalHeight(0.75))

   let layoutItem = NSCollectionLayoutItem(layoutSize: itemSize)
   layoutItem.contentInsets = NSDirectionalEdgeInsets(top:5, leading: 5, bottom: 0, trailing: 5)

   let layoutGroupSize = NSCollectionLayoutSize(widthDimension: .fractionalWidth(1), heightDimension: .estimated(110))
   let layoutGroup = NSCollectionLayoutGroup.horizontal(layoutSize: layoutGroupSize, subitems: [layoutItem])

   let layoutSection = NSCollectionLayoutSection(group: layoutGroup)
   layoutSection.orthogonalScrollingBehavior = .groupPagingCentered

   return layoutSection
}
In createHourlySection method, we are giving the item size a width of 1/4 of the entire width of the group (which is the width of the collectionView). In the cellForItemAt method for the nested collectionView, we are configuring the cells:
func collectionView(_ collectionView: UICollectionView, cellForItemAt indexPath: IndexPath) -> UICollectionViewCell {
    let cell = collectionView.dequeueReusableCell(withReuseIdentifier: HourlyCell.reuseIdentifier, for: indexPath) as! HourlyCell
    cell.configure(with: dailyForecast[indexPath.row])
    return cell
  }
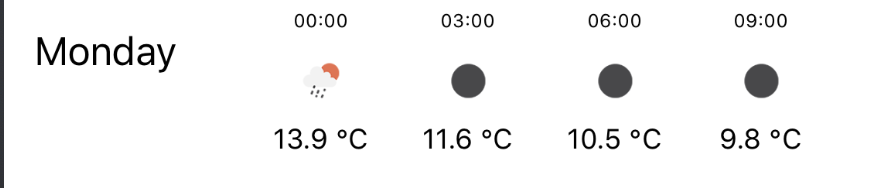
The HourlyCell is the custom collection view cell we are using. In this cell, we have a label for the time, label for the temperature and an image view. Let's set these up:
func configure(with item: WeatherInfo) {
    let dateFormatterGet = DateFormatter()
    dateFormatterGet.dateFormat = "yyyy-MM-dd HH:mm:ss"

    let dateFormatter = DateFormatter()
    dateFormatter.dateFormat = "HH:mm"

    if let date = dateFormatterGet.date(from: item.time) {
        hourlyTimeLabel.text = dateFormatter.string(from: date)
    }

    tempSymbol.loadImageFromURL(url: "http://openweathermap.org/img/wn/\(item.icon)@2x.png")
    tempLabel.text = String(item.temp.kelvinToCeliusConverter()) + " °C"
}
}
This is what we get:
So, here is how we can have nested collection views and show data in an advanced form. CollectionViews are extremely powerful and with Diffable Data Source and CollectionViewCompositionalLayout, some really beautiful layouts can be developed!
Here is how you can make a weather app in Swift!
Comments (0)