
Interested in this project?
Continue LearningIntroduction
Have you ever wanted to build your own extension for Google Chrome but wasn't sure when to start? We're going to be building a simple extension that saves the text you highlight with your cursor!
Setting Up Files
Let's get started by talking about all the files we'll need to create and understanding their purpose. In a new folder, create the following files:
- manifest.json
- popup.html
- popup.js
- background.js
- main.css
Wow, so there are actually a number of files that go into this. We're going to dive into each file's purpose as we go through the project.
Getting an Icon
One other file you'll need is an icon. If you want to make your own then check out Figma, otherwise download the same icon I created from my repository here. Add it to the same folder as the other files.
Writing the Manifest and HTML
The first thing we'll need to do is write the manifest of the extension. This JSON file tells Google Chrome a lot of information about your extension: what it does, what permissions it needs, any icons used, and what scripts it runs. Next, we'll create an html page that we want to display in the popup when you click its icon in the toolbar. After this, we'll have a minimum working product we can look at!
manifest.json
Okay, let's actually write some code. Open up the manifest.json file and put in this info:
{
"manifest_version": 2,
"name": "Easy Text Saver",
"version": "1.0",
"description": "Paste your highlighted text into a file from anywhere on the web.",
"permissions": [
    "activeTab",
    "storage"
],
"icons": {
    "48" : "icon48.png"
},
"browser_action": {
    "default_icon": "icon48.png",
    "default_popup": "popup.html",
    "default_title": "Easy Text Saver"
},
"background": {
    "scripts": [
        "background.js"
    ],
    "persistent": false
    }
}
This is a lot, so let's focus on a few things. Notice that the permissions for this tab are activeTab and storage. We need the extension to be able to access the tab you'll be using it on in order to display anything. We need access to the browser's storage to save the items you put in it!
For icons, I chose to make the default icon 48 px by 48 px. You can play around with making it another common size like 128 px.
browser_action tells Chrome that this extension should come up in your toolbar and it has a popup that should be read from popup.html.
Finally, background refers to the scripts running in the background of the extension. persistent is set to false because this background.js does not need to be constantly running.
popup.html
Cool, let's make our html page for the extension popup. After this, we'll be able to load it in and see what it is going to look like! Some things we want to do in this file is make sure we leave a space where we want to inject JavaScript into the popup and also set up a div tag for where we want the cursor-selected text to go. We're also going to set up a link to our main.css stylesheet, but we won't worry about touching it until the extension is functioning. Here's the code for popup.html
<!DOCTYPE html>
<html>
    <head>
        <meta  charset="utf-8" />
        <title>Easy Text Saver</title>
        <link  rel="stylesheet"  type="text/css"  href="main.css" />
        <script  src="popup.js"></script>
    </head>
    <body>
        <div id="popup-body">
        <h2>Easy Text Saver</h2>
        <h3>Here is your saved text!</h3>
        <div id="output"></div>
        </div>
    </body>
</html>
Loading and Viewing Your Extension
Awesome, now we are going to take a quick look at how the extension looks in our browser. In order to do this, go to chrome://extensions and flip the developer mode toggle on. Now, you'll see the option to load unpacked extensions. Select that and load the folder that contains all the files we've created. You should now be able to see the icon in your toolbar! Click on it and see what opens up. Not much, right? Let's fix that.
Aside
Note that whenever you change manifest.json you will have to remove and reload the extension in order for the changes to take effect. Your other changes will either take effect automatically or by clicking the update button in the extensions menu.
JavaScript & The Chrome API
Extension Architecture
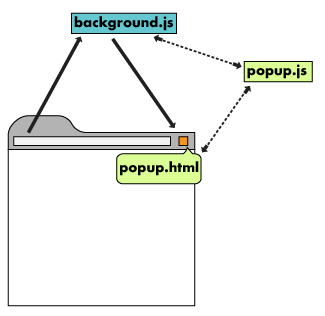
We need two JavaScript files to make this extension work. The first one is popup.jsand this file contains the JavaScript we want to inject into popup.html. This will be the text that gets selected by your cursor! It also has to communicate with background.js in order to store the text that will get displayed in the popup. Take a look at the overview of the architecture in this image. In our extension, popup.js sends a message to background.js with the selected text, then background.js stores it in Chrome, and sends it back to popup.js with the updated array of all clipped text!
 Source
We're going to utilize Chrome's API in order to allow the different files to send messages to each other and store text in the browser's storage.
Calling The Text with popup.js
We're going to start by creating a function in popup.js that gets the text you select with your cursor. Let's do this by creating a script that executes when the tab you're on loads.
window.onload  =  function() {
}
Great! Let's use the Chrome API to enter the code that will grab our text for us.
window.onload  =  function() {
    chrome.tabs.executeScript( {
    code: "window.getSelection().toString();"
    }
    )};
For this next part of the function we are going to need to define the part that will send the text to background.js in order to be stored by Chrome. We need another function that takes the selected text as a parameter in order to send it. After that, we'll start working on fleshing out background.js.
window.onload  =  function() {
    chrome.tabs.executeScript( {
    code: "window.getSelection().toString();"
    }, function(selection) {
    chrome.runtime.sendMessage({selection: selection[0]}, function(response) {
    document.getElementById("output").innerHTML  =  null;
    });
});
};
Okay, we did a lot here. First we defined a function that sends a message that contains the highlighted text (selection[0]). Then, we defined a function that contains the response from background.js that will contain the array of all clipped text. Right now this is set to null because we haven't actually encoded yet what the response is equal to. However, we know we will want to set it to be located under the div tag in popup.html with id="output".
Writing background.js
Let's write our background.js code now. This piece of code is going to wait until it gets a request from popup.js before adding the selection text to the list (we'll call it clippings).
// background.js
chrome.runtime.onMessage.addListener(function (request, sender, sendResponse) {
    let clippings = [];

});
Sweet. Now we're going to use the chrome API to call the array of text that might already be present in clippings and add the text we've selected to it. We'll use conditionals here: we want to know if (a) the user selected test and if text is already present, or (b) if the user didn't select anything and wants to see what was stored, or (c) if this is the first addition to the page.
chrome.runtime.onMessage.addListener(function (request, sender, sendResponse) {
    let clippings = [];
    chrome.storage.sync.get("list", function (result) {
        if (request.selection && result.list) {
            clippings = [...result.list, request.selection];
        } else if (result.list) {
            clippings = [...result.list];
        } else {
            clippings = [request.selection];
        }
    });
});
Awesome, the last thing we need to do in this function is send a response back to popup.js with the array stored in clippings.
chrome.runtime.onMessage.addListener(function (request, sender, sendResponse) {
    let clippings = [];
    chrome.storage.sync.get("list", function (result) {
        if (request.selection && result.list) {
            clippings = [...result.list, request.selection];
        } else if (result.list) {
            clippings = [...result.list];
        } else {
            clippings = [request.selection];
        }
        sendResponse({clips: clippings});
        chrome.storage.sync.set({
            list: clippings,
        });
    });
    return true
});
The code we've added sends a response in the form of key-value pair clips: clippings. Notice that we have to include return true in the function because otherwise popup.js will not be able to receive the message. Remember how we set the result of the text earlier to null in popup.js? Try to fill it in yourself. You'll need to call response and the key that corresponds to the array of selected text.
Solution
// popup.js replacing null
document.getElementById("output").innerHTML  =  response.clips;
We're calling response and asking for clips which maps to the array clippings of all the clipped text. Now it gets appended to the div and is visible in the popup. Try it out!!
Wait, What About Removing Text?
You probably quickly noticed a flaw after using this clipper. You can't delete text! Let's make a few changes to our JavaScript files to make this possible.
First, we modify popup.js to clear all saved text in the array when we click on it. We can use addEventListener and tell it to wait for the text to get clicked on. When this happens, it will send a message to background.js to return an empty array and update the extension!
// popup.js
window.onload  =  function() {
    chrome.tabs.executeScript( {
    code: "window.getSelection().toString();"
    }, function(selection) {
    chrome.runtime.sendMessage({selection: selection[0]}, function(response) {
    document.getElementById("output").innerHTML  =  response.clips;
    });
});
var text = document.getElementById("output")

text.addEventListener("click", function(e) {
    chrome.runtime.sendMessage({empty: "clear"}), function(response) {
    text.innerHTML = response.clips;
    });
});
};
empty: "clear" is an arbitrary key-value pair I made up to represent cleaning the clippings array. Now we go back to background.js and tell the conditional statements to send back an empty array it receives the message to clear. We'll want to check first if request.empty comes through before looking at selection.
// background.js
chrome.runtime.onMessage.addListener(function (request, sender, sendResponse) {
    let clippings = [];
    chrome.storage.sync.get("list", function (result) {
        if (request.empty == "clear") {
            clippings = [];
        } else if (request.selection && result.list) {
            clippings = [...result.list, request.selection];
        } else if (result.list) {
            clippings = [...result.list];
        } else {
            clippings = [request.selection];
        }
        sendResponse({clips: clippings});
        chrome.storage.sync.set({
            list: clippings,
        });
    });
    return true
});
And with that the code should be good! But it doesn't look the best. Let's add some style to it.
Styling with CSS
The great thing about this is it's totally up to you how you choose to make this extension look. I'll walk through some of the design choices I made, but maybe you can make it look even better!
html {
    text-align: center;
    width: 300px;
}

body {
    font-family: "Trebuchet MS", Helvetica, sans-serif;
    max-width: 300px;
}

#popup-body  #output {
    text-align: center;
    font-size: 12px;
}

#popup-body  #output:hover{
    opacity: 0.6;
}
Some pretty simple adjustments here. I adjusted the default font and sizes for the text, and I also added an opacity property when your cursor hovers over text so you know you can click to delete.
Here's a quick tip: use # to access styling in div names like I did.
Appendix
I hope this project was fun and useful. There's a lot of room for improvement here too. Can you figure out how to pass in the array as an unordered list in HTML and use it to delete individual clips rather than the whole thing? The extension could certainly look a lot better too in the image and styling. Give it a shot and share your results!
Comments (0)