
Interested in this project?
Continue LearningIntroduction
Dependencies
None! This is a tutorial is meant to introduce you to git concepts.
What is Git?
Git is a version control system (VCS). A version control system is something that allows teams to manage changes to source code over time.
When Should I Use Git?
Git is used generally when collaborating with others, and is helpful even in your own projects. It allows you to look back into the edit history of your project and can even let you work on different versions of the project at the same time!
Overview
Repository: folder of stuff which git keeps track of
Commit: a snapshot of all of your files at a certain point in time
History: a series of connected commits. These connected commits describe all of the snapshots you have ever taken and their relationships. Under the hood, git keeps the history as a linked list (where each commit points to the previous commit)
Reference this powerpoint to visualize the flow as you go through the tutorial.
Basic Commands
Here's a list of commands to familiarize yourself with what you will be typing into the command line. All of them are in this form: git <command>. We will be going over what most of these do.
git init
git status
git log
git add
git commit
git push
Remember if you ever forget what one of these commands does feel free to type either man git or man git-<command> (man stands for manual)
Gitting Started
Downloading Git
Follow these instructions to download git:
Run
git --version
to check if you already have git installed
For Windows users, after downloading Git, you will have a choice to use git from the command prompt. For now, elect to not do that. After this, you should have a program called "git bash" on your computer. This is a terminal just like the command line except it supports all Unix commands. Open that program up for this tutorial.
First thing you should do is configure your name and email. This information is vital for each commit you make.
git config --global user.name "John Doe"
git config --global user.email johndoe@example.com
Create the Directory
Start by creating a new folder and going into that directory (directory and folder mean the same thing). This folder will contain all of the files you will be tracking the history of.
mkdir git-tutorial
cd git-tutorial
mkdir stands for "make directory" and cd stands for "change directory"
Next let's get some files! Copy and run these 3 commands:
curl -LJO https://raw.githubusercontent.com/TryEnlight/introGitTutorialFiles/master/README.md
curl -LJO https://raw.githubusercontent.com/TryEnlight/introGitTutorialFiles/master/test.txt
curl -LJO https://raw.githubusercontent.com/TryEnlight/introGitTutorialFiles/master/hi.txt
These commands help you download 3 files.
Great! Now you have a new directory with 3 files in it: README.md, hi.txt, and test.txt.
The Basics
Now let's start using Git.
git init
This command will initialize your git repository. Run this command:
ls -a
If this is not working for you as a windows user, remember to open up Git Bash
-a makes the ls command list all files including hidden ones.
You will see a .git folder. This is where all of your history will be stored and is called the git repository. Feel free to explore it a bit with cd .git.
You won't be making any edits to this folder.
You might wonder why we haven't created a github repository yet. We will, but an interesting thing about git is that you don't technically need one to track changes locally.
The Three 'Areas'
git status
This command will output something that looks like this:
On branch master

No commits yet

Untracked files:
  (use "git add <file>..." to include in what will be committed)
    README.md
    hi.txt
    test.txt

nothing added to commit but untracked files present (use "git add" to track)
Let's break this down. Currently you are in the working directory. This is the folder where all of your files are and any changes you make are reflected immediately.
There is something called the Staging Area or Index (I will use these terms interchangably). This is the place to which changes to files are added to so that they can be part of the next commit (read commit as snapshot).
We have already talked about the repository where all of your commits are saved. Here is how those areas are related.
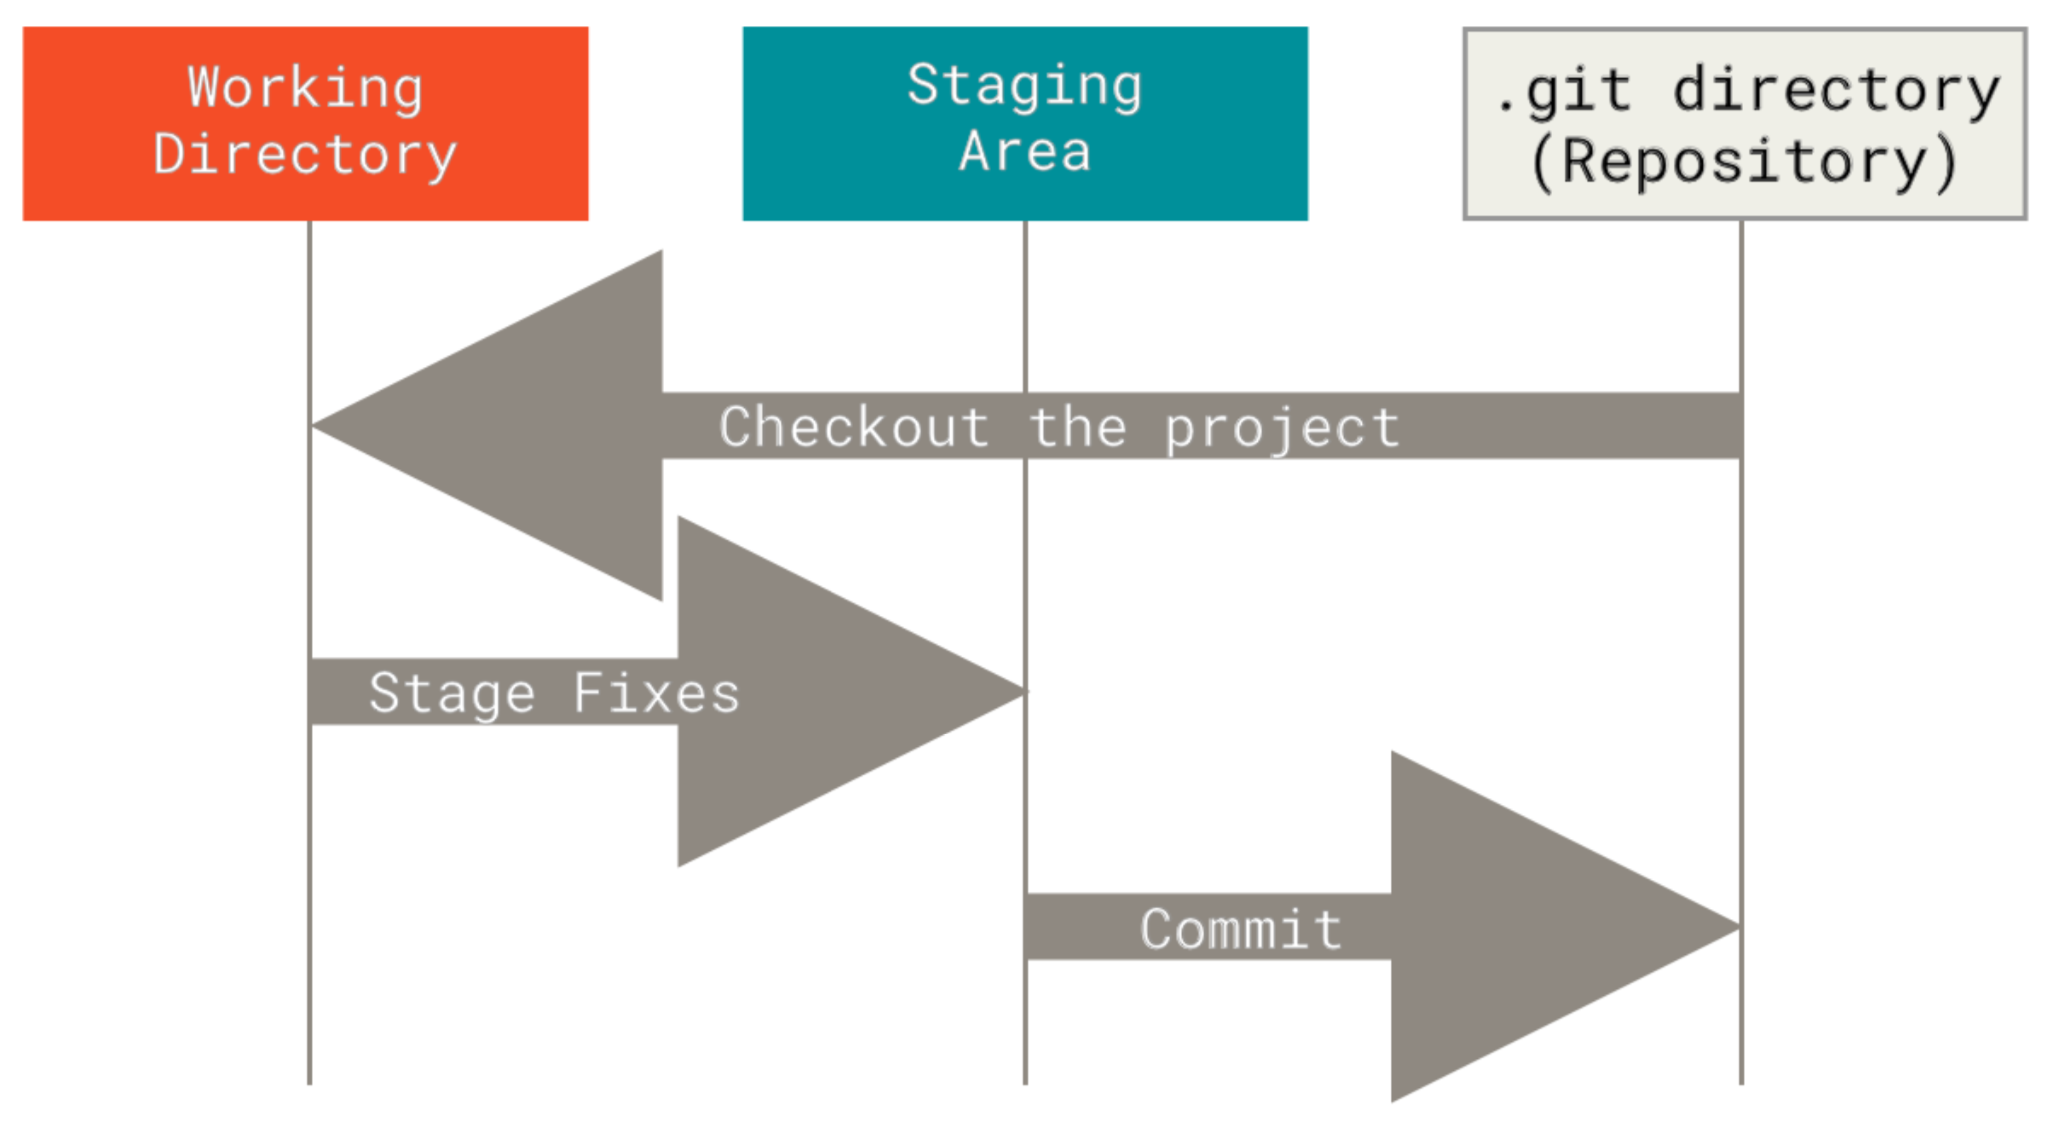 Source: Pro Git
Currently, you have 3 files in the working directory that are unstaged and untracked. Untracked and unstaged are very similar. In both cases, you have changes to your working directory that are not in the staging area.
git add hi.txt
This command puts hi.txt in the staging area. We call that staging the file.
git status
Now check out the output. Should be something like this:
On branch master

No commits yet

Changes to be committed:
  (use "git rm --cached <file>..." to unstage)
    new file:   hi.txt

Untracked files:
  (use "git add <file>..." to include in what will be committed)
    README.md
    test.txt
Now hi.txt is ready to be committed. Let's do that.
git commit -m "first commit"
Great, you just made your first commit! with the -m flag, you attached a message with your commit. Eventually you will have to write meaningful commit messages that describe what you changed to keep everyone working on a project in the loop.
Side note: If you happen to write git commit without the -m you will be taken to vim. A text editor in which you write your commit message. If that happens, write a commit message, save, and exit. This link explains how to do that.
git status
Notice that hi.txt has disappeared from the output since it hasn't been changed since the last commit.
Now add another way to say 'hello' to hi.txt to change the contents of that file. Notice what happens when you run git status again. This time hi.txt is unstaged. It shows as modified.
On branch master
Your branch is up to date with 'origin/master'.

Changes not staged for commit:
  (use "git add <file>..." to update what will be committed)
  (use "git restore <file>..." to discard changes in working directory)
    modified:   hi.txt

no changes added to commit (use "git add" and/or "git commit -a")
Now try adding and committing your change to hi.txt.
Solution
git add hi.txt
git commit -m "add another hello to hi.txt"
Here is an overview of the different states of your files. As you can see, git add can bring both an untracked file and a modified file to the staging area as we did with hi.txt.
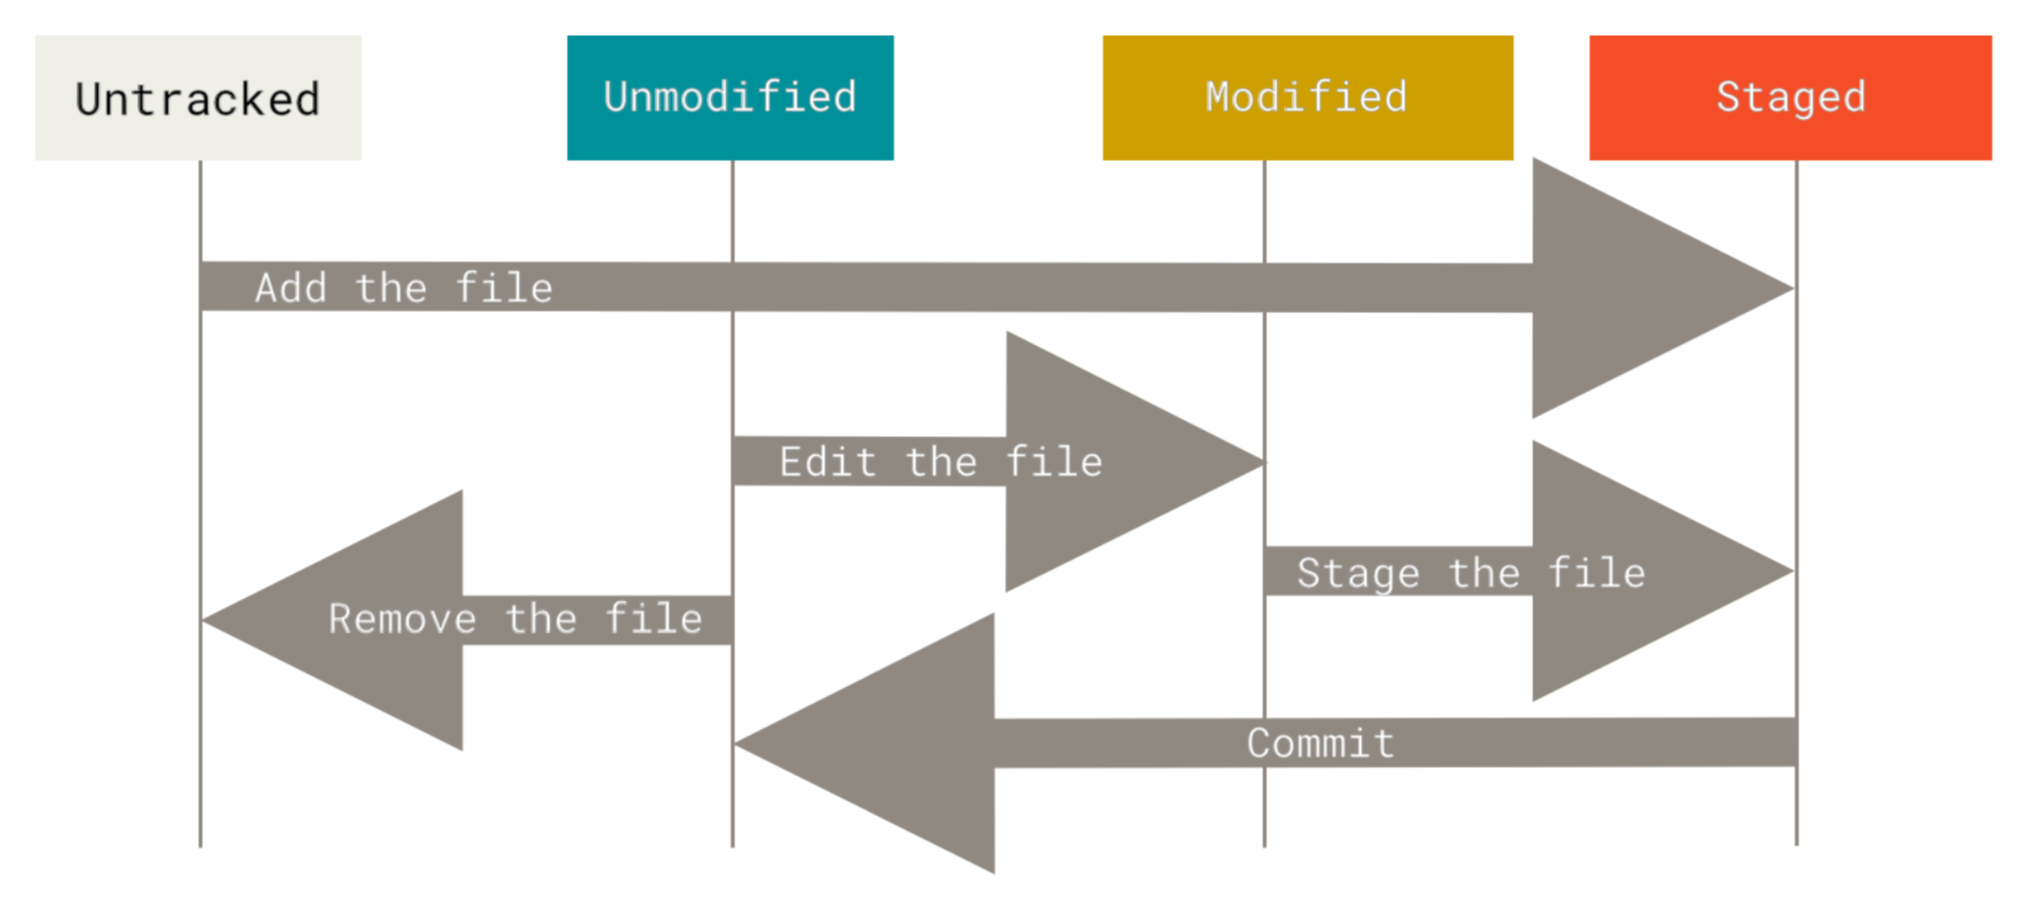 Source: Pro Git
This diagram has a lot and it's ok if it all doesn't make sense just yet. Take a moment to look at it.
Let's commit everything else now:
git add --all
git commit -m "commit the rest of the files"
See all of your previous commits with:
git log
Notice that each commit has a long string of numbers and letters with it. That is the commit's SHA-1 hash. In the future you will use these hashes to execute other git commands.
Also notice the author (from when you git configured it), and your commit message.
Press q to exit.
Nice job! Keep going to learn how to work with github.com.
What is GitHub?
So far we have talked a little about how Git is structured and the basics of the working directory, staging area, and git repository. Now, its time to talk about the remote repository.
Every person that collaborates on a project has the full history of commits and all of the code. So the question is: how do we compare the versions of the repository that each person has? By the end of this tutorial you will understand everything behind this image:
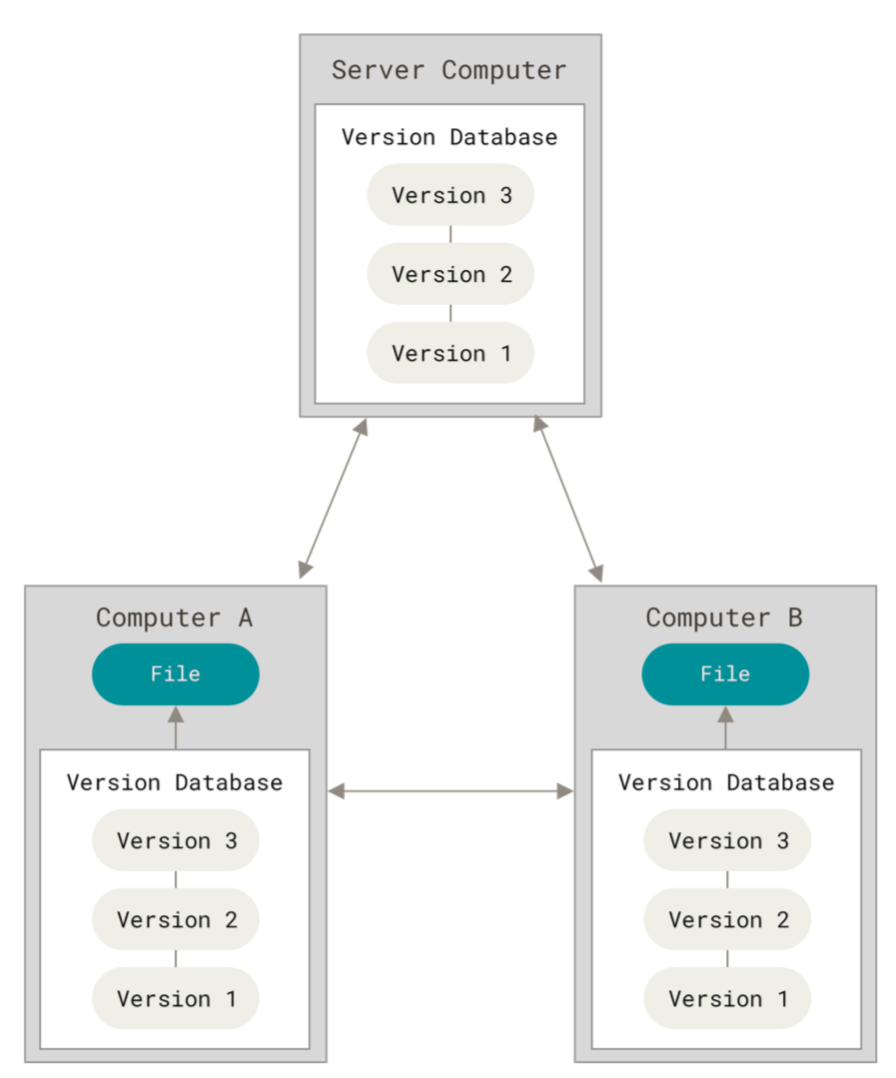 Source: Pro Git
The remote repository here is represented by the Server Computer. This will typically be on github.com. Each of the Computers represents a person working on the project.
Create and Connect a Remote Repository
If you don't have one already, create a github account. This is the most commonly used website for remote repositories.
Click New and name the repository Git Starter Tutorial. Set the access level to Public so that anyone can see the repository and you can choose who can commit. Do not initialize with a README.
Great, now you will be presented with a screen with a long url on it. We will be using the https link today.
Now let's connect the remote repository with your local repository.
git remote add origin <https link goes here>
replace <https link goes here> with the link from your remote repo (short for repository).
You now have a remote repo named 'origin'! You will refer to the GitHub repo as 'origin' in your commands.
Our First Push
git push origin master
It might prompt you for your github credentials and then whoosh! Your code is on the internet.
You just pushed to the master branch of the remote repository.
Think of branches as a tree made of dots. Each dot is connected to the last dot with a connection. Each dot is a commit. The master branch is the main trunk, and other branches can spawn from the master branch and then get merged back in.
Like so:
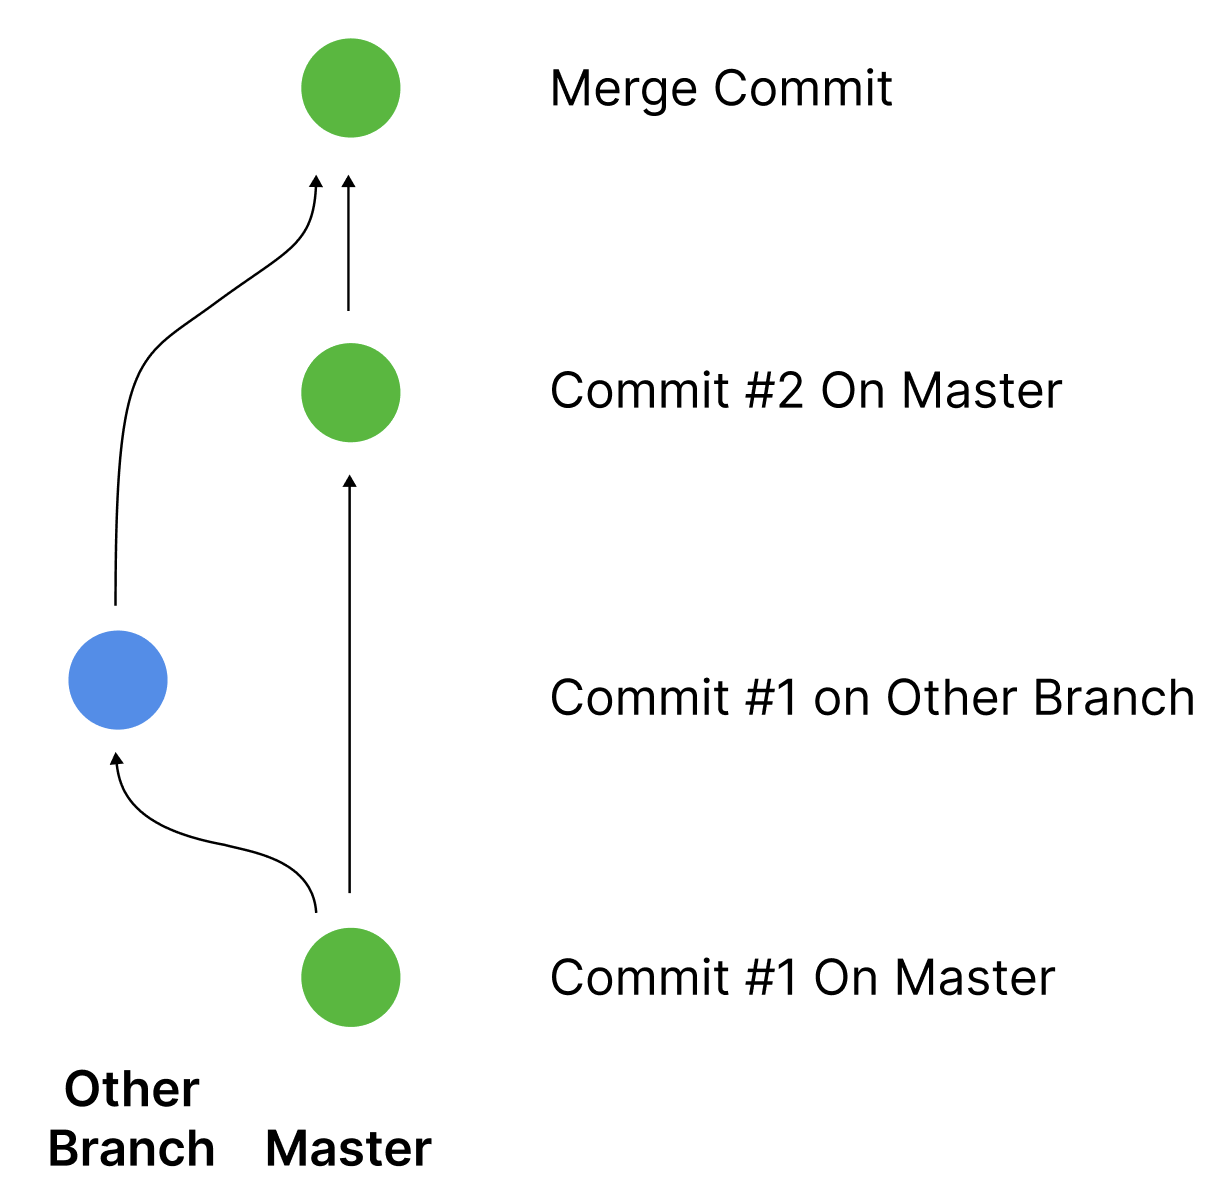
These are useful because you might want to work on an experimental feature, but not create bugs for everyone else.
There are two main operations you will be doing with remote repositories. git pull and git push.
If another person pushes changes to the remote repository that you don't have yet. You can git pull and their changes will get merged with yours.
Branches and Merge Conflicts
What happens when there is a merge conflict? This would happen when you and another person have edited the same part of the code in different ways. In more technical language, this means that when you git pull, the changes that are on the remote repository conflict with the changes you have made in your working directory.
Another way conflicts happen is when you try to merge two local branches that have conflicting changes. (Local refers to anything that is on your computer) Under the hood, these two cases are actually almost the same!
Let's create a branch
git branch feat-53
git checkout feat-53
git branch creates the branch named feat-53 and git checkout switches to the branch so now your working directory will reflect the feat-53 branch.
Currently there are two pointers
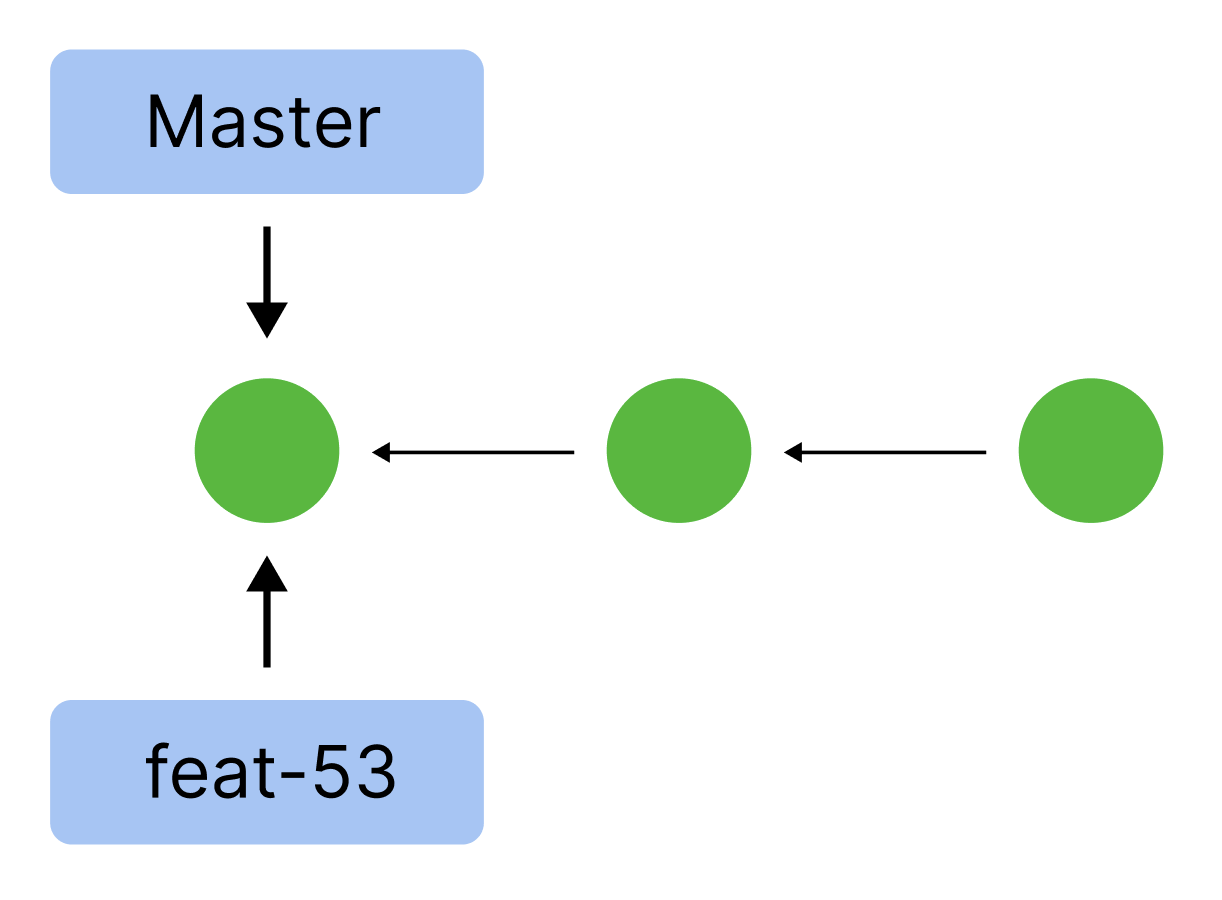 We are following the pointer for feat-53.
Now in test.txt, add a number to the end of the first line so it becomes "Testing 1 2 3 4".
Stage, commit your change, and push it to origin feat-53.
Solution
git add test.txt
git commit -m "add a number to test.txt"
git push origin feat-53
Awesome! The output that you should have gotten from your git push will tell you that you created a new branch. But didn't you already create the branch? Yes, but now that new branch you created locally is there on the remote repository. You can go to github.com to check. If you're wondering what a pull request is, we will talk about that in another tutorial.
After committing, the pointers now look like this:
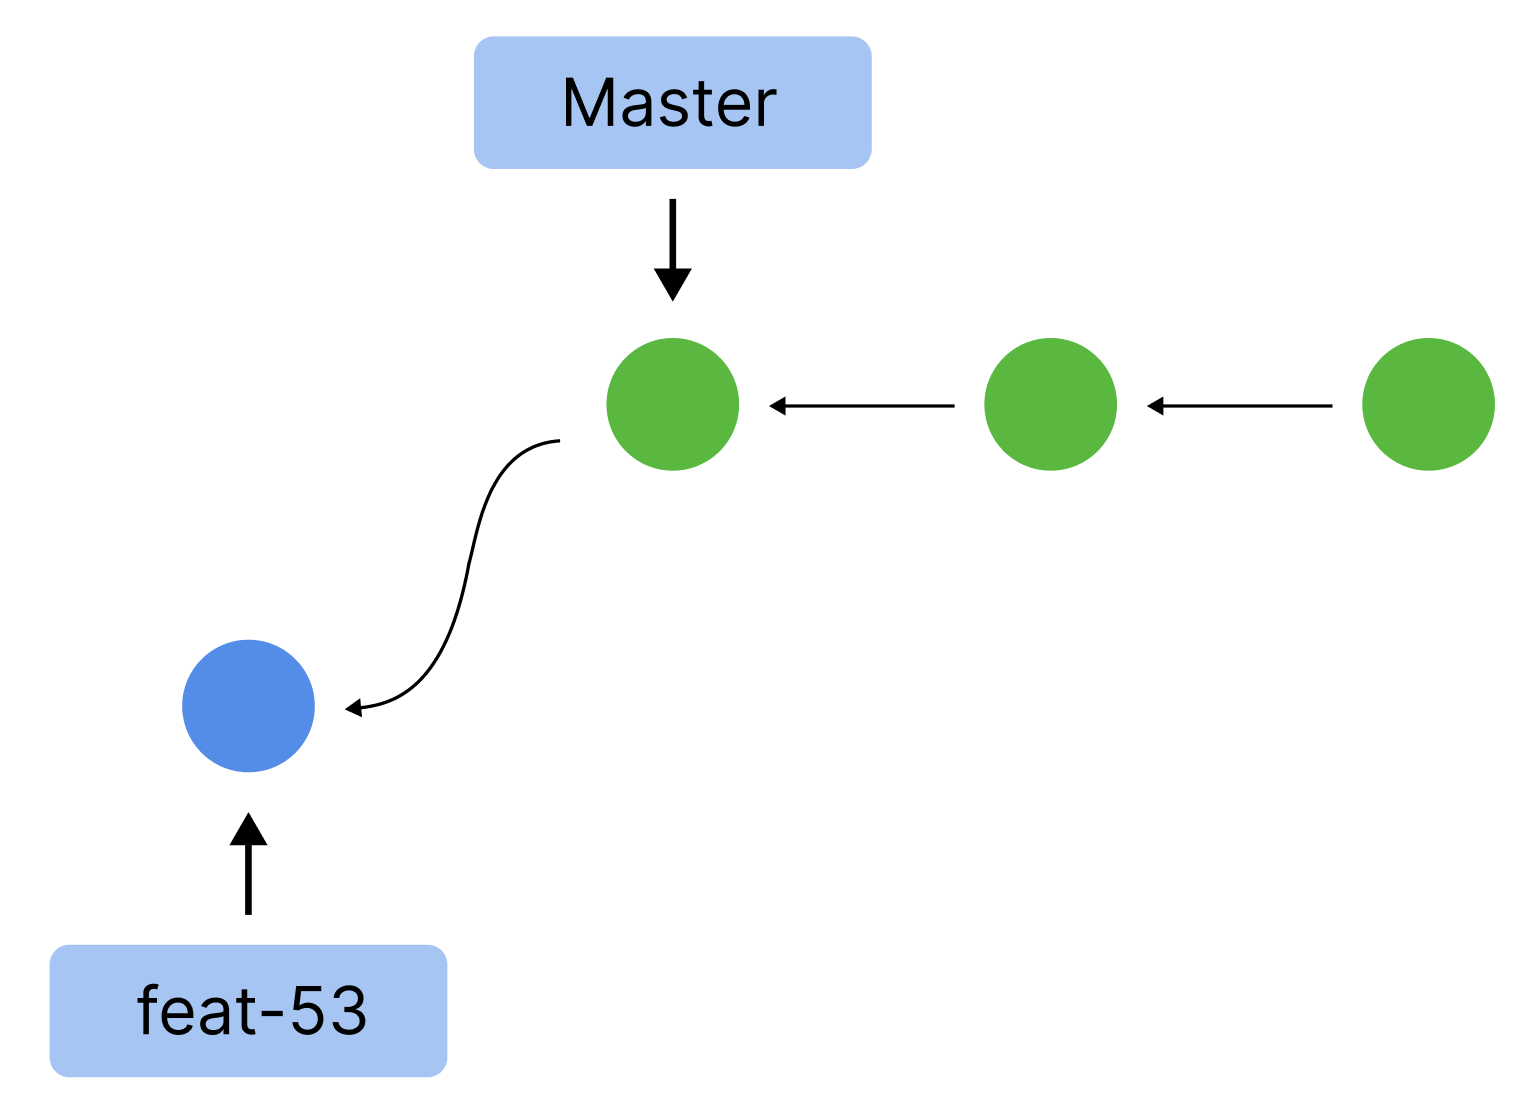
Side note: the commit that the pointer of your branch is pointing to is called the HEAD (all caps).
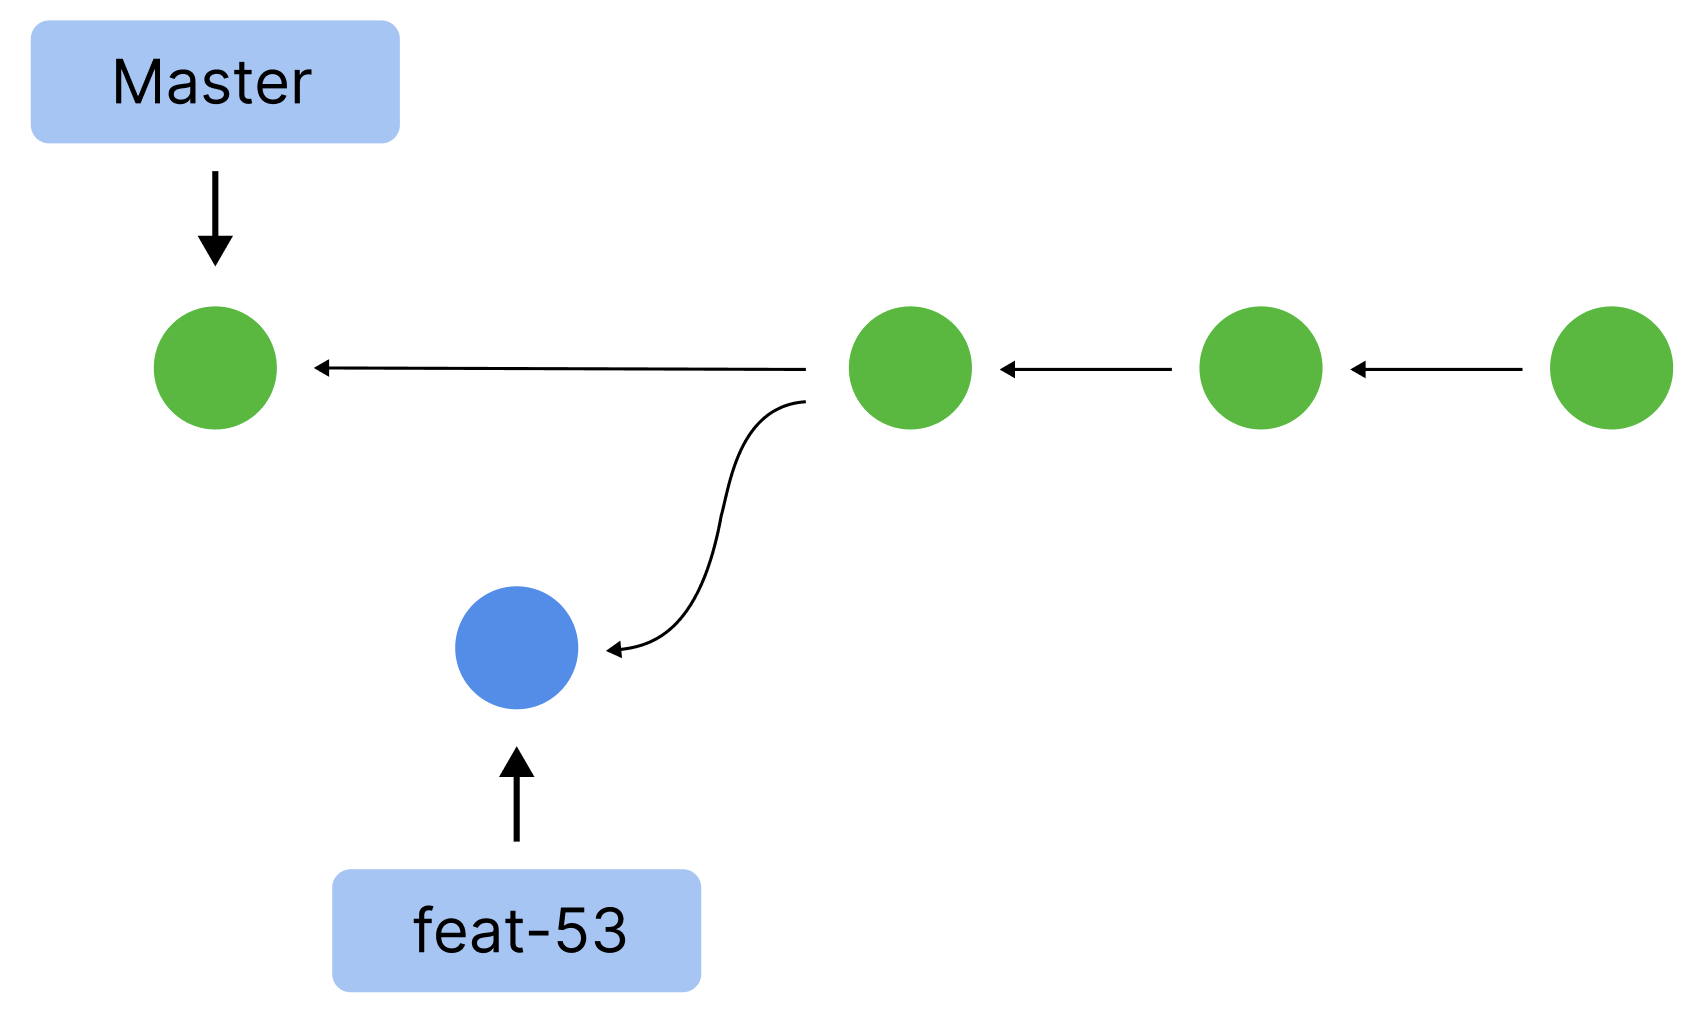
Now lets switch back to the master branch
git checkout master
Now if you look at test.txt, you will notice that your change is gone. That is because you are now on the commit that the "master" pointer points to.
Remove the line "Testing 1 2 3" from test.txt, commit it, and push it.
Solution
git add test.txt
git commit -m "remove testing line from test.txt"
git push origin master
Great, now your history looks like this:
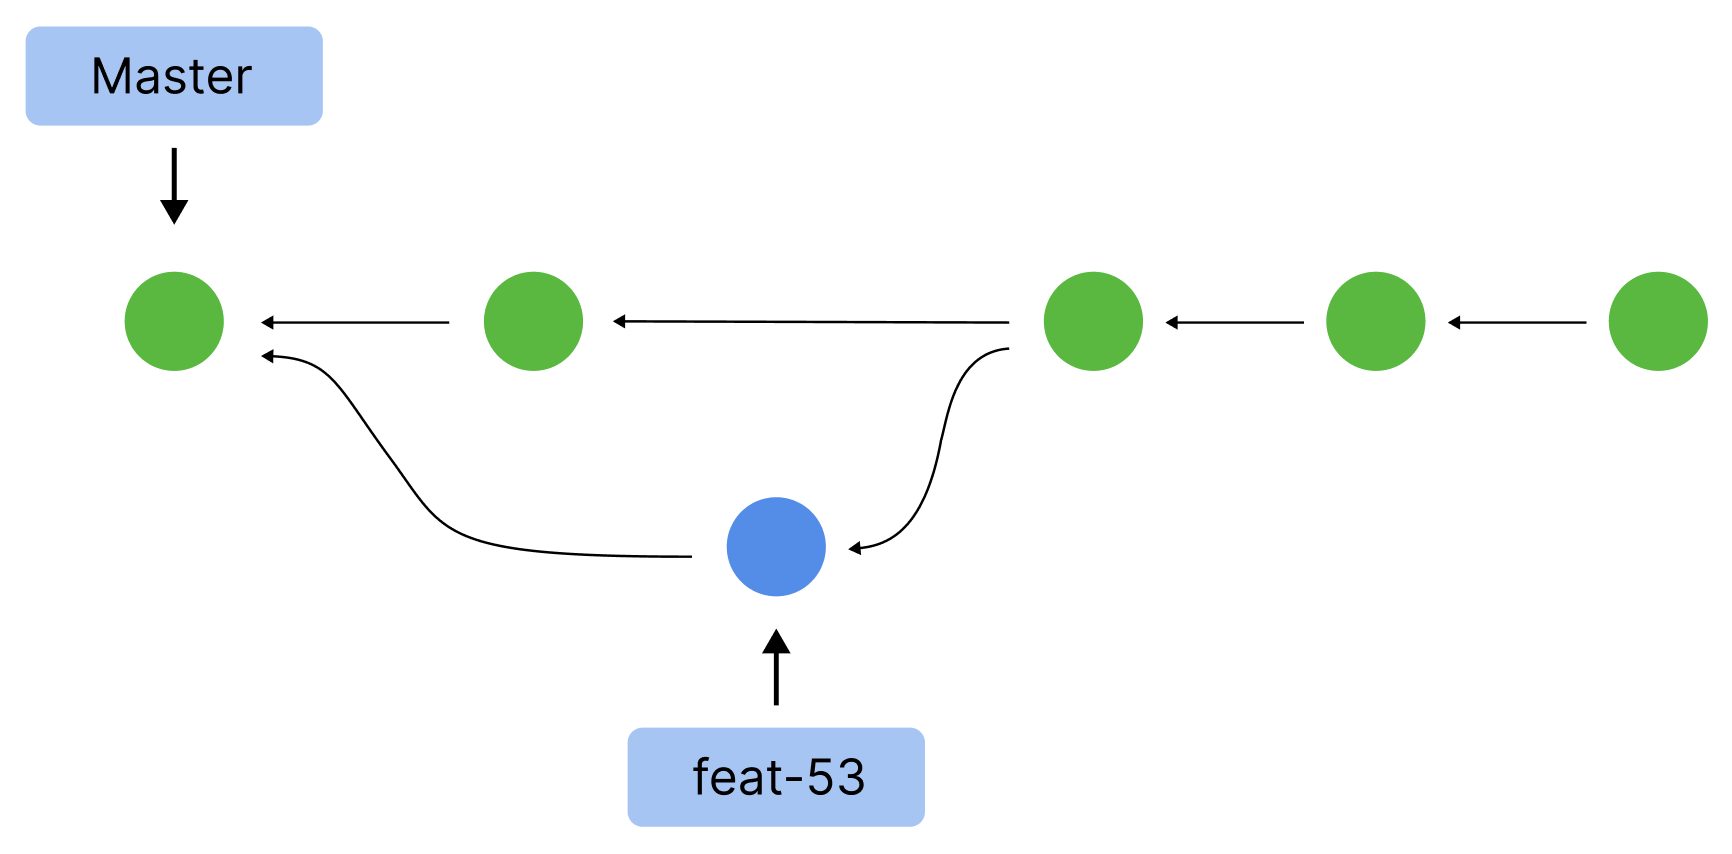
Merging
Let's try to merge feat-53 into master. We are currently on the master branch so we can merge feat-53 into it.
git merge feat-53
Looks like there's a conflict! Git cannot auto-merge because both master and feat-53 have edited the same line and are now trying to merge.
Open up test.txt (where the conflict is). You should see this:
<<<<<<< HEAD
=======
Testing 1 2 3 4
>>>>>>> feat-53
Git is cool
This shows that at your current HEAD (the tip of the master branch), there is nothing. However, in the branch feat-53 there is "Testing 1 2 3 4". The two versions of the change are separated by ======= and each version is labeled with <<<<<<< for your current version, and >>>>>>> for the incoming version.
To fix the conflict you must remove the sideways carets and the equal signs and replace it with the version that we want to keep.
Lets keep the feat-53 branch version.
test.txt:
Testing 1 2 3 4
Git is cool
Now to complete the merge, we must add the file and commit it.
Solution
git add test.txt
git commit -m "merge and keep feat-53"
You have successfully navigated a merge conflict! Your history looks like this now:
Delete the Branch
We no longer need the feat-53 branch, so lets delete that as well. Deleting the branch only removes the pointer, not the history of the branch.
git branch -d feat-53
git push origin -d feat-53
The first command deleted your local copy of the feat-53 branch; the second command deleted the remote respository's copy of the feat-53 branch. Be wary of deleting a remote copy of a branch because others might still be working on it.
Side note: if you deleted your local branch and pushed, it would not delete the remote branch.
Wrap Up
What if you wanted to access this repository from another computer? What if you wanted to create another copy of this repository? What if you wanted to make a copy of someone else's repository? Every single one of these questions is answered by this command:
git clone <https link here>
Feel free to play around with it! Try making a copy of your repository somewhere else on your computer. You will use this command a lot when building off other people's projects.
You learned about branches, merging, merge conflicts, remote repositories, cloning, and the HEAD. You should now be able to collaborate with others on a project! However, there is much more to Git! Stay tuned for .gitignores and hooks.
Comments (0)