Interested in this project?
Continue LearningIntroduction
What is React?
React is a JavaScript library for creating user interfaces. It is open-source and maintained by Facebook. With React.js, it's super easy to build and maintain complex applications. We'll get a glimpse of the power of React.js through building a simple to-do app.
When would I use React?
React is ideal when you are building an application that uses a lot of state (data) or involves a lot of DOM manipulation. DOM stands for Document Object Model, which is the programming interface for HTML elements on webpages. It's basically the data structure of a webpage in the form of a tree.
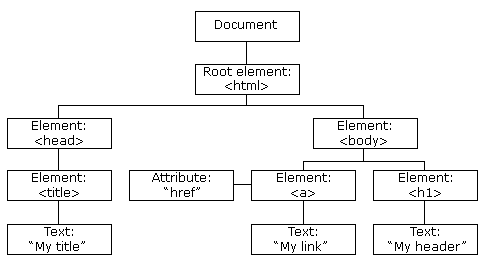 Source: W3 Schools
Instead of manually injecting HTML at different nodes in JavaScript (ex: by targeting an HTML element by using document.getElementById), React and other JavaScript frameworks allow us to build HTML elements using bits of state or chunks of data.
Not only is the development process easier (and more efficient), React is easily maintainable as everything is broken down into individual components that are extensible and easy to read.
How React Works
React works by creating a "virtual" version of the elements on the page (also known as the virtual DOM). It is a representation of a user interface that is kept in memory and synced (or reacts!) with the “real” DOM. Therefore, you're able to tell React what state you want the user interface to be in, and it will update the "real" DOM to make sure it matches that state. Essentially, React.js is another layer of abstraction that removes attribute manipulation (ex: document.getElementById(), event handling (ex: element.addEventListener()), and manual DOM updating that is required if we were only using vanilla JavaScript.
React just makes everything easier — and you'll see what I mean very soon!
Build a To-do List App
Dependencies
Before you do this tutorial, it is reccomended that you have a solid understanding of HTML, CSS, and JS. Feel free to do some beginner Web Development tutorials beforehand. There's also a to-do app tutorial in HTML/CSS/JS that can be found here. If you do that tutorial first, you'll understand the differences of React in terms of development experience and efficiency.
Getting Started
To get started, you'll need to make sure you have Node >= 8.10 and npm >= 5.6 on your machine. You can install these packages for macOS, Windows, or Linux here. To bootstrap a new react project, we can use create-react-app to make our lives easier. The following command will generate and configure all of the files, folders, and libraries we need:
npx create-react-app to-do-app
Great! Now, let's cd into to-do-app and run npm start to start a development server.
cd to-do-app
npm start
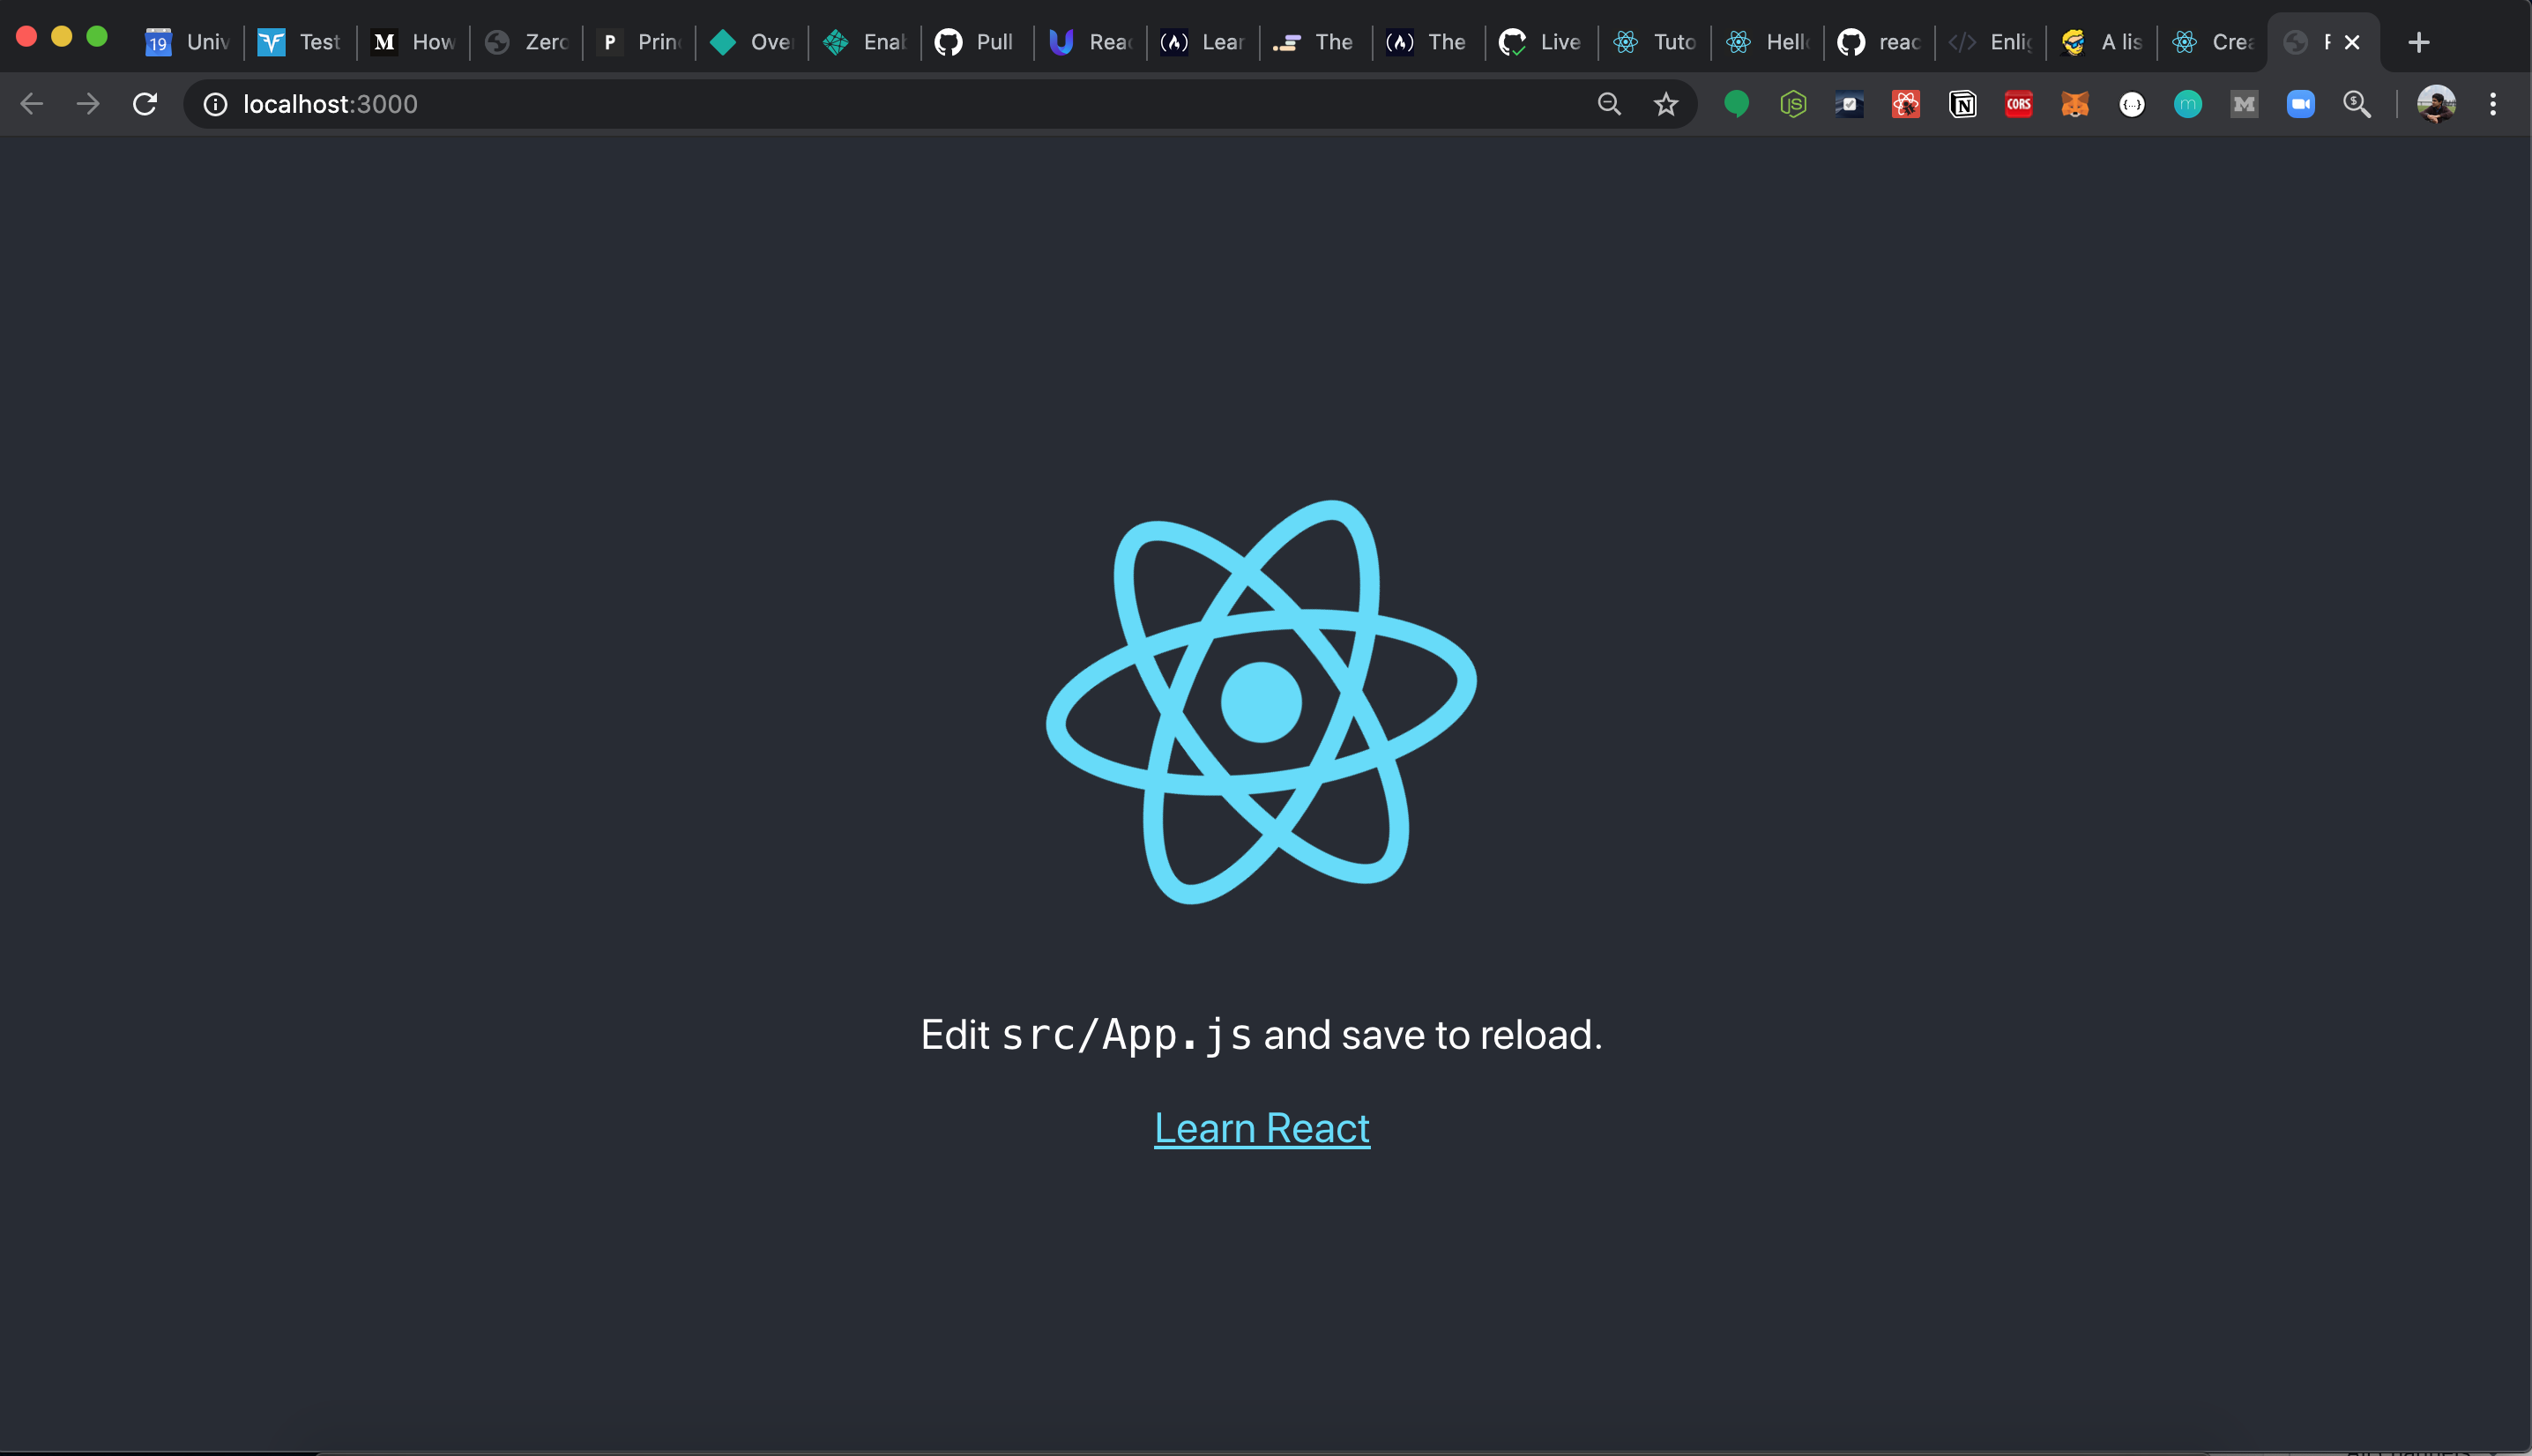
If you head over to [localhost:3000](http://localhost:3000) in your browser, you should see your first React application!
Understanding File Structure
Within our directory, we have a few directories and files:
node_modules: the directory where our external libraries and dependencies are storedpackage.json: our configuration file which contains our app's metadata and dependenciespublic: the directory that contains our "production" code and assets that aren't compiled dynamically (images, etc.)index.html: the bundled scripts from React will be placed in the<body>tag of this file (the root node)
src: the source code of our project including React components, styles, and dynamic assetsApp.js: a React componentindex.js: our root file where the<App/>component is rendered.App.css: styles for the<App/>componentindex.css: global styles for our application
There are a few other files, such as serviceWorker.js, but they aren't within the scope of this tutorial. Service workers allow you to create a progressive web app that can support offline experiences and work in the background. In your code, create-react-app also supports setting up tests (setupTests.js) for your app, but we won't be working with them at the moment.
Hello World
This is what your App.js file should look like:
import React from "react";
import logo from "./logo.svg";
import "./App.css";

function App() {
  return (
    <div className="App">
      <header className="App-header">
        <img src={logo} className="App-logo" alt="logo" />
        <p>
          Edit <code>src/App.js</code> and save to reload.
        </p>
        <a
          className="App-link"
          href="https://reactjs.org"
          target="_blank"
          rel="noopener noreferrer"
        >
          Learn React
        </a>
      </header>
    </div>
  );
}

export default App;
This is a lot — and it's quite confusing! Let's clean it up and make it more simple. Remove everything in between <div className="App"> and </div> and add in a <h1> tag with the text Hello World. Let's also delete all the styling within App.css to start fresh.
import React from "react";
import "./App.css";

function App() {
  return (
    <div className="App">
      <h1>Hello World</h1>
    </div>
  );
}

export default App;
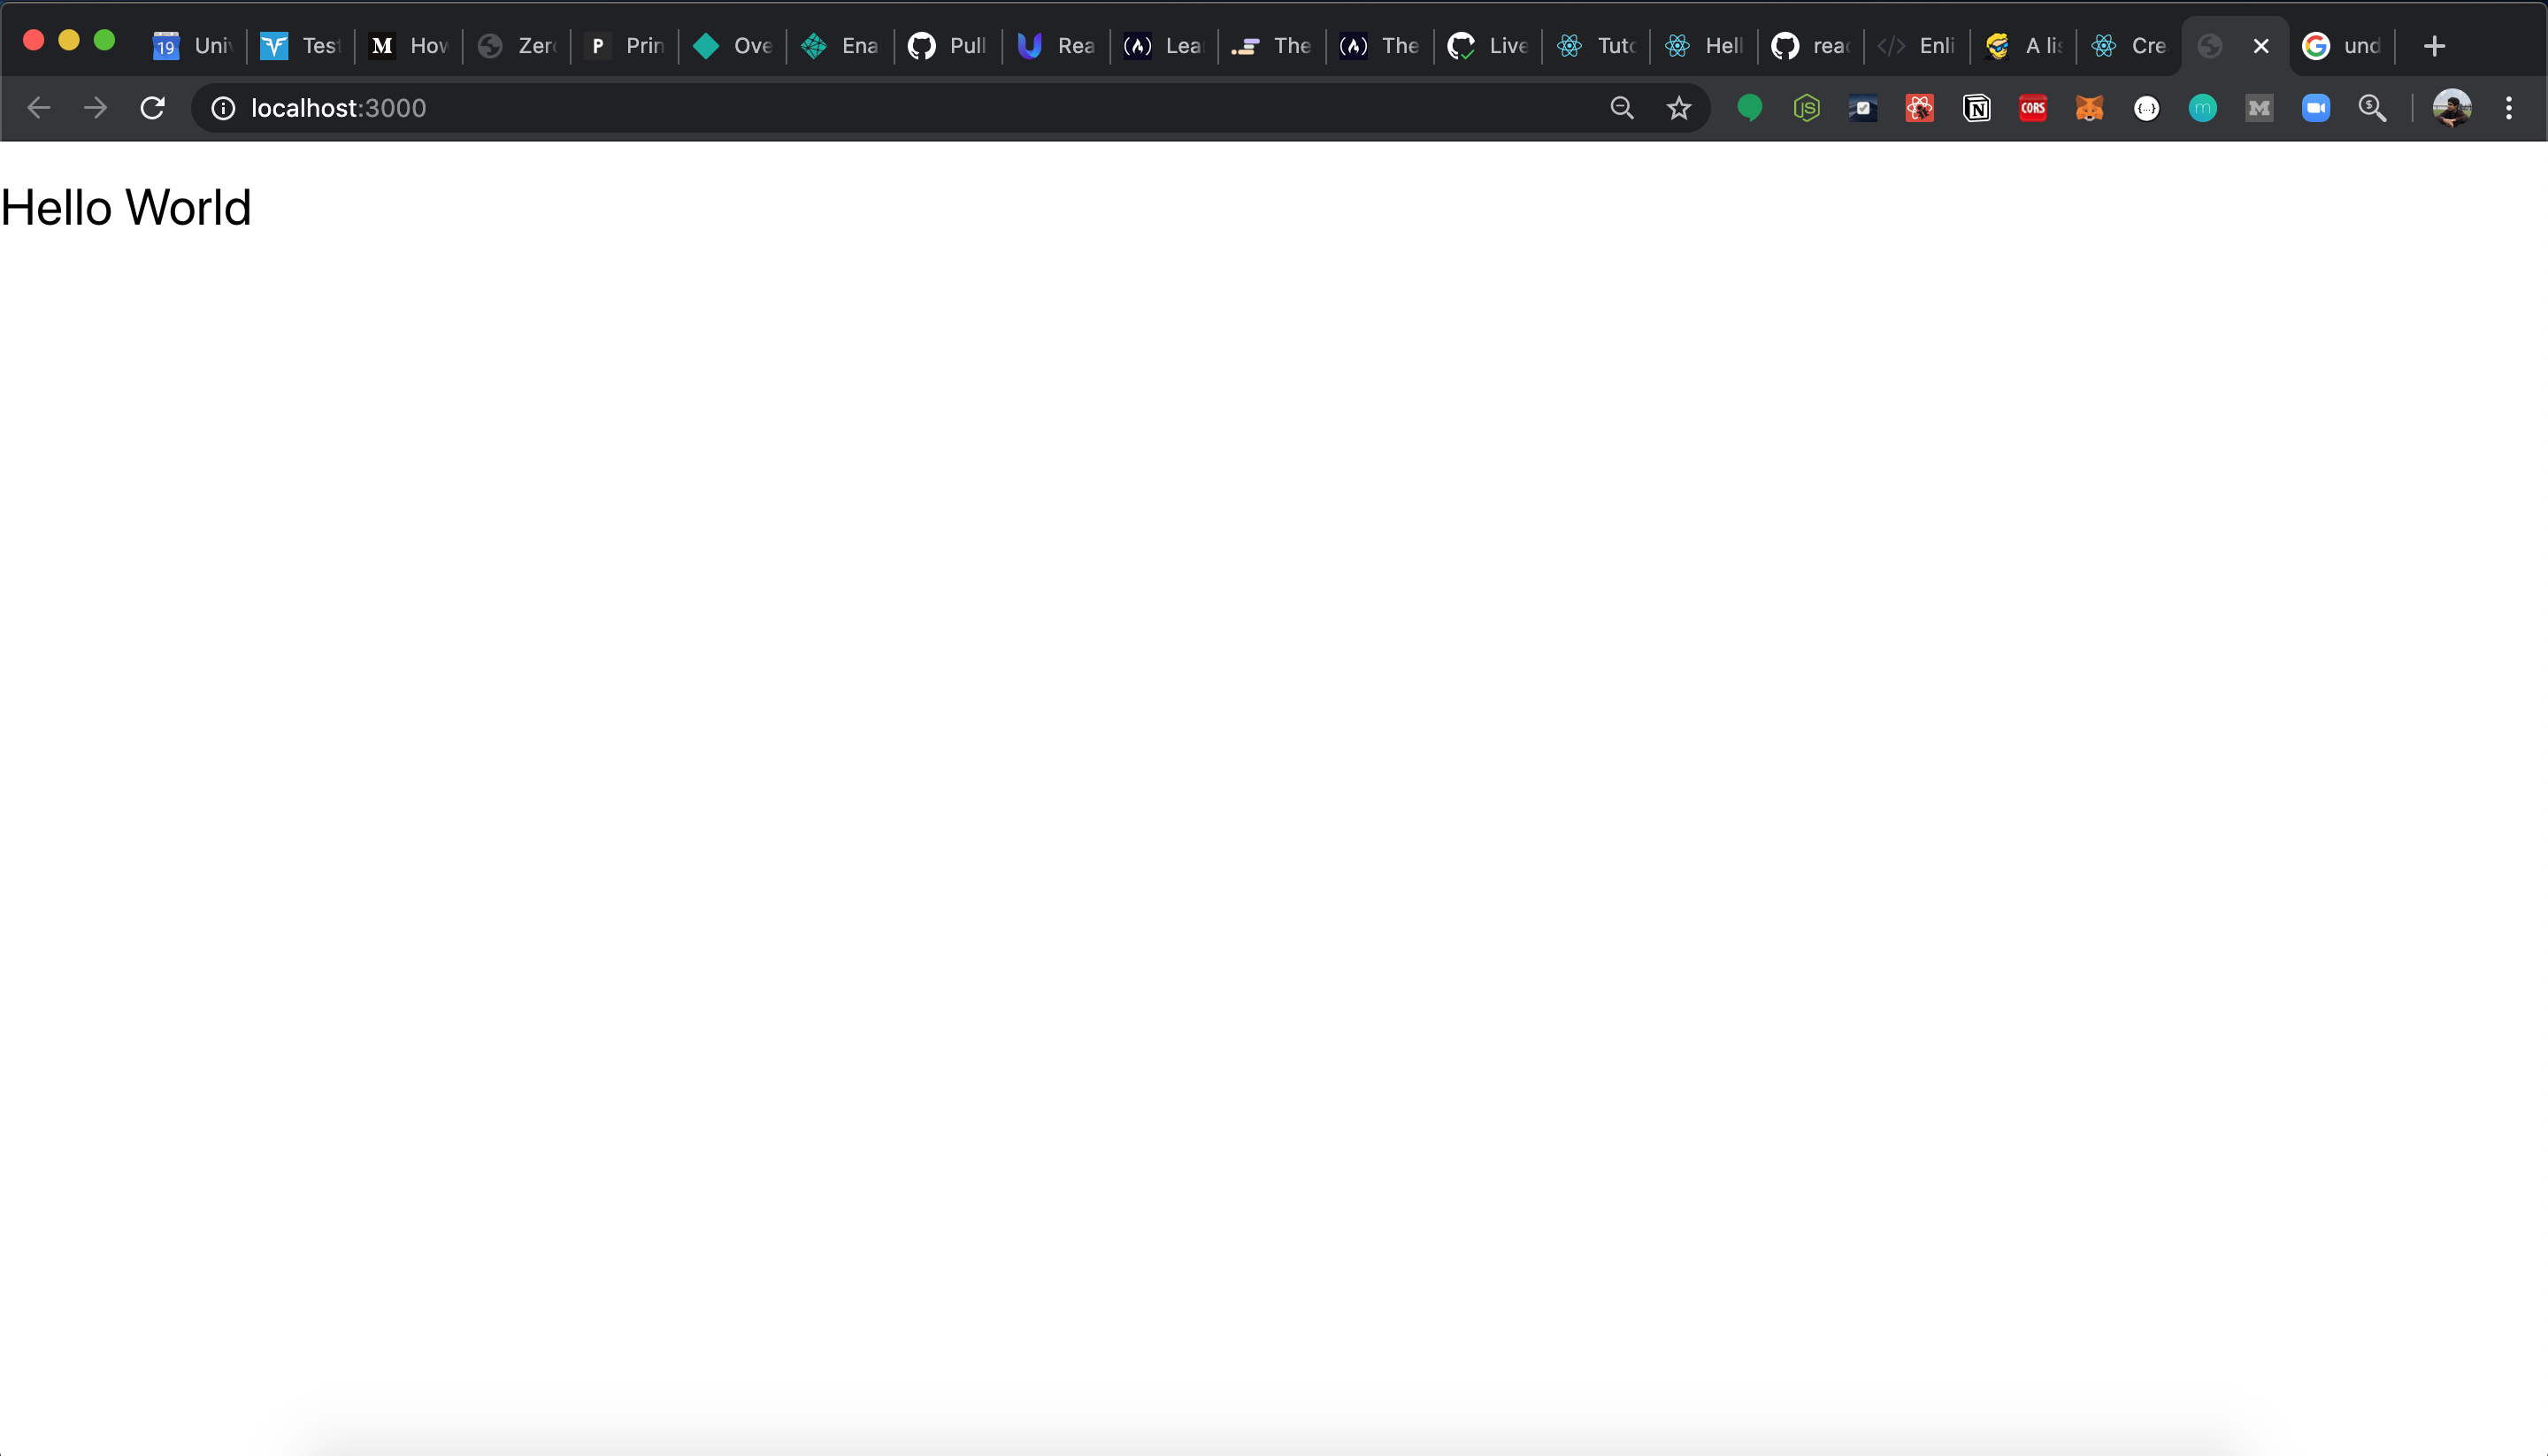
If you head back to localhost:3000, you should see your new application with the changes you've made reflected immediately thanks to hot reloading.
Note that App is a functional component in React, which means that it is “stateless” and simply accepts data and displays it in some form. This is opposed to using a class-based component, which is stateful and allows you to use React lifecycle methods like componentDidMount. Lifecycle methods are functions that are called at certain times in the rendering process of React components. This may be confusing at first — but don't worry about it! We'll walk you through everything you need to know to build your own React app!
Creating the To-do List
We'll first start by building a functional component in a new file called ToDo.js. For this tutorial, we'll be using something called hooks, which are a new addition to React that allow use to use state and other React features in functional components. They make code a lot easier to read and are more intuitive in my opinion. Here is what our file should look like.
import React from "react";

function TodosComponent() {
  return (
    <div>
      <h1>Hello from our Todo component!</h1>
    </div>
  );
}

export default TodosComponent;
Great, now we have a new functional component! All we are doing here is adding displaying an <h1> tag for now.
Let's think about the functionality we need in our simple to-do application:
- display a list of existing to-dos
- allow users to input new to-dos
- allow users to mark a to-do as completed
- allow users to remove a to-do
Creating the component
We'll be implementing this functionality by using event listeners and several helper functions. We're also going to need to store this data somewhere and use state. Therefore, let's use the useState hook, which we can import at the top.
import React, { useState } from "react";

function TodosComponent() {
  return (
    <div>
      <h1>Hello from our Todo component!</h1>
    </div>
  );
}

export default TodosComponent;
Before we move on, we just need to make sure that we import this component in our App.js file. We can go back into App.js and import it like this:
import ToDo from "./ToDo"
and then render it like this within App.js (use <Todo/>)
import React from 'react';
import './App.css';
import ToDo from "./ToDo"

function App() {
  return (
    <div className="App">
      <ToDo/>
    </div>
  );
}

export default App;
Next, we'll need to define two variables in state: (1) to store the current todo the user is typing and (2) to store all the todos entered. For the todos that are entered, we can make an array that stores the task content (todo) and a boolean variable isCompleted indicating whether it has been completed or not.
import React, { useState } from "react";

function TodosComponent() {
  const [currentTodo, setCurrentTodo] = useState("");
  const [todos, setTodos] = useState([
    {
      todo: "bake a cake",
      isCompleted: true
    },
    {
      todo: "go for a walk",
      isCompleted: false
    },
    {
      todo: "contribute a web development tutorial on Enlight",
      isCompleted: false
    }
  ]);

  return (
    <div>
      <h1>Hello from our Todo component!</h1>
    </div>
  );
}

export default TodosComponent;
As you can see above, I just added some sample to-dos to state as an example. We can make this an empty array later, but let's see how our app looks if we quickly map through the array and display the data. It would also be helpful to see the total number of items in the to-do list, so let's add a conditional render to show the number of items only if there is more than one todo in the list.
import React, { useState } from "react";

function TodosComponent() {
  const [currentTodo, setCurrentTodo] = useState("");
  const [todos, setTodos] = useState([
    {
      todo: "bake a cake",
      isCompleted: true
    },
    {
      todo: "go for a walk",
      isCompleted: false
    },
    {
      todo: "contribute a web development tutorial on Enlight",
      isCompleted: false
    }
  ]);

  return (
    <div>
      {todos.map((todo, index) => (
        <p>{todo.todo}</p>
      ))}
      {todos.length > 0 && `${todos.length} items`}
    </div>
  );
}
export default TodosComponent;
Before you preview, feel free to center your application and add some padding by styling the .App class in App.css.
.App {
  max-width: 50em;
  margin: 0 auto;
  padding: 32px;
}
This is what our app should look like:
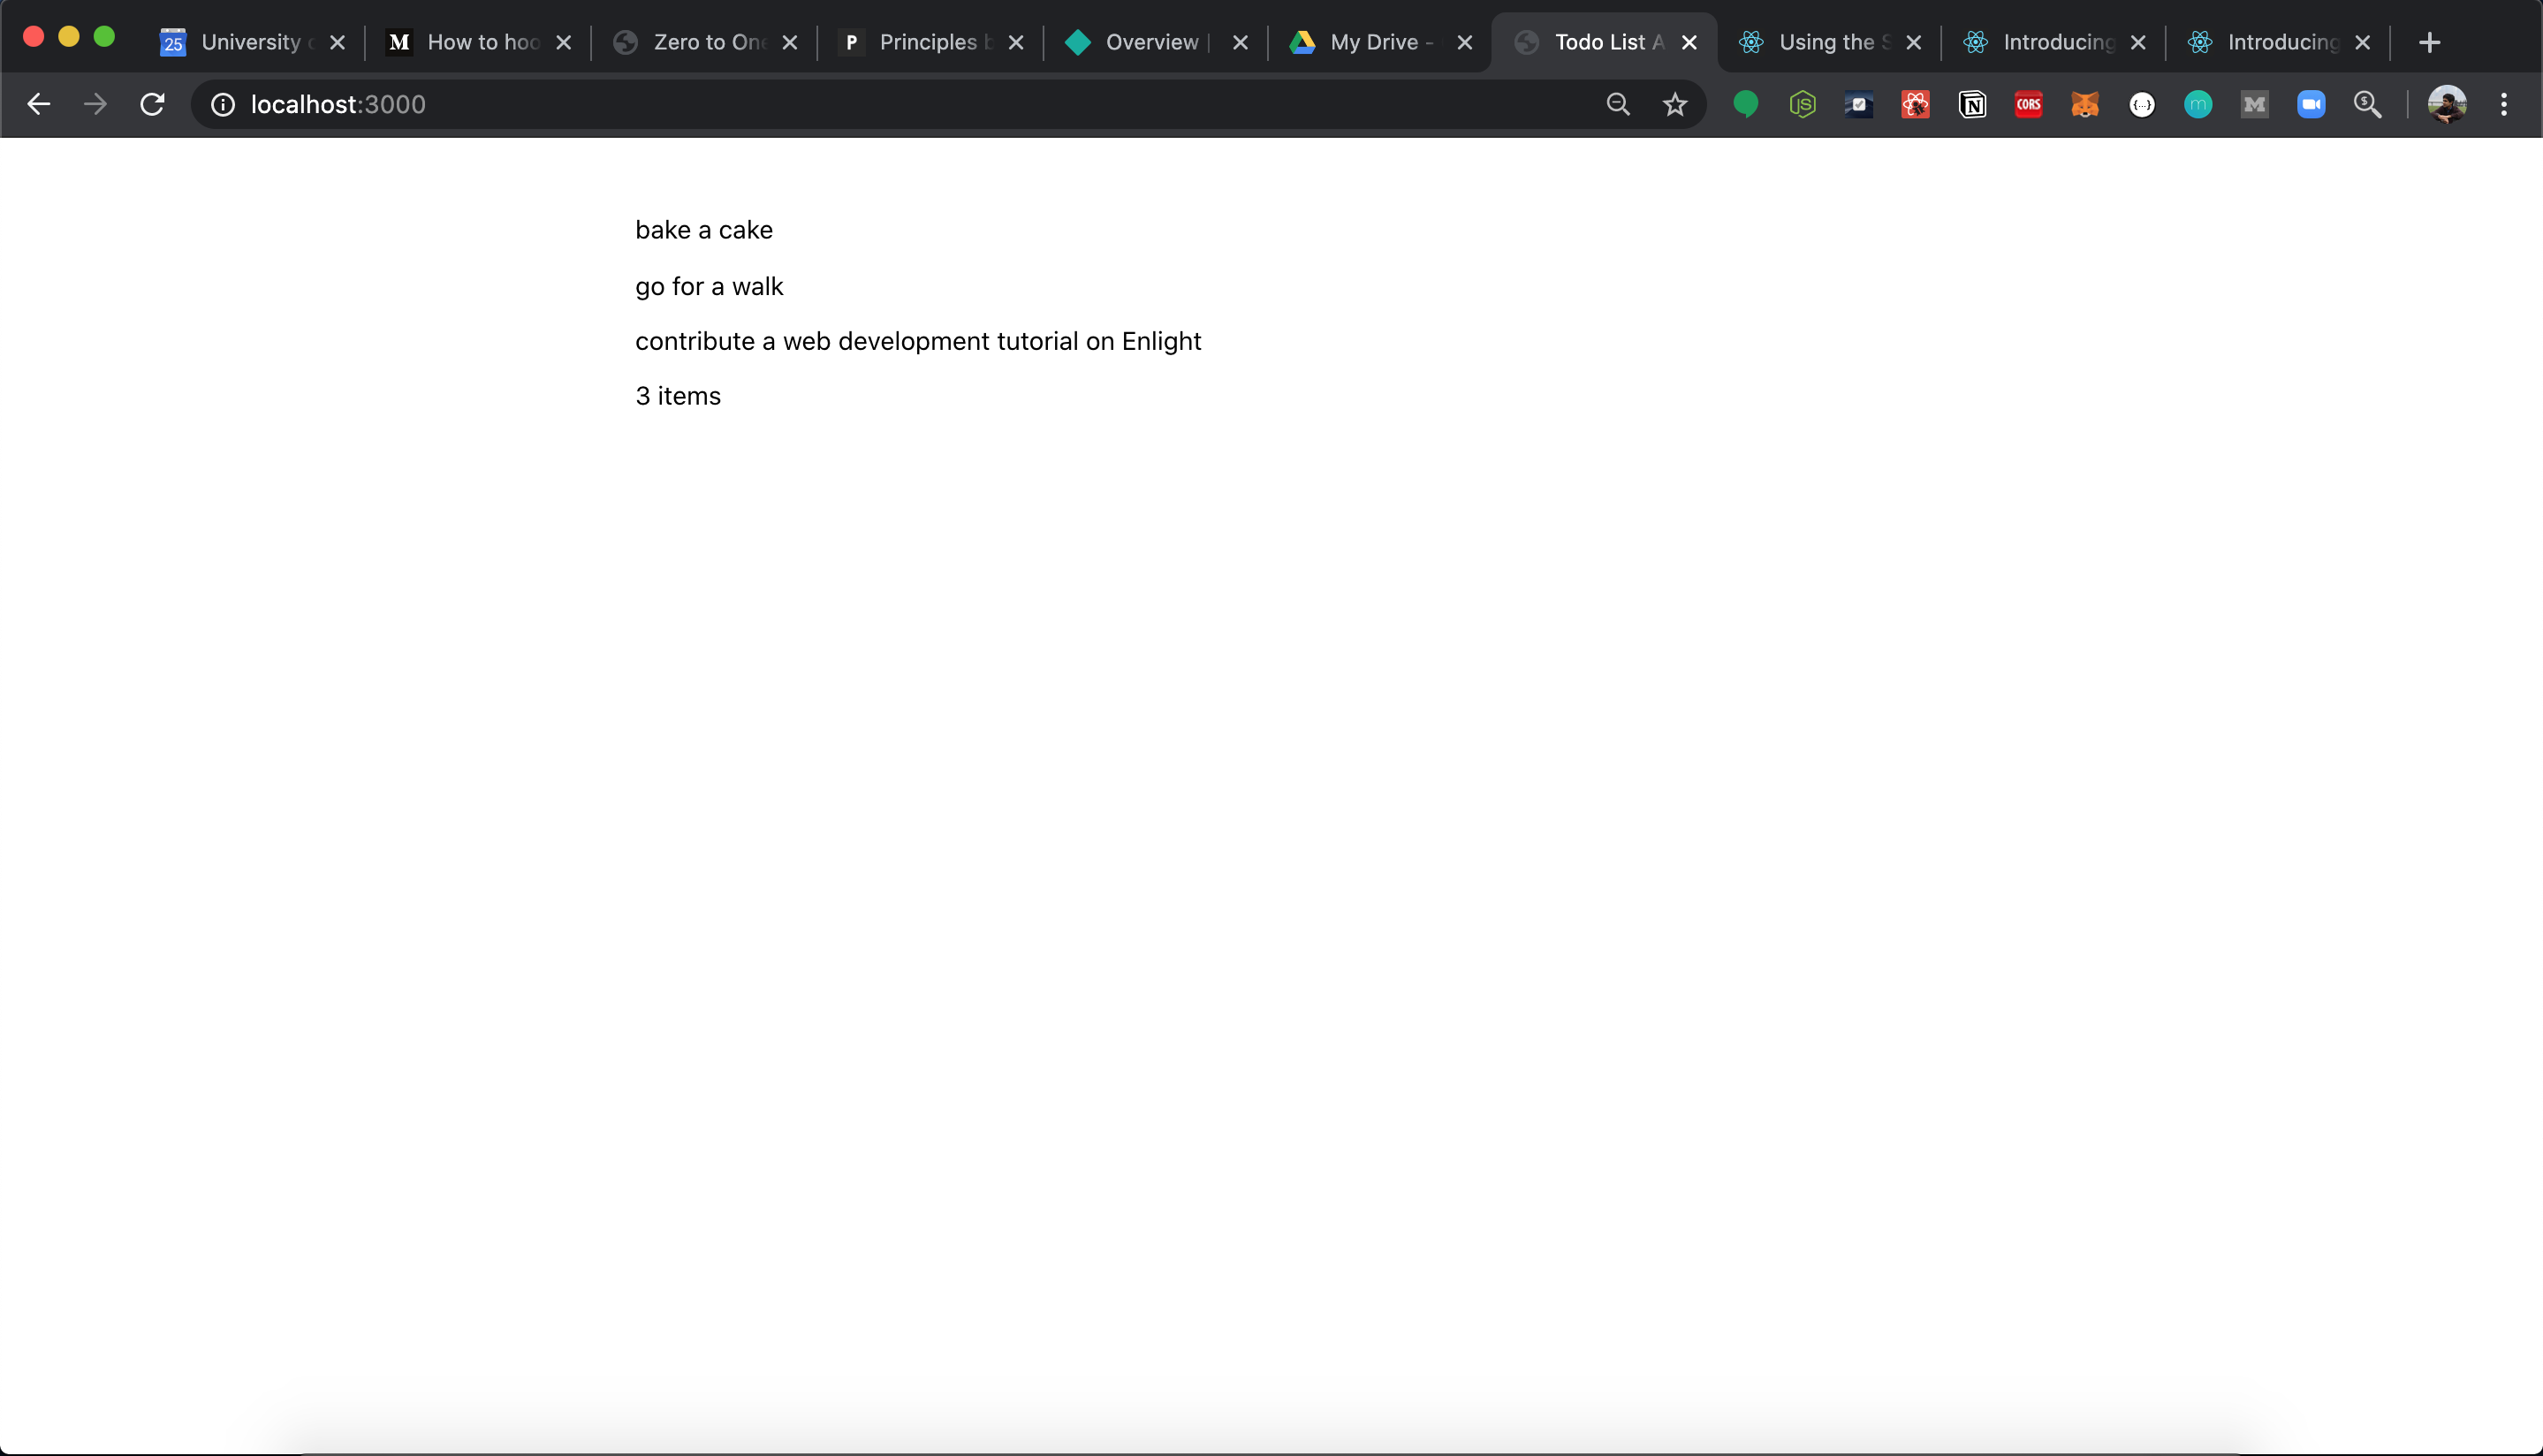
Awesome — so we're now displaying data from state! The todos are rendered from the default array we specified above and displayed on screen.
Adding input
Now that we're able to display data, how about adding data?
Let's add an <input/> tag in our component's render function and store its value in the currentTodo variable we made earlier when defining our state variables. We can do this by using an onChange event listener and setting the value of currentTodo to whatever has been inputted thus far (this can be accessed using e.target.value). We can update the value in state by passing in the value we want to update the currentTodo state variable to as a parameter in the setCurrentTodo function.
However, in addition to storing whatever has been inputted, we also need to know when to add the inputted todo to our todos array so that it can be displayed as a task item. We can do this by detecting whenever the enter key on the keyboard is pressed through using the onKeyPress event listener. We'll also want to erase everything in the currentTodo variable (the value of our <input/> tag) once the enter key is pressed.
Lastly, let's set a className of todo-input for styling it later.
return (
  <div>
    <input
      className="todo-input"
      value={currentTodo}
      onChange={e => {
        setCurrentTodo(e.target.value);
      }}
      onKeyPress={e => {
        if (e.key === "Enter") {
          createNewTodo(currentTodo);
          setCurrentTodo("");
        }
      }}
      placeholder="What needs to get done?"
    />
    {todos.map((todo, index) => (
      <p>{todo.todo}</p>
    ))}
    {todos.length > 0 && `${todos.length} items`}
  </div>
);
Oh wait, we get an error! We haven't defined the createNewTodo function yet. Go ahead and comment this out for now. That's what we'll do next.
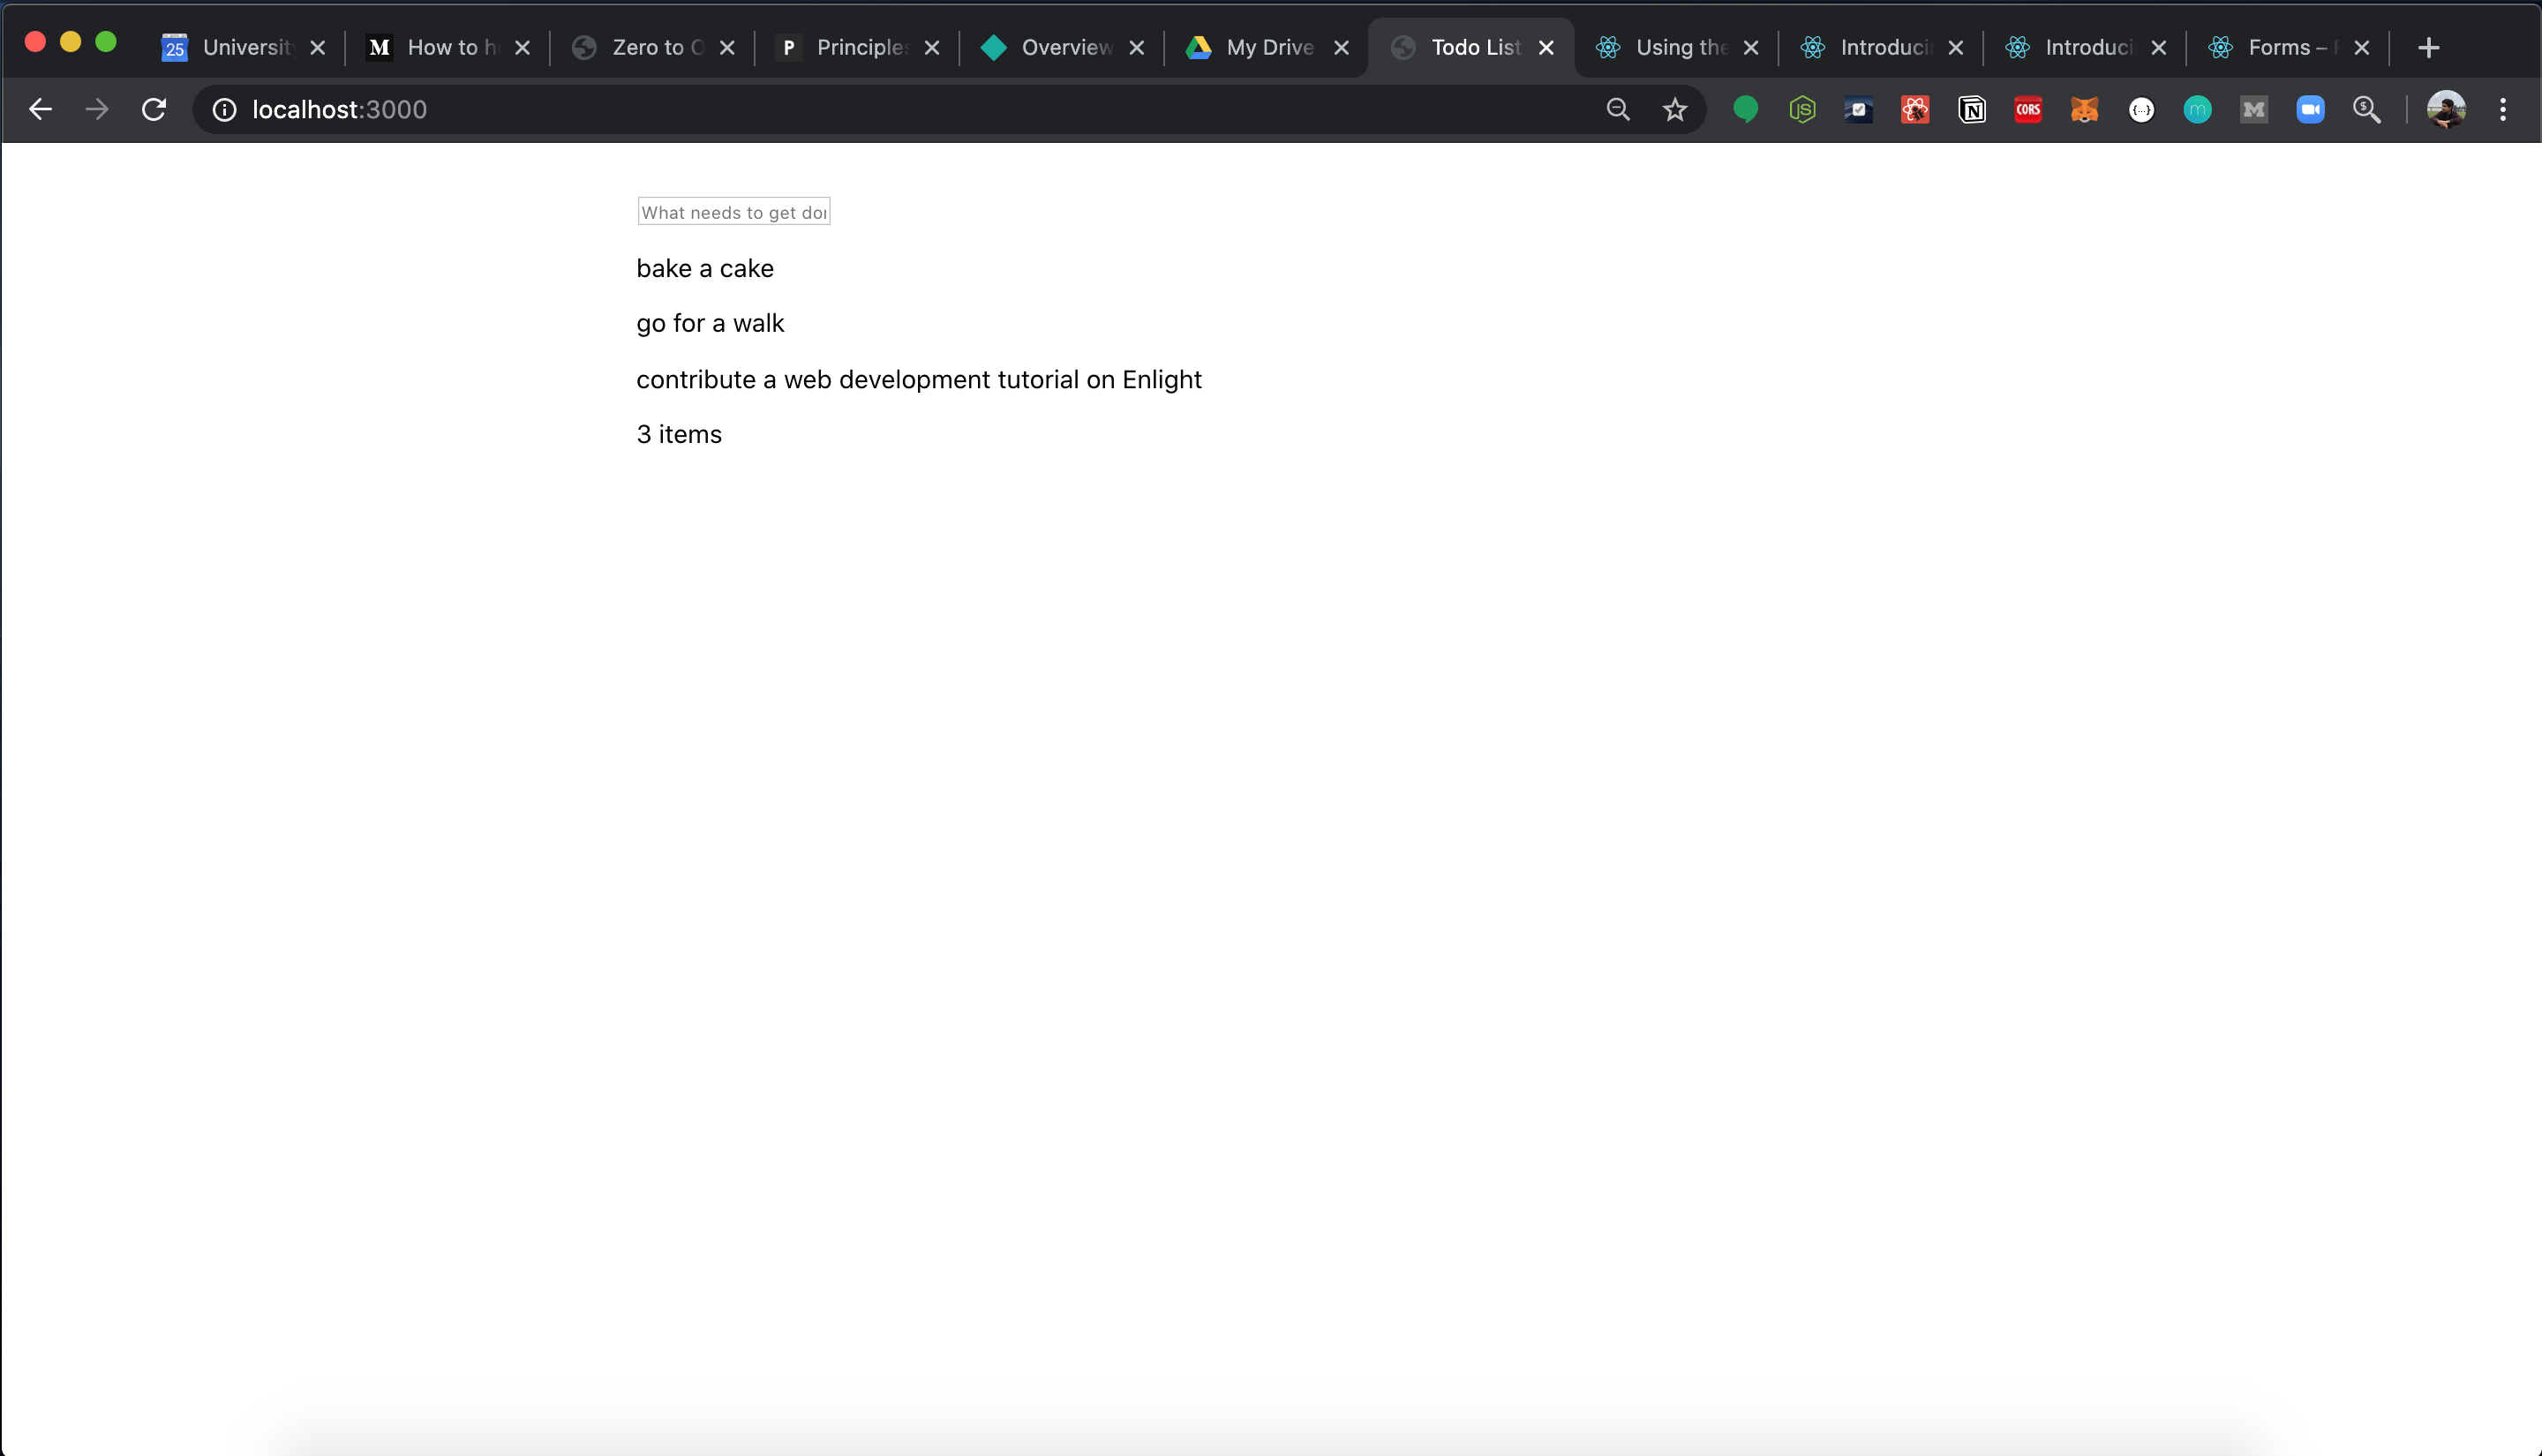
This is what our app should look like now!
You may notice that if we type something and hit enter, the input box clears — but nothing gets added to the list. Let's do that right now by making the createNewTodo function.
Let's define this createNewTodo function right before we return the JSX (which is our combo of HTML and JS) in our component. We can't edit state directly, so we'll want to make a copy of the todos array and push a new object with the todo and the boolean variable isCompleted. Then we can update the todos array in state by using the setTodos function.
function createNewTodo(currentTodo) {
  let todosArray = [...todos];
  todosArray.push({
    todo: currentTodo,
    isCompleted: false
  });
  setTodos(todosArray);
}
Now, if you uncomment the createNewTodo function, you should be able to see your new todo in the list after you hit the enter key. Cool, right?
A little styling
Before we move on to adding functionality for completing and deleting todos, let's style up the app a bit. Open up App.css and I'll walk through what we'll be styling. First, let's style our input.
.todo-input {
  font-size: 24px;
  border: none;
  width: 100%;
}

.todo-input:focus {
  outline: none;
}
Our input now looks super nice.
In addition, let's write some other styles that we'll use very soon. When we mark a todo as done, we'll want to have a line strike through the todo, so we will define the .done class. We'll also want to define the .todo class which will add padding and vertically center each task entry. Lastly, let's define some styles for our checkbox and delete elements through the .checkbox and .delete classes respectively.
.App {
  max-width: 50em;
  margin: 0 auto;
  padding: 32px;
}

.todo-input {
  font-size: 24px;
  border: none;
  width: 100%;
}

.todo-input:focus {
  outline: none;
}

.done {
  text-decoration: line-through;
}

.todo {
  margin: 32px 0px;
  display: flex;
  align-items: center;
  font-size: 24px;
}

.checkbox {
  width: 24px;
  height: 24px;
  border-radius: 50%;
  margin-right: 10px;
  cursor: pointer;
  background: #d9d9d9;
  font-size: 10px;
  display: flex;
  justify-content: center;
  align-items: center;
  border: 1px solid #fff;
  transition: all 300ms ease;
}

.checkbox:hover {
  opacity: 0.8;
}

.delete {
  margin-left: auto;
  font-size: 16px;
  cursor: pointer;
}

.delete:hover {
  opacity: 0.8;
}
Completing todos
First, let's make a checkbox. Since we already defined the styles, let's adjust the todos.map function to create a <div/> with the checkbox class for each task item. Using the onClick event listener, we will need to call the function completeTodo. We can also conditionally render the checkmark (which is the HTML unicode ✔ only if todo.isCompleted is true. Lastly, let's conditionally render the .done class for the text, which will display a strike through the text depending if todo.isCompleted evaluates to true as well.
{
todos.map((todo, index) => (
<div key={todo} className="todo">
<div className="checkbox" onClick={() => completeTodo(index)}>
{todo.isCompleted && <span>✔</span>}
</div>
<div className={todo.isCompleted ? "done" : ""}>{todo.todo}</div>
</div>
));
}
To complete todos, we'll need to create a new completeTodo function underneath the createNewTodo function. We'll do something similar to the createNewTodo function in terms of copying the array. However, we'll just want to set the isCompleted variable opposite to what it was before it was clicked. This will allow us to mark and unmark the checkbox if needed! Then, we can just update the todos variable in state using the setTodos function.
function completeTodo(index) {
  const todosArray = [...todos];
  todosArray[index].isCompleted = !todosArray[index].isCompleted;
  setTodos(todosArray);
}
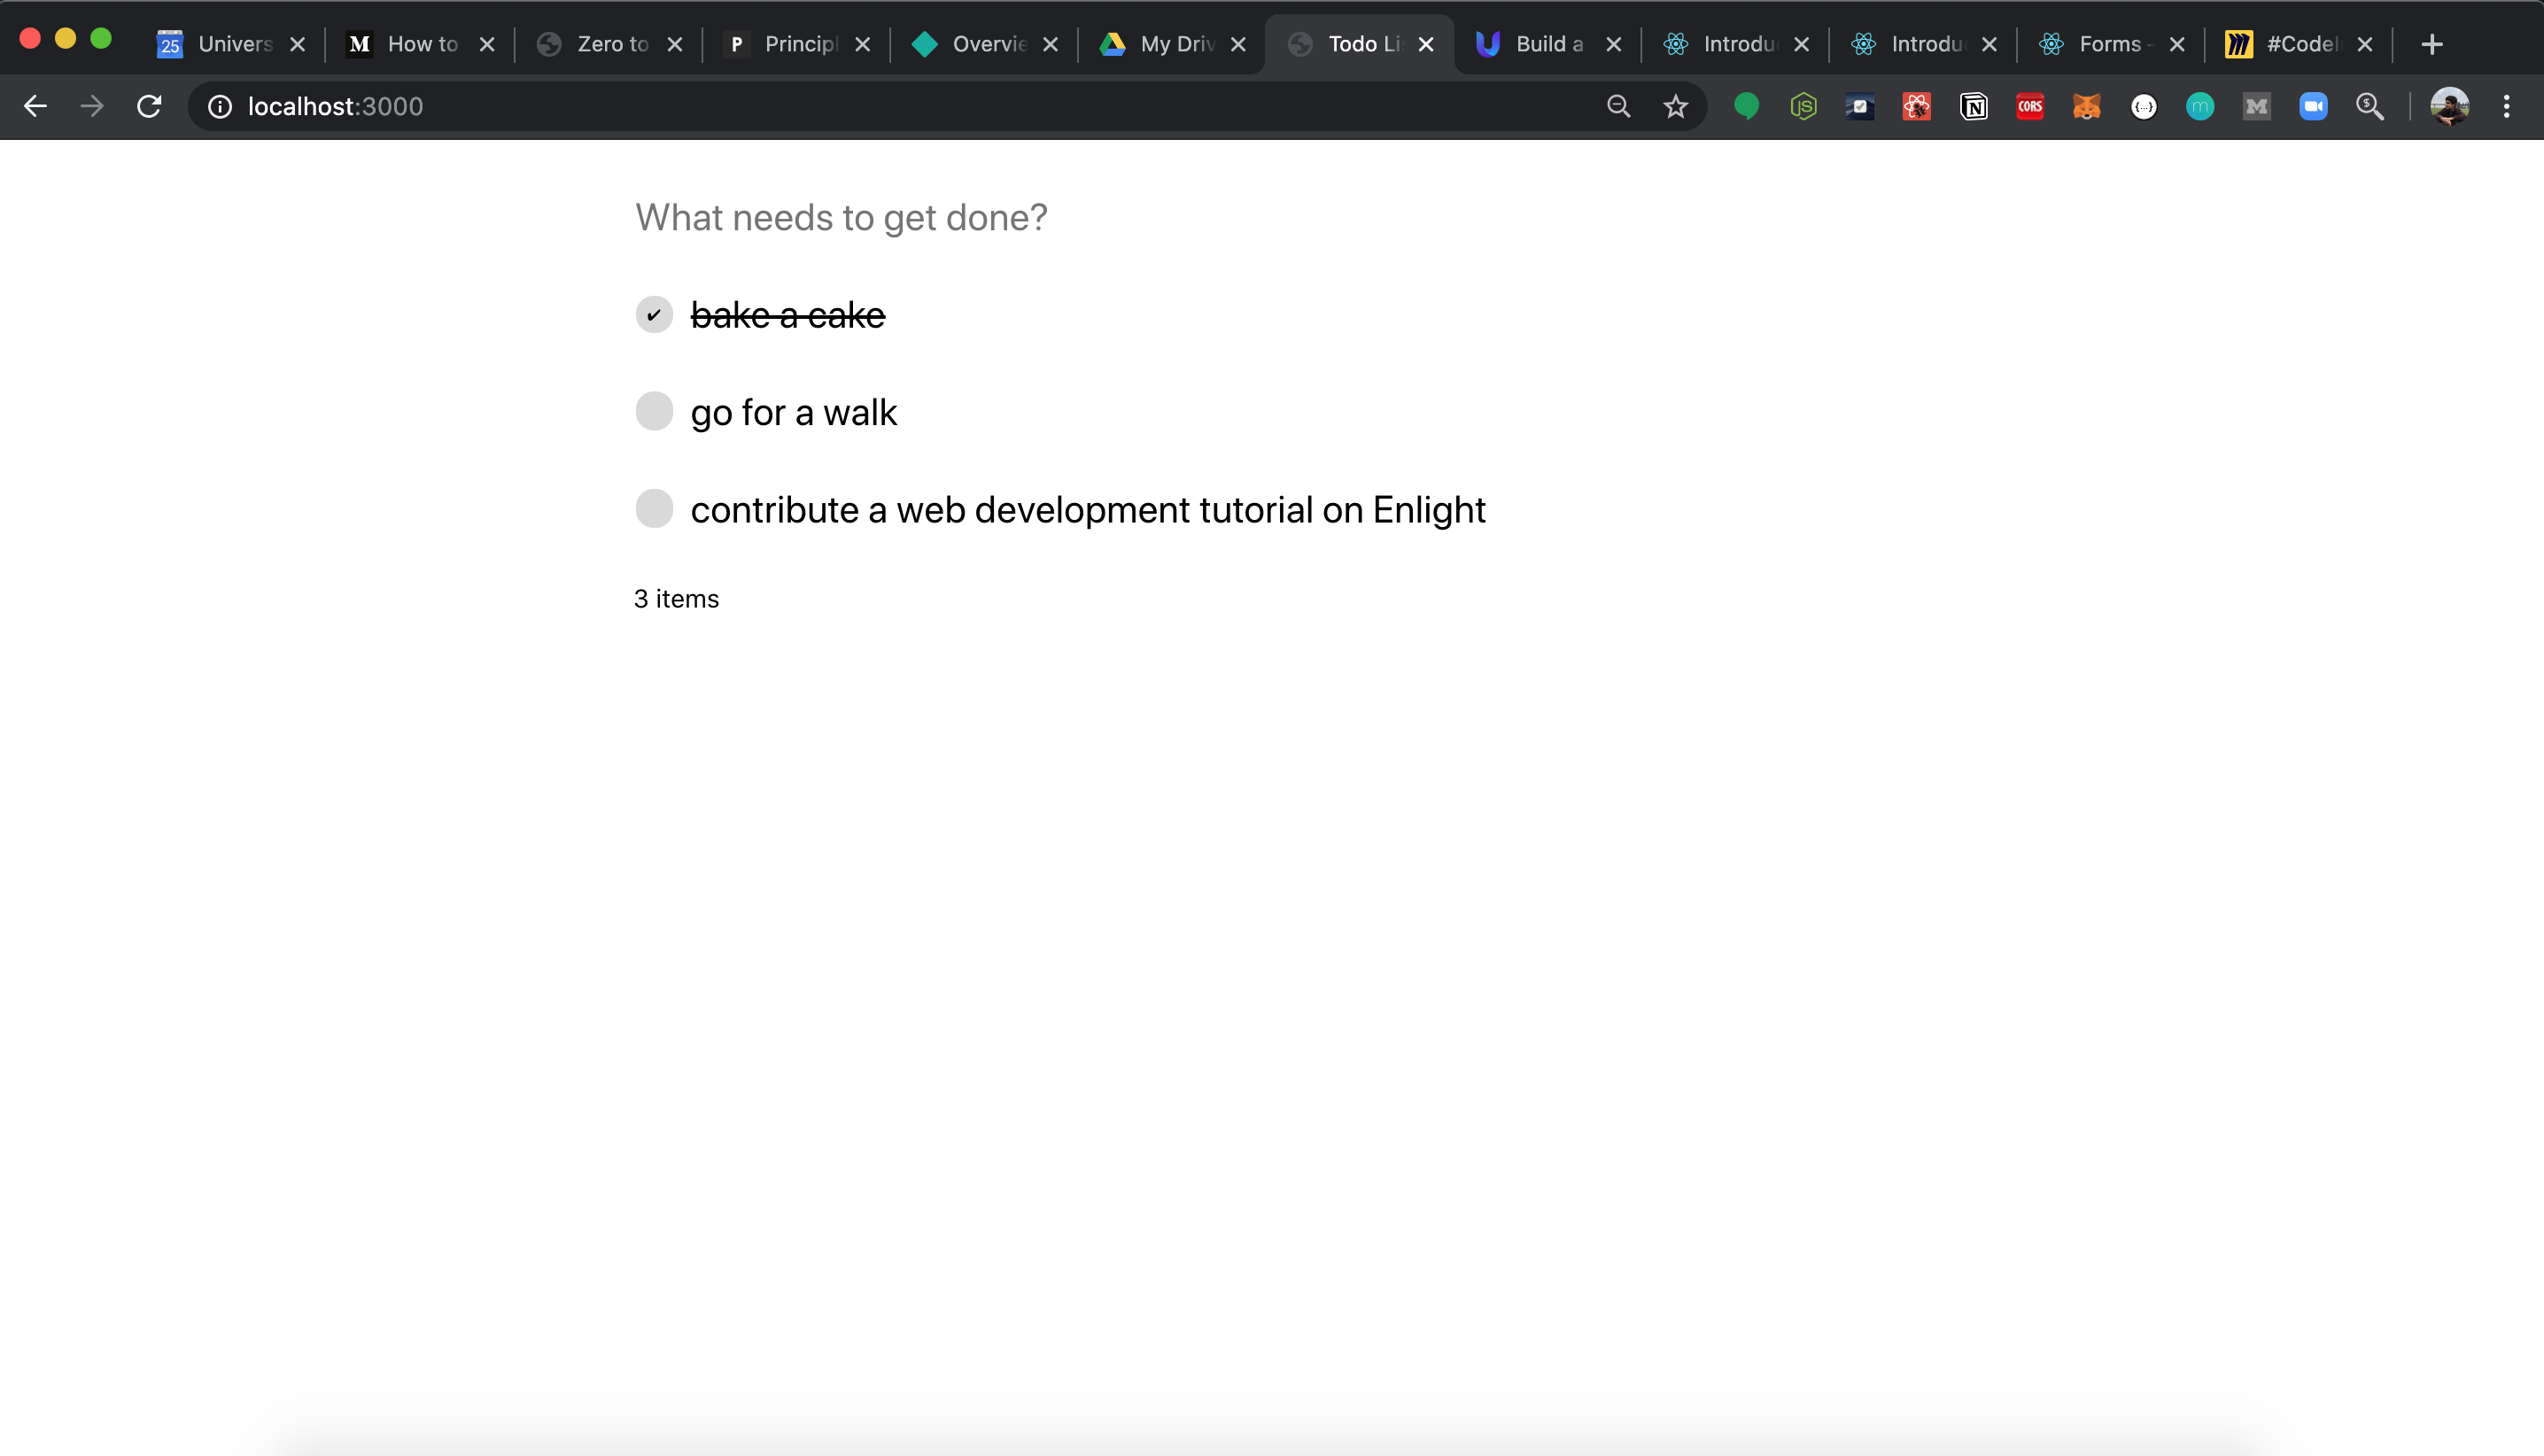
Now, take a look at your app! You should see a checkbox and be able to mark/unmark todos as completed!
Deleting todos
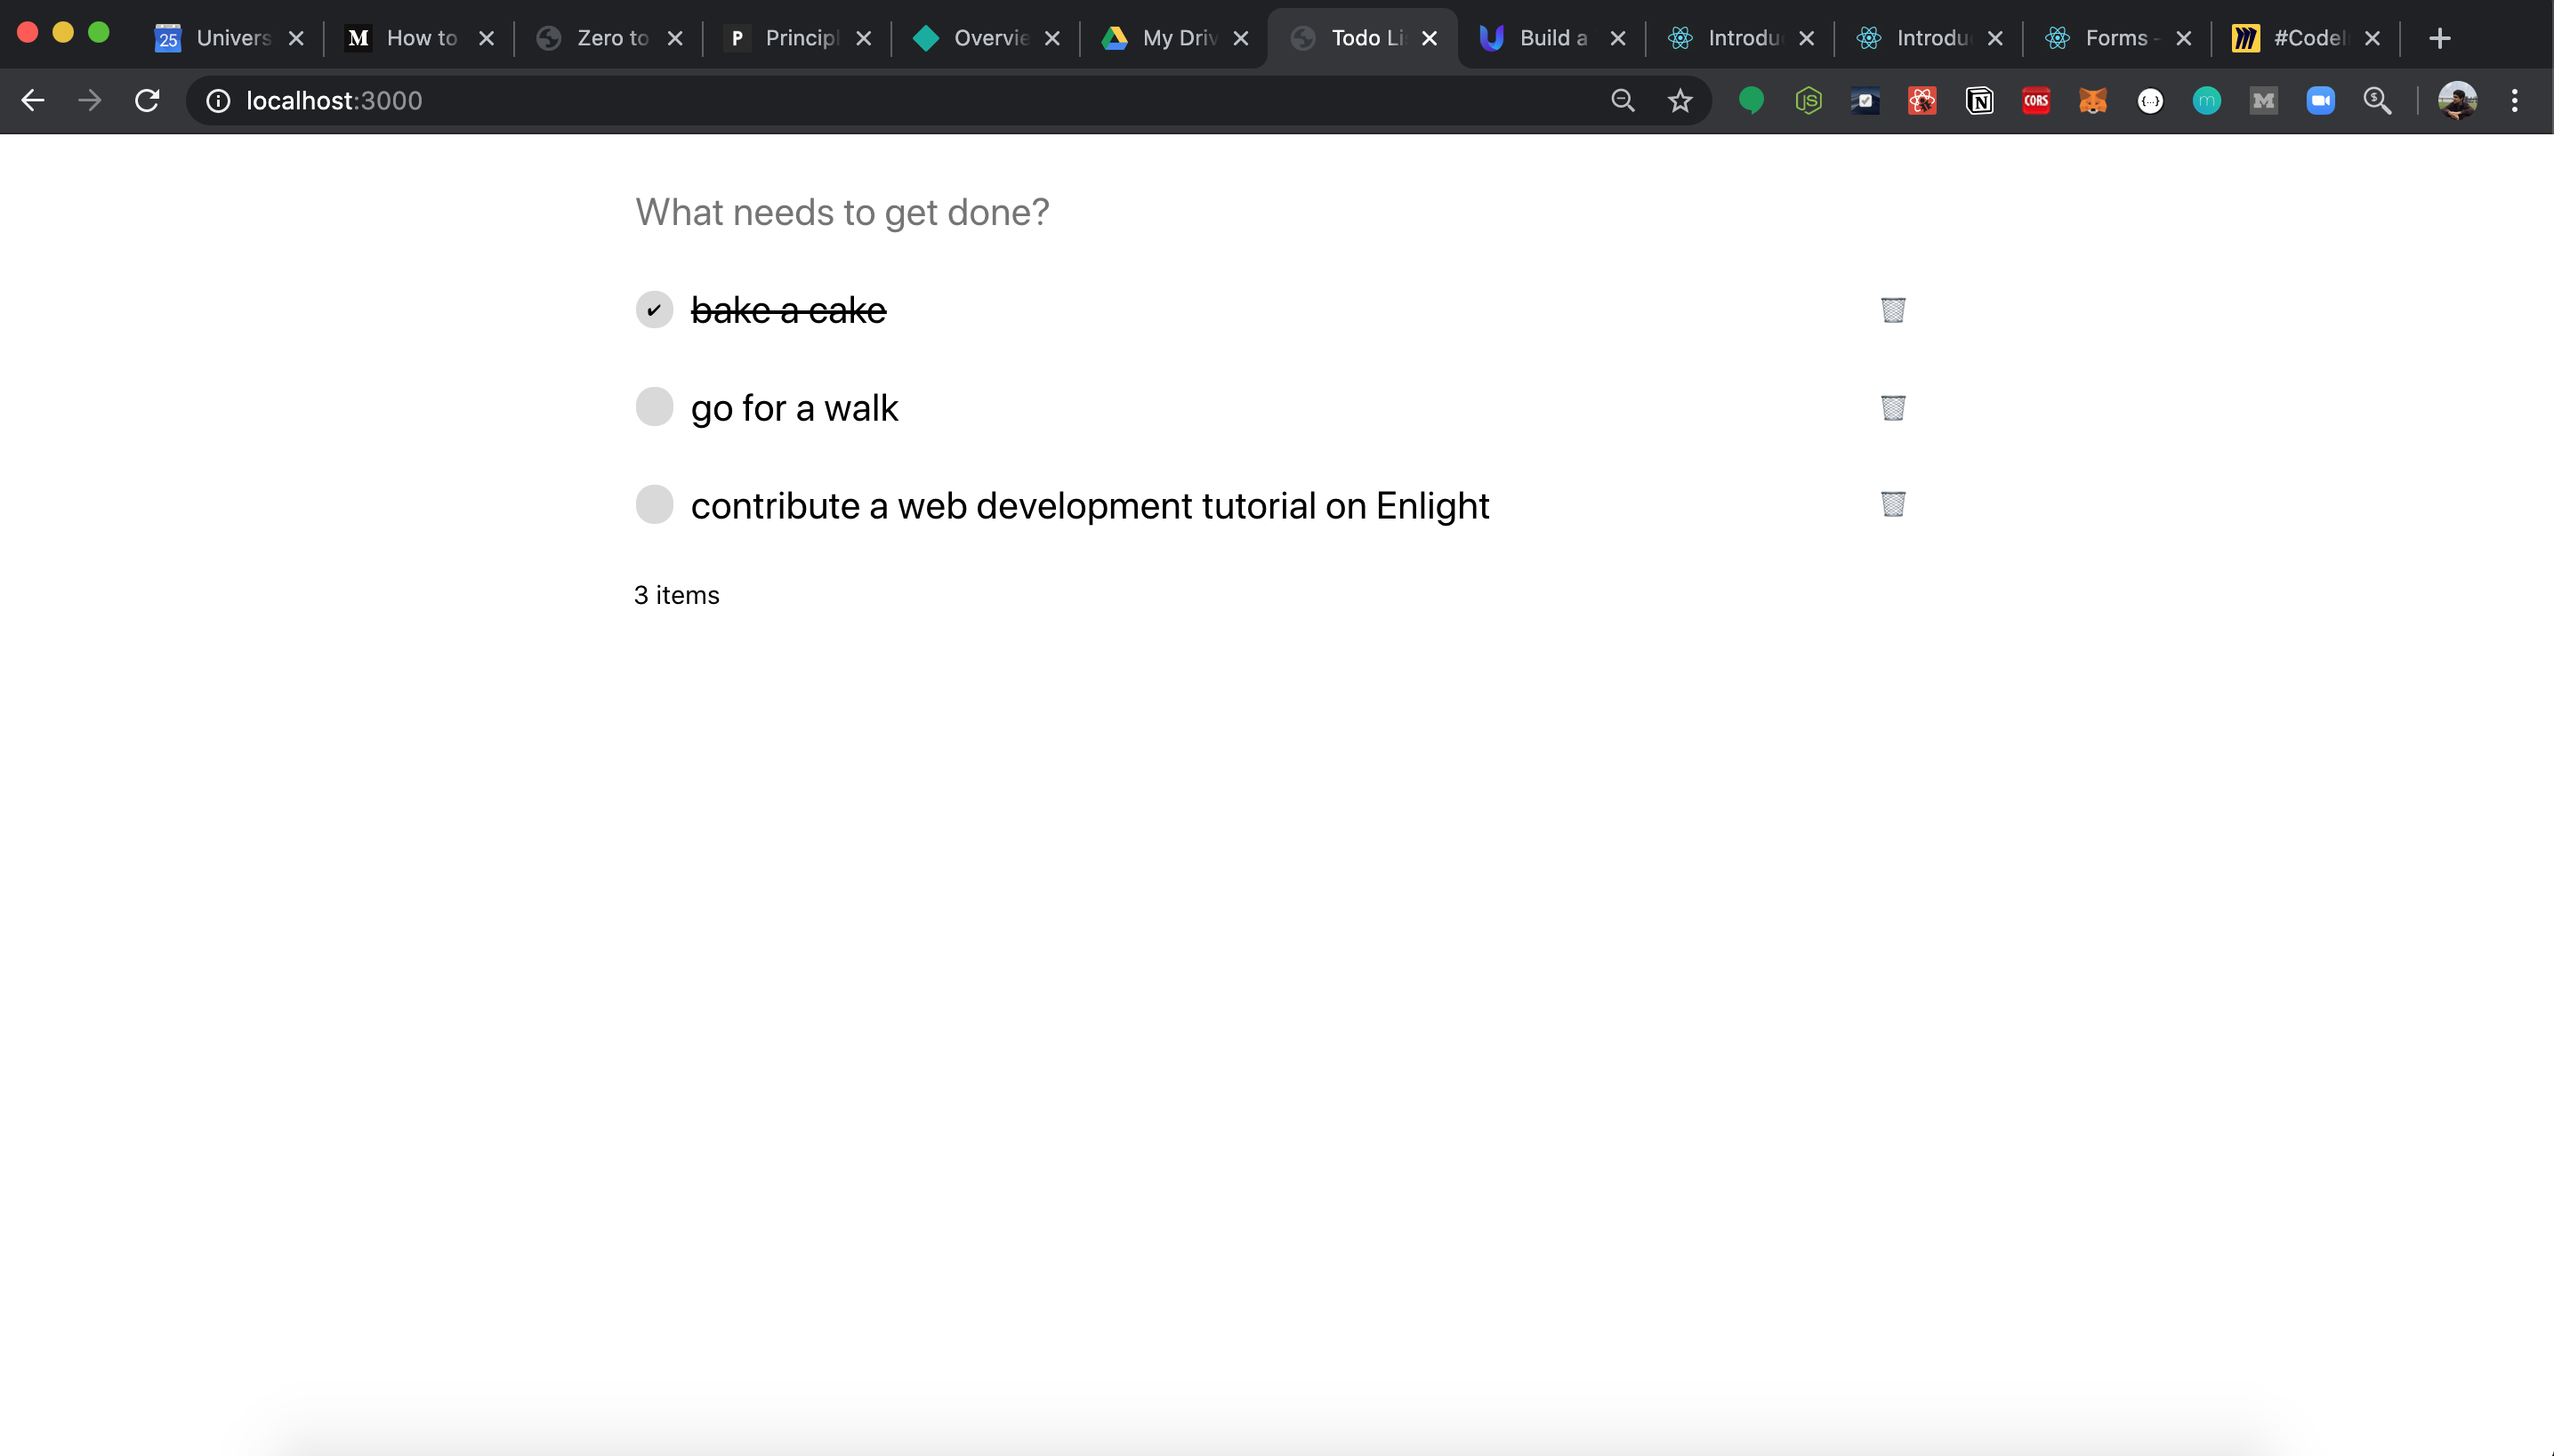
Lastly, to allow a user to delete todos, we can add the following to our todos.map function to render a trashcan emoji on the right of each todo. Once the icon is clicked, we will call the deleteTodo function with index as the parameter. We pass the index so we know which todo that we need to delete within the todos array.
<div className="delete" onClick={() => deleteTodo(index)}>
🗑
</div>
The deleteTodo function is also very similar to the other two we've written. After we copy the todos array, we'll need to use the splice function to remove the todo at the index. Then, we can simply just update the todos variable in state using the setTodos function as before.
function deleteTodo(index) {
  let todosArray = [...todos];
  todosArray.splice(index, 1);
  setTodos(todosArray);
}
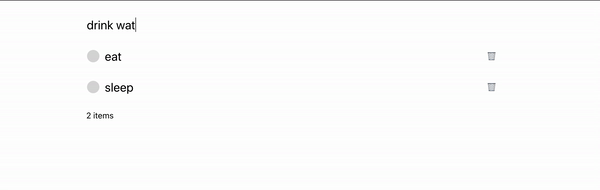
There we go! You just built your first to-do app in React! Here's what the app should look like.
Here's what our Todo.js file should look like:
import React, { useState } from "react";
function TodosComponent() {
const [currentTodo, setCurrentTodo] = useState("");
const [todos, setTodos] = useState([
{
todo: "bake a cake",
isCompleted: true
},
{
todo: "go for a walk",
isCompleted: false
},
{
todo: "contribute a web development tutorial on Enlight",
isCompleted: false
}
]);
function createNewTodo(currentTodo) {
let todosArray = [...todos];
todosArray.push({
todo: currentTodo,
isCompleted: false
});
setTodos(todosArray);
}
function completeTodo(index) {
let todosArray = [...todos];
todosArray[index].isCompleted = !todosArray[index].isCompleted;
setTodos(todosArray);
}
function deleteTodo(index) {
let todosArray = [...todos];
todosArray.splice(index, 1);
setTodos(todosArray);
}
return (
<div>
<input
className="todo-input"
value={currentTodo}
onChange={e => {
setCurrentTodo(e.target.value);
}}
onKeyPress={e => {
if (e.key === "Enter") {
createNewTodo(currentTodo);
setCurrentTodo("");
}
}}
placeholder="What needs to get done?"
/>
{todos.map((todo, index) => (
<div key={todo} className="todo">
<div className="checkbox" onClick={() => completeTodo(index)}>
{todo.isCompleted && <span>✔</span>}
</div>
<div className={todo.isCompleted ? "done" : ""}>{todo.todo}</div>
<div className="delete" onClick={() => deleteTodo(index)}>
🗑
</div>
</div>
))}
{todos.length > 0 && `${todos.length} items`}
</div>
);
}
export default TodosComponent;
Class Based Components
For this tutorial, we used functional components and hooks. However, it's worth mentioning that you can write React stateful and class-based components (and achieve the same exact result!). For example, I just rewrote our whole application using a class-based component.
import React, { Component } from "react";
class TodosComponent extends Component {
constructor() {
super();
this.state = {
currentTodo: "",
todos: [
{
todo: "bake a cake",
isCompleted: true
},
{
todo: "go for a walk",
isCompleted: false
},
{
todo: "contribute a web development tutorial on Enlight",
isCompleted: false
}
]
};
}
createNewTodo(currentTodo) {
let todosArray = [...this.state.todos];
todosArray.push({
todo: currentTodo,
isCompleted: false
});
this.setState({ todos: todosArray });
}
completeTodo(index) {
let todosArray = [...this.state.todos];
todosArray[index].isCompleted = !todosArray[index].isCompleted;
this.setState({ todos: todosArray });
}
deleteTodo(index) {
let todosArray = [...this.state.todos];
todosArray.splice(index, 1);
this.setState({ todos: todosArray });
}
render() {
return (
<div>
<input
className="todo-input"
value={this.state.currentTodo}
onChange={e => {
this.setState({ currentTodo: e.target.value });
}}
onKeyPress={e => {
if (e.key === "Enter") {
this.createNewTodo(this.state.currentTodo);
this.setState({ currentTodo: "" });
}
}}
placeholder="What needs to get done?"
/>
{this.state.todos.map((todo, index) => (
<div key={todo} className="todo">
<div className="checkbox" onClick={() => this.completeTodo(index)}>
{todo.isCompleted && <span>✔</span>}
</div>
<div className={todo.isCompleted ? "done" : ""}>{todo.todo}</div>
<div className="delete" onClick={() => this.deleteTodo(index)}>
🗑
</div>
</div>
))}
{this.state.todos.length > 0 && `${this.state.todos.length} items`}
</div>
);
}
}
export default TodosComponent;
I'd encourage you to look through this and take a few moments to observe some of the differences! :)
Challenge
As a challenge, feel free to figure out how you can save the todos using localStorage. Here's a helpful resource for you get started. You'll need to write a function to store the todos array in localStorage whenever a new todo is pushed. In addition, when the component first renders, you'll also need to fetch the data that you have stored. You can do this by using the useEffect hook if you're continuing upon our functional component example. If you'd like to use the class-based component, look into the componentDidMount lifecycle method.
If you have any questions, feel free to join the Enlight community on Discord where you can get help!
Conclusion
I hope you received a solid understanding of React through this tutorial! Feel free to leave feedback in the Enlight community on Discord.
We're looking forward to adding more content on React.js, so stay tuned!
Comments (0)